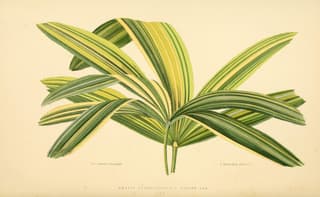
Lady Palm with Root-Bound: Prevention & Cure
Rhapis excelsa
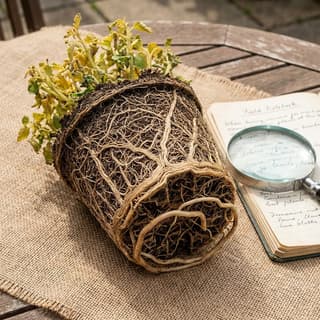
Root-Bound on Lady Palm: What to Know?
Root-Bound on Lady Palm (Rhapis excelsa) is a environmental condition with moderate severity. Lady Palm has moderate susceptibility to this disease. Root-bound, also called pot-bound, is a common environmental condition that occurs when a plant's roots have outgrown their container. The roots become so densely packed that they circle around the ro...
Lady Palm is a easy-care plant. Recovery from Root-Bound takes approximately 14 days with proper treatment. As an indoor plant, ensure good ventilation to aid recovery.
🔍 What Does Root-Bound Look Like on Lady Palm?
- • Roots visibly growing out of drainage holes
- • Dense circular root mass around pot edges
- • Soil dries out extremely quickly after watering
- • Water runs straight through without being absorbed
- • Stunted or significantly slowed growth
- • Yellowing or dropping of lower leaves
- • Frequent wilting despite regular watering
- • Reduced flowering or no new blooms
- • Pot becoming distorted or cracked from root pressure
- • Thick roots visible on soil surface
❓ What Causes Root-Bound on Lady Palm?
- → Container too small for plant size
- → Plant not repotted for extended period (2+ years)
- → Fast-growing species in restricted space
- → Inadequate pot size at initial planting
- → Neglecting regular root maintenance
- → Using non-expanding containers without upgrades
💊 How to Treat Root-Bound on Lady Palm?
TLDR: Treat Root-Bound on Lady Palm with quick treatment (~7 days) or organic (~14 days). Lady Palm has moderate susceptibility to this disease.
Quick Fixes
Quick assessment
Remove plant from pot. If roots are extremely tight and circling, proceed immediately with aggressive treatment.
Fast soak
Submerge root ball in water for 30-60 minutes only. This loosens soil just enough for quick work.
Aggressive root pruning
Using sharp shears, cut away outer 2 inches of root mass all around. Make 4-6 deep vertical cuts (½ inch) into root ball. Speed is key - work quickly but carefully.
Score root ball
Make X-shaped cuts across the bottom of root ball (½ inch deep). This forces rapid new root growth in all directions.
Immediate repotting
Place in new pot 2-4 inches larger with fast-draining potting mix. Fill quickly, ensuring good soil contact with roots.
Transplant solution application
Water immediately with diluted transplant shock solution (vitamin B1-based). This accelerates root establishment.
Stress reduction
Move to bright indirect light immediately. Maintain consistent moisture for first week - check daily and water when top inch is dry.
Early fertilization
After 7 days, apply half-strength liquid fertilizer to boost recovery. Resume full strength after 3 weeks.
Organic Treatment
Prepare workspace
Gather materials: new pot (1-2" larger), fresh organic potting mix, pruning shears, water bucket, and newspaper or tarp to protect work area.
Remove plant gently
Turn pot sideways and gently slide plant out while supporting the base. If stuck, run a knife around the edge or gently squeeze flexible pots.
Overnight root soak
Submerge entire root ball in room temperature water overnight (8-12 hours). This naturally loosens compacted roots without chemicals.
Gently tease roots
Using fingers, carefully separate and untangle circling roots. Work from outside toward center. Be patient - this may take 15-20 minutes for severely bound plants.
Natural root pruning
Trim outer 1 inch of circling roots with clean shears. Make 3-4 shallow vertical cuts (¼ inch deep) along the root ball sides to stimulate outward growth.
Prepare new container
Add 2 inches of fresh organic potting mix to bottom of new pot. Ensure pot has adequate drainage holes.
Replant carefully
Center plant in new pot at same depth as before. Fill around sides with fresh mix, gently pressing to eliminate air pockets but avoid compacting.
Initial watering
Water thoroughly with room temperature water until it drains freely. This settles soil around roots without using chemicals.
Recovery period
Place in bright indirect light for 7-10 days. Avoid direct sun and fertilizers. Keep soil lightly moist but not waterlogged.
Gradual acclimation
After 2 weeks, gradually return to normal light conditions. Resume regular watering schedule. Wait 4-6 weeks before fertilizing.
🛡️ How to Prevent Root-Bound on Lady Palm?
TLDR: Prevent Root-Bound on Lady Palm with 8 essential preventive care practices.
- ✓ Repot fast-growing plants every 1-2 years
- ✓ Repot slow-growing plants every 2-3 years
- ✓ Choose pots 1-2 inches larger in diameter when repotting
- ✓ Use well-draining potting mix to encourage healthy root growth
- ✓ Monitor drainage holes regularly for emerging roots
- ✓ Check root health annually by gently removing plant from pot
- ✓ Select appropriate pot size based on plant growth rate
- ✓ Avoid keeping plants in same container for too long
🌱 How to Care for Lady Palm to Prevent Root-Bound?
💧 How to Water
Water when the top 2-3 cm of soil is dry. Avoid overwatering - Lady Palm is sensitive to waterlogged soil. Reduce watering frequency in winter. Use chlorine-free water for best results.
☀️ Lighting
Prefers medium to low indirect light. Avoid direct sunlight which can scorch the leaves. Tolerates partial shade, making it ideal for less bright corners. Adapts well to low-light indoor environments.
🪴 Ideal Soil
Use well-draining soil rich in organic matter. A mix of potting soil with perlite and pine bark works well. Ideal pH is slightly acidic, between 6.0 and 6.5.
Frequently asked questions
Can Root-Bound kill my Lady Palm?
How long does Lady Palm take to recover from Root-Bound?
Is Root-Bound contagious to other plants near Lady Palm?
Sources & References
- Root-Bound Plant Guide: How to Fix a Root-Bound Plant - MasterClass
- Root Bound Symptoms - Help For Root Bound Plants | Gardening Know How
- Root Bound Plant Symptoms and Repotting Tips - Wild Interiors
- Root Bound: Prevention, Symptoms, Treatment | Hydrobuilder.com
- How to Repot a Root Bound Plant - The Green Mad House
- NC State Extension
- Missouri Botanical Garden
- Gardenia.net