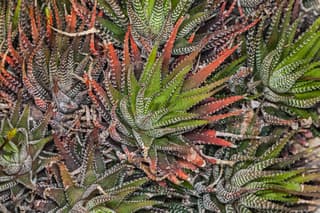
Salt Buildup: Environmental Stress | How to Fix
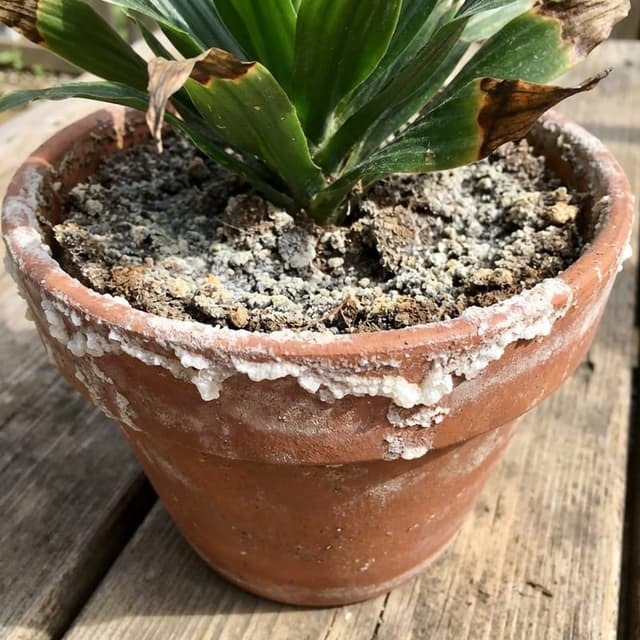
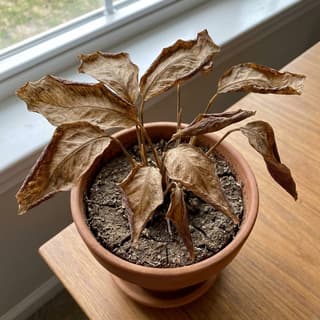
Salt buildup (also called salt accumulation or fertilizer salt deposits) is an environmental condition where mineral salts accumulate in the soil over time, creating a toxic environment for plant roots. The most visible sign is a white or yellowish crusty layer on the soil surface or around pot edges.
Slow
14 days
What is Salt Buildup?
Salt Buildup is a environmental condition with moderate severity that affects plants. Salt buildup (also called salt accumulation or fertilizer salt deposits) is an environmental condition where mineral salts accumulate in the soil over time, creating a toxic environment for plant roots. The most visible sign is a white or yellowish crusty layer on the soil surface or around pot edge...
Salt Buildup is a environmental disease with moderate severity that spreads at a slow rate. Recovery typically takes approximately 14 days with proper treatment. It affects 10 plant species in our database.
Unlike infectious diseases, Salt Buildup is caused by environmental conditions. Without correcting the environment, symptoms return even after treatment. Unlike many common diseases, Salt Buildup is not contagious between plants.
🔍 What Are the Symptoms of Salt Buildup?
TLDR: Salt Buildup presents 9 main symptoms. Early identification is crucial for effective treatment.
Main Symptoms
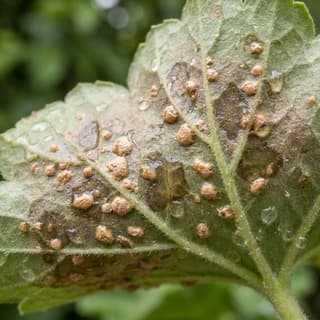
- ! White crusty deposits on soil surface
- ! White or yellow crystalline buildup around pot edges
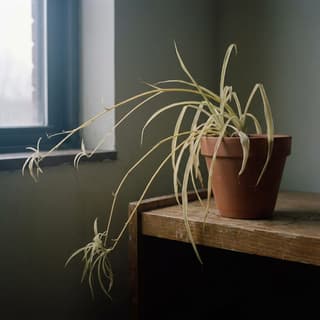
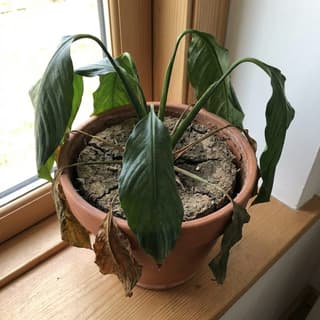
- ! Brown or burned leaf tips and edges
- ! Yellowing leaves (chlorosis)
- ! Wilting despite adequate watering
- ! Stunted growth, especially in new growth
- ! Premature leaf drop
- ! Dead root tips
- ! Reduced flowering or bud abortion
Visual Signs
❓ What Causes Salt Buildup in Plants?
- → Frequent shallow watering that does not flush salts through drainage
- → Over-fertilization or too frequent fertilization
- → Tap water high in dissolved minerals and salts
- → Poor drainage preventing salt leaching
- → Underwatering that concentrates salts in remaining water
- → Low-quality potting soil with high salt content
- → Hard water with high mineral content
- → Lack of flushing between fertilizer applications
💊 How to Treat Salt Buildup?
TLDR: Treat Salt Buildup with 7 days of quick treatment or 14 days of organic treatment. Full recovery takes approximately 14 days.
Quick Fixes
~7 days
Step 1
Take plant to sink, bathtub, or outdoors where water can drain freely
Step 2
Water soil thoroughly as normal, wait 5 minutes
Step 3
Water again heavily - pour twice the pot volume slowly through soil
Step 4
Let water drain completely through bottom holes
Step 5
Remove any visible white crust from soil surface and pot rim
Step 6
Do not let pot sit in drainage tray during process
Materials needed:
Organic Treatment
~14 days
Step 1
Remove visible white salt crust from soil surface (up to 0.25 inches deep)
Step 2
Use only rainwater or distilled water for leaching to avoid adding more minerals
Step 3
Slowly pour water through soil until it drains freely - use 3-4 times the pot volume
Step 4
Allow excess water to drain completely, never let pot sit in drained water
Step 5
Incorporate organic compost or worm castings to buffer future salt accumulation
Step 6
Repeat leaching every 4-6 months as preventive maintenance
Materials needed:
Expert Treatment
~21 days
Step 1
Test soil EC (electrical conductivity) to measure salt levels if available
Step 2
Remove plant from pot and gently shake off old soil from roots
Step 3
Inspect roots and trim any brown, mushy, or salt-damaged root tips
Step 4
Clean pot thoroughly, scrubbing away all white salt deposits
Step 5
Repot in fresh, high-quality potting mix with good drainage
Step 6
Water with distilled or rainwater only for first month
Step 7
Implement prevention: use slow-release fertilizers, water deeply but less frequently
Step 8
Schedule regular leaching every 2-3 months with distilled/rainwater
Step by Step
- 1
Stop all fertilizer applications immediately
- 2
Water plant thoroughly with distilled or rainwater, allowing it to drain completely
- 3
Repeat flushing 2-3 times over 30 minutes, letting water drain between flushes
- 4
Scrape off any white crusty deposits from soil surface
- 5
Remove and replace the top 2-3 inches of soil with fresh potting mix
- 6
Resume normal watering schedule with low-mineral water
- 7
After 2 weeks, resume fertilizing at half strength and half frequency
- 8
Monitor plant recovery and adjust watering/fertilizing as needed
🧪 Natural vs Chemical: Which Treatment Works for Salt Buildup?
🌱 Natural Solutions
- ✓ Flush soil with distilled or rainwater (3-4 times the pot volume)
- ✓ Scrape off visible white crust from soil surface
- ✓ Remove and replace top 2-3 inches of soil with fresh potting mix
- ✓ Leach soil monthly if problem is severe
- ✓ Switch to rainwater or distilled water for regular watering
- ✓ Reduce fertilizer frequency and concentration
- ✓ Add organic matter to improve soil structure and drainage
💉 Chemical Solutions
- ✓ Apply gypsum (calcium sulfate) to help displace sodium salts
- ✓ Use sulfuric acid or aluminum sulfate to lower pH if needed
- ✓ Apply commercial salt-leaching products designed for this purpose
Treatment Comparison
| Type | Estimated time | Steps | Difficulty | Best For |
|---|---|---|---|---|
| ⚡Quick | ~7 days | 6 | Advanced | Urgent cases |
| 🌿Organic | ~14 days | 6 | Advanced | Indoor plants |
| 🔬Expert | ~21 days | 8 | Advanced | Severe infections |
🛡️ How to Prevent Salt Buildup?
TLDR: Prevent Salt Buildup with 8 essential care practices. Regular monitoring is key for early detection.
- ✓ Water thoroughly until water drains from the bottom to flush salts
- ✓ Leach container soil every 3-6 months as preventive maintenance
- ✓ Use distilled, filtered, or rainwater instead of tap water
- ✓ Use slow-release fertilizers instead of frequent liquid feeding
- ✓ Apply fertilizer at half the recommended strength
- ✓ Ensure pots have adequate drainage holes
- ✓ Avoid over-fertilizing, follow package instructions
- ✓ Choose organic fertilizers which have lower salt content
🔗Related Diseases
Low Light Stress
MediumLow light stress, also known as etiolation, occurs when plants do not receive adequate light for proper growth and development. This leads to abnormal growth patterns characterized by elongated stems, pale leaves, and weakened overall structure as the plant attempts to reach toward available light sources.
Underwatering
HighUnderwatering or drought stress is a physiological disorder that occurs when the amount of water a plant loses through transpiration exceeds the amount its roots can absorb from the soil. This leads to cellular dehydration and various visible symptoms that can compromise plant health and productivity.
Low Humidity Stress
MediumLow humidity stress occurs when indoor air becomes too dry, causing plants to lose moisture faster than they can absorb it through their roots. This is especially common during winter heating periods, near radiators and heating vents, or in air-conditioned spaces. Tropical plants are particularly susceptible to low humidity damage.
Edema
LowEdema (also spelled oedema) is a non-infectious physiological disorder caused by an imbalance between water uptake and transpiration. When roots absorb water faster than leaves can release it through transpiration, cells in the leaf tissue swell and burst, forming characteristic wart-like blisters. This is purely a cosmetic issue and does not threaten plant health.