Brown Leaves on Spider Plant: Causes and What to Do
For brown leaves on a spider plant, the cause most cited by university extension services is fluoride and salt from water and fertilizer building up at the leaf tips. Learn how to tell fluoride, salt, thirst, and sun apart, which water to use, why changing the water sometimes fails, and how to trim dry tips without cutting green tissue.
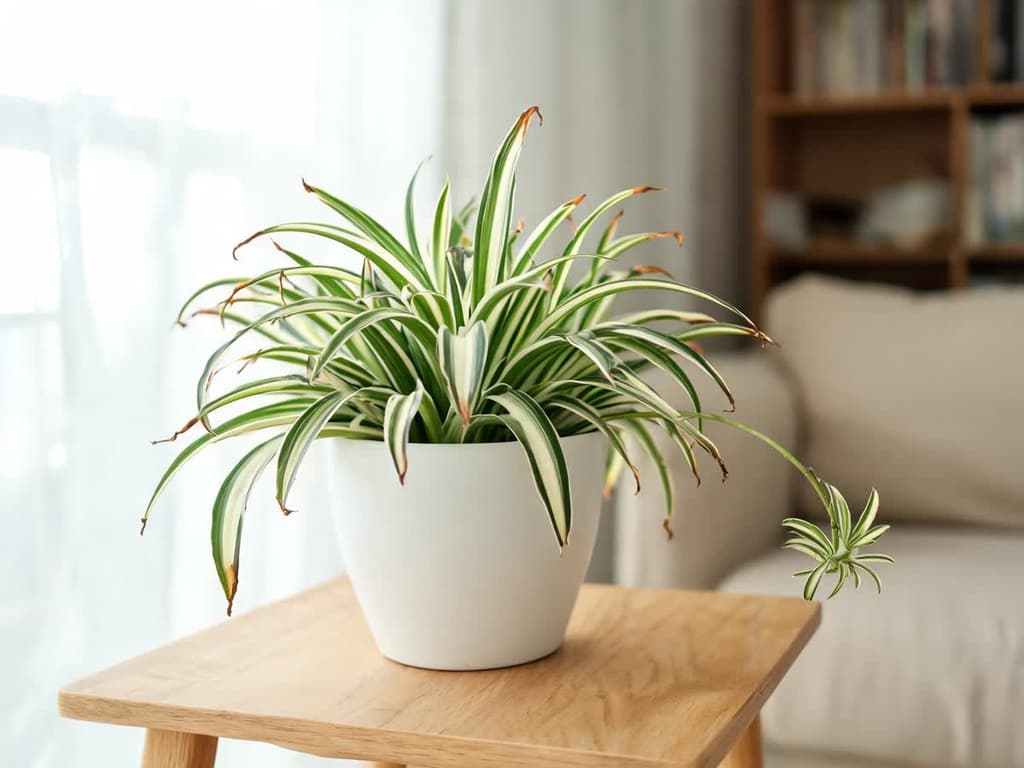
For brown tips on a spider plant, the cause most cited by university extension services is fluoride and salt from tap water and fertilizer. Both accumulate at the leaf tip. Nine technical sources on the spider plant point to substances dissolved in water: university extension services (the US university service that guides growers), the British RHS, and the New York Botanical Garden. After that come very dry air, irregular watering, direct sun, and a tight pot.
A brown tip is dead tissue and never turns green again. You can trim it without harming the plant. The fix lies in finding the cause, and the proof that you got it right shows on new leaves, not on ones that already developed a brown tip.
Quick summary:
Brown tips on spider plants stem from fluoride and salt buildup in leaves, very dry air, inconsistent watering, direct sunlight, or tight pots.
Leaving water to sit overnight clears chlorine, not fluoride. Boiling and standard carbon filters do not remove it either.
In a University of Florida study, superphosphate fertilizer doubled the size of the tip burn on spider plants, and scorch increased as soil grew more acidic.
Trim brown tips with sharp scissors without cutting into the green, and judge results by the leaves that open afterward.
Why spider plants develop brown tips
A brown tip on a spider plant (Chlorophytum comosum) is tip burn: tissue at the leaf margin dies, dries out, and turns brown and brittle. Extension services list the spider plant among indoor plants sensitive to fluoride, which collects at leaf tips and edges. Damage begins at the tip and along margins, then creeps slowly inward.
The mechanism is described in the Oregon State University Extension plant disease manual, revised in 2024. Fluoride travels upward with the water the plant draws through its roots and concentrates at the leaf margins, where the water evaporates. The manual places the spider plant on the list of indoor plants sensitive to fluoride, alongside dracaenas (PNW Handbook).
Michigan State University Extension includes the spider plant among the plants most susceptible to fluoride toxicity. According to MSU, once the leaf develops dead areas, the damage is irreversible (MSU Extension). Spider plant fact sheets from UF/IFAS (University of Florida), NC State, Wisconsin Extension, the RHS, and the NYBG link brown tips to tap water.
The same Oregon State manual cautions that thirst and excess salt create symptoms similar to fluoride burn. That is why troubleshooting also checks the soil, the container, and where the plant sits, not just the tip of the leaf.
Telling the cause from the leaf and the pot
Sources identify seven causes for brown tips on spider plants, and almost every one leaves a clue beyond the tip itself. Before changing anything, examine the soil, the pot rim, the bottom drainage hole, and the plant's position relative to windows.
What you see on the leaf and the pot | Most likely cause | First test to run |
|---|---|---|
Brown tips and edges on many leaves, sometimes with a yellowish or reddish band between brown and green. Soil surface free of crust | Fluoride from treated water | Water with rainwater or distilled water and leach the potting soil |
Brown tips and white crust on the soil surface, along the pot rim, or around the drainage hole | Salt from fertilizer or heavily mineralized water | Scrape off the crust and leach the potting soil |
Crispy brown tips, washed-out foliage, soil dry clear to the bottom and pulled away from the pot wall | Thirst: soil dried out too long between waterings | Water thoroughly until liquid drains through the bottom hole |
Brown tips with permanently wet soil and soft or darkened leaf bases | Damaged roots from overwatering | Slip the root ball out of the pot and inspect the roots |
Whitish or yellowed patches near the center of the arching leaf that later crisp up | Direct sun | Move the pot away from hot, sunny windows |
Thick white roots pushing out the drainage hole or shoving soil upward, with water draining straight through | Pot-bound roots | Repot into a larger container or divide the plant |
Crispy brown tips without any of the signs above, in a room with active heating or air conditioning | Dry air | Move the pot away from AC and heater vents, and group plants together |
The yellowish or reddish band between the dead tissue and the green is a useful clue. The UF/IFAS spider plant production guide describes this reddish color at the transition as typical of fluoride (UF/IFAS, Spider Plant Production Guide). A light brown to grayish shade is typical of excess boron, a mineral that some water and fertilizers carry. In that case, the same guide calls for fertilizer without fluoride and with low boron.
Brown tips paired with tiny, pale speckles spread over leaves point to a different cause. Ask Extension attributes stippling to spider mites, which thrive on stressed plants in dry air. The guide on spider plant dry tip causes covers mites and other less common causes, each with its fix.
If your plant's symptoms do not match any row in the table, compare photos of the leaf with similar cases. That keeps you from changing every variable at once. Bloom photo diagnostics (available for iOS) runs that comparison, and it is a feature of the Premium plan.
Fluoride and salt: water and fertilizer that scorch the tip
Switching from tap water is the step that spider plant care sheets recommend against fluoride. UF/IFAS writes that spider plants are particularly sensitive to fluoridated water and that, in this case, rainwater or distilled water is the best option (UF/IFAS Gardening Solutions). The RHS recommends rainwater for the same reason (RHS).
What removes fluoride from water and what does not:
Leaving water out for 24 hours clears chlorine, which evaporates off. It does not remove fluoride or minerals, according to Ask Extension, the US university extension inquiry service. SDSU Extension and UGA Extension suggest letting water stand from 24 hours to several days; this guide follows Ask Extension, which notes that standing only dissipates chlorine.
Boiling does not remove fluoride, nor does a standard home carbon filter, according to the EPA, the environmental agency of the United States (EPA). The Oregon State manual lists carbon among treatments that can reduce fluoride; this guide follows the EPA, which covers the carbon filters used in homes.
Distilled water and reverse osmosis water (water passed through a membrane that traps minerals) remove fluoride. The EPA cites both treatments as effective.
Rainwater bypasses municipal fluoridation, which is why the RHS and UF/IFAS recommend it.
Softened water carries higher levels of dissolved minerals than unsoftened water and should not be used on potted plants, according to the University of Maryland Extension.
To find out if your home's tap water has added fluoride, look up the annual water quality report from your city's water utility. The fluoride line appears in mg/L. In the United States, the recommended level that the EPA cites for fluoridated water is 0.7 mg/L.
Which filters actually take out fluoride
Only a filter labeled to remove fluoride does so. Pitcher filters and faucet filters made with carbon remove chlorine and improve taste. Even so, the EPA states that common household carbon systems do not remove fluoride. If the label does not mention fluoride, assume the fluoride remains in the water. Reverse osmosis and distillation remove it.
Fertilizer also introduces fluoride and salts to the root zone
Superphosphate, a phosphorus fertilizer, contains about 1.5% fluoride. In a University of Florida experiment on spider plants, soil with superphosphate doubled the size of the burned tip, from 0.6 cm to 1.2 cm. Fluoride measured in the leaf also doubled (Poole and Conover, 1975). The authors recommend avoiding fertilizer containing superphosphate.
Too much fertilizer burns tips even without any fluoride. Clemson attributes tip scorch on spider plants to excess fertilizer or water laden with dissolved salts. Wisconsin Extension adds that overfertilized plants produce fewer offsets (the plantlets trailing on long runners). For mature specimens, NYBG advises feeding once a month at half strength using a balanced fertilizer.
What about perlite, the white specks mixed into potting soil? It contains a small amount of fluoride: 17 mg per kg, compared to 2,600 mg per kg in single superphosphate, based on measurements by NC State. In a test with spider plants in soil containing up to 50% perlite, no fluoride damage appeared. Two or three heavy waterings leach out most of the fluoride in perlite (Everett and Nelson, NC State). If new potting soil contains perlite, leach it during the first watering using twice the pot volume in water before applying fertilizer.
Why changing the water does not always stop brown tips
The spider plant is called fluoride-sensitive, but three studies (Koths and Gledhill, 1978; Sheely and White, 1980; Everett and Nelson, 1996) found little or no fluoride damage under the conditions they tested. In a University of Connecticut trial, the soil contained limestone and the spider plant received fluoride every week, in doses hundreds of times higher than treated water. Not a single new leaf developed brown tips (Koths and Gledhill, 1978). The studies that did find damage share acidic soil, superphosphate fertilizer, heat, and bright light.
pH measures soil acidity: below 7 is acidic, and the lower the number, the more acidic. In the 1975 University of Florida experiment, tip burn increased as pH dropped. With dolomitic limestone in the soil, it shrank from 0.6 cm to 0.25 cm (Poole and Conover, 1975).
Heat and light also play a role. In a 1984 study, fluoride scorched spider plant tips at 31 °C and under high light. At 24 °C and under low light, increasing doses of fluoride produced no brown tips (ben-Jaacov and colleagues, HortScience). The UF/IFAS production guide confirms that fluoride damage is much stronger with high light and excess fertilizer.
This guide keeps the water switch urged by spider plant care sheets and adds three pot adjustments, because studies documenting damage consistently point to acidic soil, heat, and bright light:
Mix dolomitic limestone into the soil at the next repotting. Dolomitic limestone is powdered limestone rock that reduces soil acidity. The trial dosage translates to roughly 60 ml of limestone per 28 liters of potting medium.
Maintain soil pH between 6.0 and 7.0, checked with pH strips or a soil probe. Florida researchers suggest a 6.5 to 7.0 pH in the 1975 study and 6.0 to 6.5 in the production guide. A target range of 6.0 to 7.0 covers both and avoids overly acidic mix.
Move the spider plant out of harsh sunlight and spots exceeding 27 °C (80 °F), a threshold UF/IFAS considers too warm for the plant. Bright, indirect light keeps fluoride already present in the soil from doing as much harm.
Flushing accumulated salts out of the potting mix
Switching water stops new minerals from entering the pot. Fluoride and fertilizer salts already embedded in the soil remain there, which is why tips can keep turning dark weeks after a water switch. Rinsing the mix with generous amounts of clean water, a practice manuals refer to as leaching, carries that buildup right out through the drainage holes.
The University of Maryland Extension describes the procedure like this (UMD Extension):
Scrape off any white mineral crust from the soil surface with a spoon.
Pour in clean water equal to at least twice the pot's volume and let it all run out through the drainage holes.
Repeat every 4 to 6 months, always before feeding, so you do not wash away fresh fertilizer.
If salt deposits appear heavy or water drains poorly, repot into fresh mix.
NYBG urges emptying any drainage water that collects in the saucer. The University of Maryland advises leaching the root zone of any newly purchased houseplant the very first time you water it. When flushing potting mix for a spider plant with brown tips, use rainwater, distilled water, or reverse-osmosis water rather than tap water.
Dry air, irregular watering, direct sun, and bound roots
If water quality and fertilizer look clear, consider five other factors: dry air, inconsistent watering, damaged roots, direct sun, and cramped roots.
Dry air
Iowa State Extension points to dry air as the most likely cause of brown tips on houseplants in general. The same guide cites the spider plant among the species where brown tips are common (Iowa State). The RHS is more specific about the species: the spider plant does not need high humidity, but it can develop brown tips if the air becomes too dry.
Misting the foliage divides sources. The RHS recommends misting occasionally. Penn State Extension explains why misting does not work: misted water evaporates within minutes. Even misting every day does not change the humidity around the plant (Penn State). Iowa State says misting does not raise humidity, and the University of Maryland considers it doubtful that it does. This guide follows the three extensions, rather than the RHS, because Penn State and Iowa State explain the mechanism.
Pebble trays filled with water also divide sources: Iowa State, NC State, and NYBG recommend them, while Penn State notes they barely change room humidity. The most reliable path is running a room humidifier or grouping plants together, which helps them hold moisture locally. Keep the pot away from air conditioner and heater vents as well, as advised by the University of Maryland. If indoor humidity feels comfortable to you, Penn State views it as fine for the plant.
Inconsistent watering
Allowing potting mix to dry out too long between waterings causes tips and margins to turn brown, according to Iowa State. NYBG links brown tips to overly dry potting mix and describes two paired symptoms: foliage washed out from prolonged drought alongside scorched brown ends.
A spider plant's thick, fleshy roots store moisture and handle occasional lapses, but they cannot sit in waterlogged soil. UF/IFAS advises watering whenever the top inch (2.5 cm) of soil feels dry. Drench the pot until water streams from the drainage holes, then discard any liquid left in the saucer.
Brown tips paired with soft leaf bases
Brown tips with constantly moist soil point to root damage. Ask Extension explains that roots damaged by improper watering cannot absorb enough water, and the leaf dries at the tip even with wet soil (Ask Extension).
Slip the plant out of its pot and inspect the root ball. Healthy spider plant roots are white, plump, and firm; roots that look dark and squishy have rotted. Snip away rotted tissue with clean shears and repot into fresh mix inside a pot with bottom drainage holes.
Direct sun
Intense sun bleaches spider plant foliage before burning it. The UF/IFAS production guide describes bleached or yellow patches near the center of the arching leaf, right where light hits hardest. The RHS cautions that leaves can yellow or turn brown under excessive sunlight. NC State classifies the spider plant as intolerant of direct sun. Clemson takes a softer line, noting that spider plants tolerate limited sun, though harsh midday rays scorch foliage. This guide advises avoiding direct sun, since NC State, UF/IFAS, and the RHS all connect strong light to leaf damage.
Keep your spider plant in bright, indirect light near a window, without sun beating right onto the leaves. If the pot sits in an afternoon window with harsh sun, pull it back into the room or soften the light through a sheer curtain.
Bound roots
Spider plants quickly fill the pot with roots. The University of Maryland Extension explains the effect: in a tight pot, water runs through too fast and the center of the root ball stays dry. The leaf tip dies from lack of water (UMD Extension). The NYBG advises checking whether roots have pushed soil out of the pot.
Wisconsin Extension notes that spider plants throw more pups when slightly root-bound, yet still require regular repotting. When roots begin winding out through bottom drainage holes, step up to a slightly wider pot or divide the plant. The step-by-step guide on how to divide spider plant root balls when repotting details where to slice so each division retains both leaves and root system.
How long before spider plants stop getting brown tips
Dead brown tips never turn green again. After you address the root cause, track the new growth: the clear sign you fixed the issue is fresh leaves emerging without scorched tips.
Damaged tips can continue creeping backward for weeks following a water change. Fluoride and salts already absorbed by the plant stay in leaf tissue. Whatever remains in the potting mix keeps moving up into leaves until you flush the soil. None of the cited references measures this recovery window precisely; as a general rule, wait 3 to 4 weeks before deciding the water switch did not work.
Use clean trims as your baseline:
Trim every brown tip on the same day and note the date.
From that point forward, evaluate only leaves that unfurl after that date.
If new leaves emerge clean, you solved the problem, even if previously trimmed leaves darken slightly along cuts over early weeks.
If new leaves continue forming brown tips, the trigger remains active. Check back with the reference table and test the next cause fitting what you observe in the pot.
You can rescue a spider plant even when nearly every tip is brown. Ask Extension points out that mineral damage from tap water looks unsightly but rarely threatens the survival of the whole plant. If the specimen looks severely damaged, with ragged, split, and brown leaves throughout, the RHS advises cutting all foliage back to 2 to 3 inches (5 to 8 cm) above the base. Then let the plant push out fresh growth.
How to trim brown tips on a spider plant
Trimming off brown tips does not hurt the plant and immediately improves its appearance. The RHS advises clipping dead tips, or whole leaves, while you fix growing conditions. Iowa State reminds growers of trimming limits: tips will darken again if the underlying issue continues.
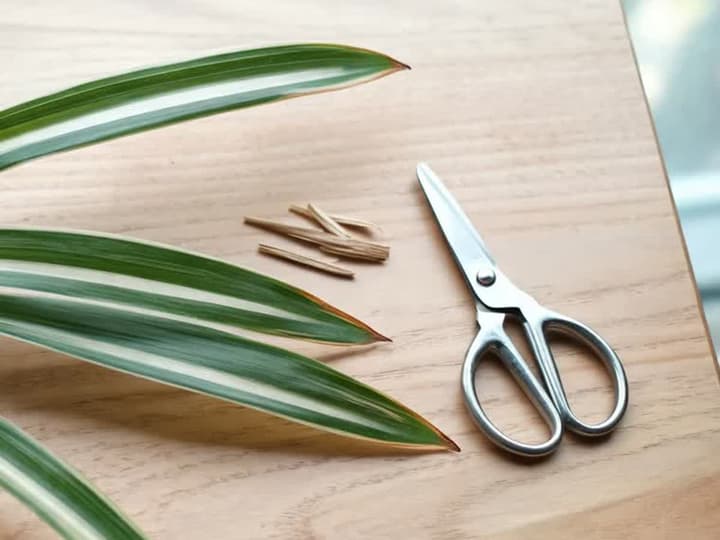
How to trim:
Use clean, sharp shears. University of Maryland Extension calls for sharp scissors to shape dead tips with a clean cut.
Do not cut into green tissue. Leave a very narrow sliver of brown along the trimmed edge. That follows the RHS recommendation for dead tips on indoor palms and keeps you from opening a fresh wound in living tissue.
Follow the natural leaf contour. Snip on an angle from both sides of the tip to shape a tapered point resembling young foliage. No consulted extension service specifies a cut angle; shaping a tapered point is standard gardening practice to preserve natural leaf lines.
Remove entirely brown leaves at the base. Snip them flush with the crown or pull firmly away, as noted by the RHS. The RHS also suggests leaving leaves that remain largely green until the plant puts out plenty of fresh foliage.
Frequently asked questions
Should I cut brown tips off my spider plant?
Yes, go ahead and trim them. Brown tips are dead tissue that cannot recover green color, and trimming with sharp shears does not hurt the plant. Leave a hairline border of brown so you avoid cutting into living tissue, and match the natural point of the leaf. Trimming only tidies appearance: if the underlying cause persists, tips darken again.
Does filtered water fix spider plant brown tips?
Only if the filter removes fluoride. According to the EPA, the carbon filters common in homes, such as pitcher filters, do not remove fluoride, and boiling does not either. Distilled water, reverse osmosis water, and rainwater do not contain tap water fluoride. After switching the water, flush the potting soil to remove accumulated fluoride.
Do brown tips on spider plants ever turn green again?
No. Brown leaf tissue is dead, and Michigan State University Extension describes the damage as irreversible. What changes once you correct conditions is new growth, which opens clean without burnt tips. Snip off existing brown tips in a single session, record the date, and evaluate only leaves that emerge afterward.
Are spider plants toxic to cats and dogs?
It is not. The ASPCA, the American Society for the Prevention of Cruelty to Animals, lists Chlorophytum comosum as nontoxic to dogs and cats (ASPCA). The classification applies to this species: confirm that the plant at home is truly a spider plant before relying on it.
What to do today for a spider plant with brown tips
Inspect the soil, the pot rim, and drainage holes: a white crust points to fertilizer salts, soggy soil indicates root issues, and roots creeping out the bottom point to a pot-bound plant.
Leach the potting mix using rainwater or distilled water equal to twice the pot's volume, then drain the saucer.
Switch watering to rainwater, distilled water, or reverse-osmosis water, and cut fertilizer back to half strength once a month.
Pull the container out of direct sunlight and hot spots, and position it away from air conditioner vents.
Trim every brown tip in one sitting, write down the date, and judge your progress strictly by leaves that open afterward.
Incorporate dolomitic limestone into fresh potting mix during the next repotting.
Related articles
How to Care for Hibiscus: Sun, Watering, Fertilizer, and Pruning for Flowers
How to care for hibiscus: 6 hours of direct sun, evenly moist soil without waterlogging, half-strength fertilizer in spring and summer, and pruning in early spring. Find out why the flower lasts one day and why buds drop before opening.
Do Ferns Like Sun or Shade? It Depends on the Type
Ferns prefer bright shade: plenty of light, but no direct sun on their fronds. Tuberous sword fern is the exception that handles sun. Here is the ideal light for each type, where to place pots, and how fronds show too much or too little light.
African Violet Yellow Leaves: Causes and What to Do
Yellow leaves on an African violet usually stem from overwatering, and the first place to check is the center of the plant. Losing one lower leaf at a time is normal. Identify whether age, watering, cold water, sunlight, cold drafts, or fertilizer is the culprit based on the yellowing pattern, and see what to do today.