How to Repot a Desert Rose Without Killing the Plant
Repotting a desert rose is when you decide the height of the caudex and the pot size. Watering afterward does not follow the rule of other plants: it depends on what happened to the roots.
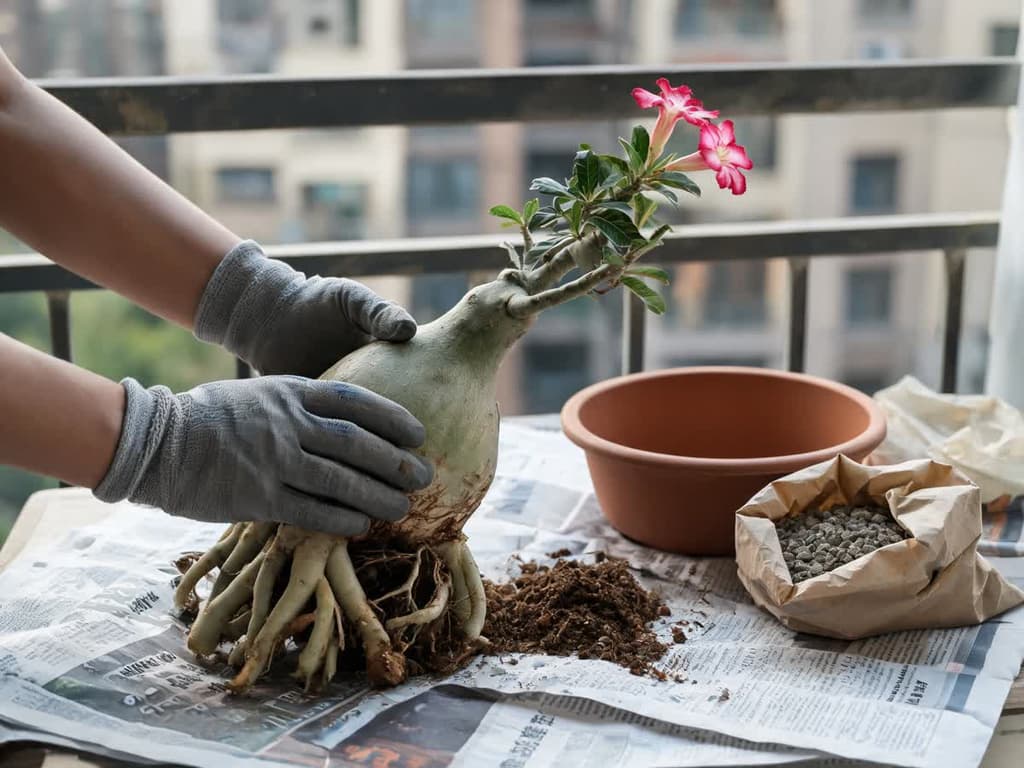
Repotting a desert rose is the only time you see its roots. It is also when you decide how much of the caudex will remain exposed. The caudex is the swollen base of the trunk where the plant stores water. Repotting also determines the volume of potting mix it will have for the next two years. You make all three decisions in fifteen minutes, and their effects last far longer than that.
If your desert rose (Adenium obesum, in the dogbane family Apocynaceae) is firm and full of leaves, the answer is simple: repot between October and March, while it is actively growing. If the base feels soft when pressed, do not wait for the right season. Take it out of the pot today, cut away whatever is rotting, and keep the plant dry.
Quick summary:
Timing in Brazil: spring and summer, from October to March. Never during the dry winter, between June and August, when the plant is dormant and may be leafless.
Choose a pot only slightly larger than the previous one: shallow, wide, and made of terracotta. An oversized pot holds moisture longer and is the most common preventable cause of rot.
Use a predominantly mineral potting mix: pumice, coarse sand, grit, or perlite. A bag of cactus mix by itself contains too much organic matter for this plant.
Watering after repotting depends on one thing alone: whether you damaged the roots. Intact roots can receive water right away. Cut roots must stay dry until they callus.
Always wear gloves. The milky sap contains cardiac glycosides, substances that affect the heart if ingested, and it irritates the skin.
The three reasons to repot, and what changes for each
Anyone looking into how to repot a desert rose falls into one of three situations, and the procedure changes for each. Identifying yours before you start saves you work down the line.
Changing the pot. The plant has outgrown the pot, roots are showing through the bottom drainage hole, or the plastic pot is bulging. Here, you can keep the root ball, the block of soil that clings to the roots, almost intact: disturb the roots very little and resume watering early.
Changing the potting mix. The soil in the pot has compacted, no longer dries out at a normal pace, or is already two years old. Here, you remove everything surrounding the roots, which almost always means breaking fine feeder roots.
Raising the caudex. You want the plant set higher, displaying more of the trunk and thick roots. Lifting the plant is the only way to achieve this look, and every repotting has a limit on how high you can go.
All three can happen on the same day. The more you handle the roots, the longer the plant must go without water afterward.
When to repot a desert rose in Brazil
Repot during the warm season when the plant is actively growing, and as early as possible within that window. The publication Growing Adeniums in Southern Arizona, from University of Arizona Extension, is direct. Repotting should take place in the warm growing season, the earlier the better, and you should not repot adeniums in the fall or winter.
That recommendation was written for the Northern Hemisphere. Inverted for Brazil, the window runs from October to March. The best part of it is the beginning: in October and November, the plant has just woken up and has the entire summer ahead to rebuild roots.
The Brazilian winter, from June to August, is off-limits. During this period, the desert rose slows its growth and many plants drop their leaves, which is normal and not a disease. Gerald Klingaman, from University of Arkansas Extension, writes that wet potting mix in winter can kill a caudiciform plant during dormancy. A caudiciform is a plant that stores water at the base of its trunk, like the desert rose. Repotting disturbs the roots, and wounded roots in cold potting mix are the combination that causes the plant to rot.
Signs that it is time
Sign | What it means | Urgency |
|---|---|---|
Roots emerging from the drainage hole | The pot is full | Next spring |
Plastic pot bulging or cracked | The caudex is pushing against the walls | Next spring, before it breaks |
Potting mix dries in one day, or stays wet after a week | The mix has lost its structure | Next spring |
Two years in the same mix | The organic component has broken down | Next spring |
Soft base to the touch, trunk wrinkling while soil is damp | Active rot underway | Today, regardless of the season |
The last scenario is the only one that disregards the calendar. In all others, waiting two months for spring is better than repotting in July.
The care guide for this species in Bloom schedules repotting every two years. What drives that timeline is not the pot getting tight: it is the potting mix breaking down. Arizona Extension notes that adeniums grow well in mix rich in organic matter for a few years and then struggle as that organic matter decomposes. The two-year interval is the average; the signs in the table determine the exact year.
The pot: shallow, wide, and snug
A desert rose does not want a large pot. It wants a pot only slightly larger than the previous one. The most common mistake is the opposite: picking an oversized pot that holds moisture for far too long. Arizona Extension recommends avoiding this and repotting adeniums into a container only slightly larger than the one they left.
A snug pot helps control the size of the plant. The same publication notes that adeniums tolerate root confinement in small pots, which provides an effective way to keep them at a manageable size. If you like the current size, do not upsize the pot: replace the potting mix and return the plant to a container of the same size.
Terracotta dries out faster. The porous walls of unglazed clay help the potting mix lose water. Arizona Extension points to this as the reason clay is ideal for this plant. Glazed, plastic, or concrete pots work, provided you water less frequently.
The shape matters because of the caudex. A shallow, wide pot accommodates the swollen base and shallow roots, and this is also what the species care sheet recommends.
Four container considerations:
Multiple drainage holes, kept clear. A pot resting flush on the floor can block its own drainage holes. Pot risers or feet create an air gap underneath, which also discourages roots from growing outward.
No saucers. A saucer holds standing water under the pot, which is the exact opposite of what this plant needs.
Never use a pot that narrows at the rim. As the caudex expands, you will not be able to remove the plant during the next repotting without breaking the pot or the plant.
Weight at the base. These plants become top-heavy and can tip over in the wind. Klingaman suggests top-dressing the entire surface of the potting mix with gravel to add ballast to the container.
The potting mix: why cactus soil is not enough
Use a predominantly mineral mix. Arizona Extension is specific on this point. Bagged houseplant potting soil, even when labeled as cactus mix, is usually too rich in organic matter to serve as the primary ingredient in an adenium pot. The preferred potting mix is predominantly mineral.
In practice, assemble it like this:
70% mineral material, coarser for large pots and finer for small pots. Pumice is the most frequently cited component, with coarse sand, gravel grit, perlite, and coconut coir chips appearing on the same list.
30% cactus and succulent potting mix. This provides the portion that retains a modest amount of moisture and nutrients, rather than serving as the base.
No pure garden soil and no standard indoor potting soil. Both compact easily and take too long to dry out.
Particle size corresponds to pot size. Small pots need a finer mix, and large pots need a coarser mix. A large pot retains more moisture than a small pot using the same potting mix, so it requires larger particles to compensate.
If the plant just came home from a store, replace all of the nursery mix. Remove what surrounds the roots and repot into the mineral mix you just prepared. Arizona Extension recommends this because the plant may have come from a greenhouse or a different climate, potted in a mix that does not match your growing conditions.
Allowing the soil to dry between waterings and using a free-draining mix applies to desert roses just as it does to any succulent, details covered in depth in succulent care. What differs for this species is the high mineral proportion of the mix and the snug container dimensions.
How to repot a desert rose: step by step
Gather your supplies beforehand: a new pot, dry potting mix, clean pruners or a razor knife, gloves, and a shaded spot where the plant can sit for a few days if needed.
Stop watering about a week before. Dry potting mix releases easily from the roots and the pot walls. Wet mix turns to mud and tears fine roots.
Put on gloves. Desert rose sap contains cardiac glycosides. North Carolina State University Extension notes two facts: the latex causes contact dermatitis, and all parts of the plant are toxic if ingested. The ASPCA lists the species as toxic to dogs, cats, and horses.
Loosen the plant from the pot, never by pulling the trunk. Squeeze the sides of a plastic pot or run a knife around the inside rim of a clay pot. Pulling on the caudex tears the roots right at the union, which is the worst possible place.
Remove the old potting mix. Use your fingers, or a gentle stream of water if the soil is clinging tightly. Set it aside to discard: never reuse old potting soil in the new pot.
Inspect the roots carefully. Healthy roots are firm and light in color. Anything dark, hollow, or mushy is rotting. Look also for powdery white patches, which indicate root mealybugs.
Prune only what must be pruned. Remove rotten tissue entirely, cutting back to clean, healthy tissue. Excessively long healthy roots can be shortened, but every cut delays when you can resume watering.
Decide on the planting height. If you want more of the caudex exposed, now is the moment, and the section on raising the caudex outlines the limits.
Position and backfill. Center the plant, spread the roots outward, and fill with the new mix, tapping the bottom of the pot on the ground to settle the substrate instead of packing it down with your hands.
Determine watering based on root condition. The next section explains the criteria, which vary depending on whether you cut the roots.
If you pruned roots in step 6, do not pot the plant up yet. Leave it out of the pot in a shaded, well-ventilated spot until the wounds callus over, and only then proceed to step 8.
Watering after repotting: the answer depends on the roots
You will find two opposing recommendations on this question: wait roughly three weeks, or give it a thorough watering as soon as you finish. Both are correct, and what separates them is not personal preference, but the condition of the roots.
University of Arizona Extension sums up the variable in a single sentence: if roots were not significantly damaged in the process, the repotted plant can be watered immediately. In practice:
Preserved root ball, intact roots: you can water normally on the same day.
Rinsed roots, but no cuts: wait 2 to 3 days, long enough for minor scrapes to dry.
Pruned roots, or rotten tissue removed: keep the plant dry until the cuts callus. The same publication is emphatic regarding rot. Rotted areas must be cut away as soon as noticed, and the remaining tissue kept dry.
This instruction runs counter to the instinct applied to almost all other plants. When repotting a peace lily, watering right away settles the potting mix and prevents wilting. With a desert rose, that water enters through an open wound into tissue that already stores moisture. The wound acts as an open doorway to rot.
The care card below outlines the watering schedule for this species under normal conditions. It applies to established plants, not to the days immediately following repotting, when healing dictates the timing rather than the clock.
When watering resumes, provide a full, thorough soak until water drains freely from the bottom, rather than offering daily sips. Iowa State University Extension notes that rot in succulents stems from excess moisture in the root zone. The healthy cycle consists of soaking thoroughly and letting the mix dry out completely. See how to water succulents for how this works day to day.
Root rot and a soft caudex: what to do during repotting
A base that feels soft when squeezed indicates rot until proven otherwise, and you can still save the plant if enough healthy tissue remains. Arizona Extension outlines the procedure in two parts: cut away rotted areas as soon as they are noticed and keep the remaining tissue dry. If enough of the plant remains free of infection, the adenium recovers.
In practice, cut slightly above the edge of the rot until you expose clean, firm tissue, wiping your blade clean between cuts. Then leave the plant unpotted, in the shade and open air, for several days. You cannot rush this process, and no potting mix can make up for a wet cut.
Take advantage of the exposed roots to check for root mealybugs, which stay hidden in the potting mix the rest of the time. Look for powdery white deposits on the roots, throughout the soil, and on the inner walls of the pot. Arizona Extension outlines the treatment in five steps: wash all soil from the roots, spray with rubbing alcohol, keep the plant unpotted for a few days to repeat the treatment, discard the old potting mix, and scrub the pot before reusing it.
Excess water and soil fungi produce the same soft base, and what distinguishes the two is the shape of the lesion and the smell. The card below breaks down the diagnosis of root rot in this species.
What about ground cinnamon on the cuts?
Cinnamon is recognized as a minimum risk ingredient by the US Environmental Protection Agency and is exempt from pesticide registration requirements. Its documented antifungal activity comes from cinnamaldehyde and eugenol. Brian Baker and Jennifer Grant detail this in a profile published by the Cornell University Integrated Pest Management program in 2018.
What does not exist is research measuring ground cinnamon applied to root cuts on adeniums. None of the university extension publications on the species recommend it; they all recommend the same alternative: keep cut tissue dry until it calluses. If you want to dust on some cinnamon, it is unlikely to do harm. What you must avoid is dusting cinnamon and watering the next day under the assumption that the wound is protected.
Superglue on cuts, which also circulates as a quick fix, has no authoritative backing and traps moisture inside the plant tissue. Do not use it.
After repotting: what is normal and what is not
A newly repotted desert rose often pauses growth. It may drop blossoms, shed some leaves, and show no new growth for two or three weeks, even when you did everything right. This is simply the plant channeling its energy into growing new roots.
Two precautions for this period:
Reintroduce sunlight gradually. If the plant spent days in the shade callusing, moving it directly into intense sun will scorch it. Provide a week of partial light before returning it to full sun. Once established, it requires six or more hours of direct sun daily, according to North Carolina State Extension. Without that sun, it stretches out and fails to flower.
Do not fertilize at the same time. Fertilizer feeds a plant that is growing, and a newly repotted plant has stopped growing. Wait for new leaves to appear before fertilizing again. The schedule of seasonal doses is in how to fertilize desert rose.
Signs that something went wrong: a caudex that keeps softening, a trunk that wrinkles while the soil is damp, or a sour smell coming from the pot. In all three cases, unpot the plant again and examine the roots. If you are unsure of what you are seeing, a photo can help identify both the species and the symptom.
Raising the caudex: the repotting that shapes the plant
Raising the caudex means repotting the desert rose higher than it sat previously, showcasing the thick trunk base and portions of the upper roots. It is the real motivation behind many repottings, and it is the easiest technique to overdo. University of Arizona Extension documents this practice. Many growers repot adeniums slightly higher than before to expose more of the caudex or the thickened upper roots, which are considered attractive features of the plant. The same publication adds that this can also help protect these structures from rot.
It sets the limit in the very next sentence: lifting should not be overdone, and should be a gradual process, done a little bit with each repotting.
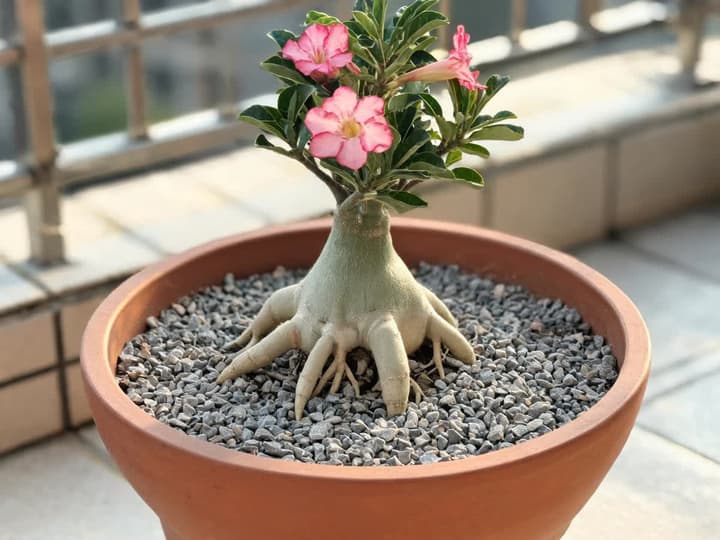
In practice, this means lifting the plant just an inch or two at a time, every two years, rather than unearthing half the root system all at once. Roots that become exposed shift their physiological role and need time to toughen up. Pulling a plant up too high all at once sacrifices root mass and leaves you with a skinny trunk teetering over a pot.
Three practices that improve results:
Spread the roots horizontally as you position the plant, rather than letting them point straight down. This creates the broad root flare of a miniature tree over time.
Top-dress the surface with gravel, which anchors the elevated plant and adds ballast to the pot.
Do not expose the graft union, if your plant is grafted. A rounded scar on the lower trunk marks the graft, and that scar tissue will not swell into a caudex.
Not every desert rose develops a caudex. Seed-grown plants form a swollen base, whereas plants grown from stem cuttings generally do not, as detailed in how to propagate desert roses.
The Arizona publication notes that bonsai techniques are used to dwarf tree species that would otherwise grow large. Adeniums already grow naturally in this miniature tree shape. You are not stunting anything: you are simply choosing how much to display of what the plant built on its own.
Frequently asked questions
What moon phase is best for repotting a desert rose?
No published studies or university extension recommendations link moon phases to success when repotting adeniums. What changes the outcome is temperature and season. Repotting in May with an actively growing plant yields far better results than repotting in January during an ideal moon phase.
Can you repot and prune a desert rose on the same day?
Yes, and spring is a great time for both. Arizona Extension points to spring as an ideal time to prune and shape the plant, which aligns with the repotting window. Keep in mind that two sets of wounds at the same time demand extra caution with water: keep the plant dry until all cuts seal.
How long should you wait to water after repotting?
It depends on what happened to the roots. Intact root ball and undamaged roots: you can water the same day. Rinsed roots without cuts: wait 2 to 3 days. Pruned roots or removed rot: keep the plant dry until wounds callus over, which takes several days and has no fixed timeline.
Can I put a desert rose in direct sun right after repotting?
If it never left the sun, yes. If it spent days in the shade callusing, transition it back gradually: give it one week of partial shade before placing it in full sun. Plants moved directly from dim conditions into intense light will scorch, even though desert roses are full-sun plants.
Do you need to put gravel in the bottom of the pot?
The evidence is divided. Linda Chalker-Scott, from Washington State University Extension, writes that water will not drain from fine-textured soil into coarser material until the fine soil is completely saturated. In her assessment, this layer creates the waterlogging it is meant to prevent. A 2025 experiment published in PLOS ONE by Avery Rowe evaluated drainage layers in containers and found little to no effect on water retention. Until consensus emerges, do not rely on gravel: what keeps the roots dry is a clear drainage hole and a gritty mineral mix.
Do I really need gloves to repot?
Yes. The milky sap contains cardiac glycosides and the latex causes contact dermatitis, according to North Carolina State Extension. Arizona Extension recommends washing off any sap that touches skin, taking special care not to get it in your eyes. If you have children or pets at home, repot on a surface that can be easily washed down afterward.
Key takeaways from this guide
The right time to repot a desert rose in Brazil runs from October to March. The pot is slightly larger than the previous one, shallow, and made of terracotta. The potting mix is predominantly mineral, and watering only resumes when the roots allow.
The most costly mistake in repotting is watering freshly cut roots the following day, despite the best of intentions.
For complete care instructions across light, flowering, and dormancy, see how to care for a desert rose.
Sources: Chalker-Scott, L. The Myth of Drainage Material in Container Plantings, Washington State University Extension · Chamberland, M. (2021). Growing Adeniums in Southern Arizona (az1953), University of Arizona Cooperative Extension · Klingaman, G. (2010). Caudiciform Plants, University of Arkansas System Division of Agriculture · NC State Extension Gardener Plant Toolbox, Adenium obesum · UF/IFAS Gardening Solutions, Desert Rose · ASPCA Animal Poison Control, Desert Rose · Iowa State University Extension, Common Problems and Issues of Succulents · Baker, B. and Grant, J. (2018). Cinnamon & Cinnamon Oil Profile, Cornell University NYSIPM · Rowe, A. (2025). Effect of drainage layers on water retention of potting media in containers. PLOS ONE.
Related articles
How to Care for a Goldfish Plant: Light, Watering, and Blooms
How to care for a goldfish plant: bright light without strong sun, water when the soil surface dries, and humid air. Learn how to tell a Nematanthus from a Columnea, why it drops leaves, and how to get it to bloom again.
Lavender Leaves Turning Yellow: Where the Yellowing Starts Shows the Cause
Lower leaves turning yellow with moist soil means overwatered roots, the most common cause. Old leaves drying one by one on woody stems is normal. Take the stem and root test, see if your plant can still be saved, and find out what to do today.
How to Propagate Lavender: Where to Cut and Why Cuttings Rot
A lavender cutting comes from a non-flowering branch tip, about 4 inches long, planted in sandy soil that never stays soggy. Learn where to cut, rooting times, seasonality in Brazil, and what to do if the base turns black.