How to Propagate Camellias: Cuttings, Air Layering, Grafting, and Seeds
Take a 3- to 4-inch cutting from a light-brown stem tip in late summer, apply rooting hormone, and enclose it in a plastic bag. Learn the best timing, rooting periods, and when air layering works better.
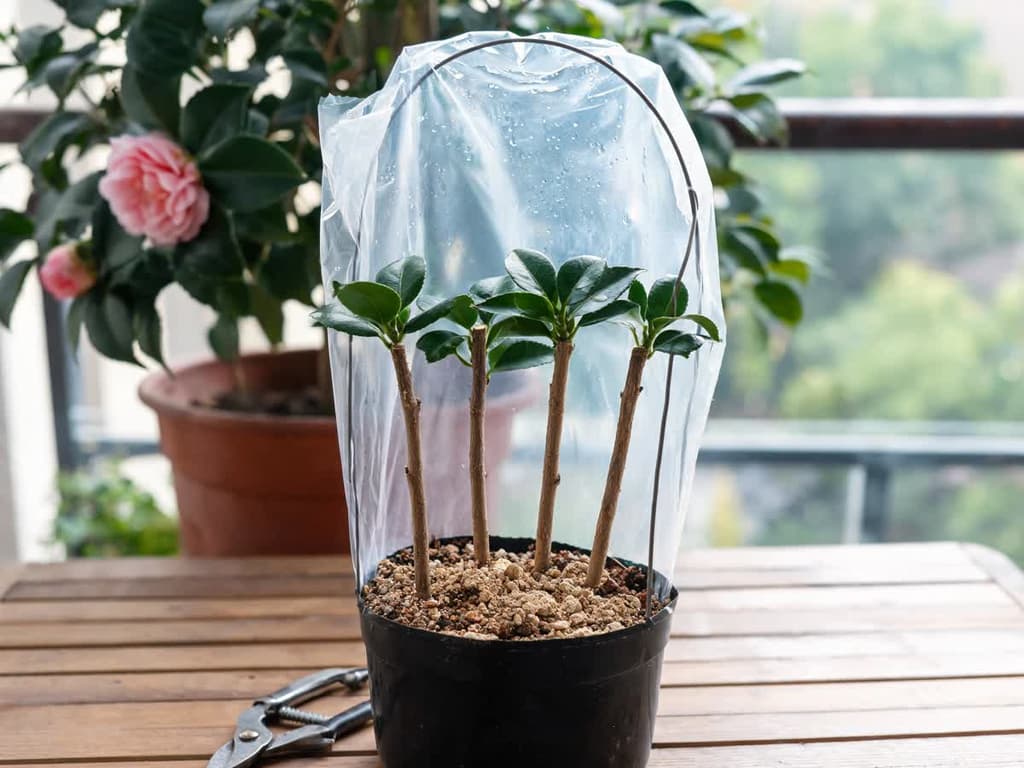
To propagate camellias, cut the tip of a branch from the current year's growth that has turned light brown. The cutting should be 7 to 10 cm long with 2 or 3 leaves. Apply rooting hormone to the base, plant it in a pot with sand and soil, and cover it with a plastic bag in the shade. In Brazil, the season runs from January to March.
Camellia cuttings root slowly, and few varieties root at a high rate. At home, rooting can take anywhere from several months to a year. If you only want a single new plant, air layering (rooting the branch while it is still attached to the plant) is the safest method. With layering, the branch continues to receive water from the mother plant.
This guide covers the common garden camellia (Camellia japonica), the species featured in our camellia care guide. The figures come from the Royal Horticultural Society (RHS), the American Camellia Society (ACS), university extensions, and published studies.
Which propagation method to choose for camellias
Choose your method based on how quickly you need results and how many new plants you want. Stem cuttings produce multiple plants at once, but each cutting must survive on its own until it roots. Air layering yields one large plant per branch while it remains attached to the mother plant. Seeds do not come true to the mother plant's flower.
Method | Timing in Brazil | Time until roots form | Does the flower come out identical to the mother plant? |
|---|---|---|---|
Semi-ripe cutting | January to March | 1.5 to 2 months in a nursery; several months to 1 year at home | Yes |
Air layering | September to November | Roots appear between February and May | Yes |
Ground layering | September to November | Up to 12 months | Yes |
Grafting | August and early September | Takes when the scion pushes leaves | Yes, identical to the grafted branch |
Seed | March and April, when the fruit cracks open | Germinates in about 1 month if sown fresh | No |
The RHS explains the difference between cuttings and air layering. A cutting must survive on its own until it grows roots. Simple ground layering is the ground-level version: a low branch is bent down to the soil and partially buried. In both air layering and ground layering, the branch develops roots while still attached to the mother plant, which continues sending water to it. NC State Extension recommends cuttings for camellias, and none of the consulted sources directly compared the success rates of the two methods.
If the camellia must be removed within a few weeks, there is no time for air layering. Take cuttings from several branches on the same day, even outside of the January to March window. Outside that ideal season, cuttings root more slowly, according to Bond Nursery in an article published by the ACS. Even though they are slower, cuttings are the only method that fits that timeframe: air layering takes months to form roots (ACS).
How to propagate camellias from cuttings
A semi-ripe cutting is a piece taken from the tip of a current season's branch. The base is already firm and light brown, while the tip remains softer. The Southern California Camellia Society (SCCS), an organization of camellia growers, specifies using light-brown wood rather than green stems.
Step-by-step camellia cutting guide
Cut a 3- to 4-inch (7 to 10 cm) healthy branch tip, making the cut directly below a leaf node. The node where the leaf emerges is where the roots develop, according to the RHS. The RHS mentions 4 to 6 inches (10 to 15 cm) for shrubs in general. For camellias, Bond Nursery and the SCCS use 3 to 4 inches (7 to 10 cm), and this guide follows that size.
Strip off the lower leaves, leaving 2 or 3 leaves at the top. The SCCS cuts the remaining leaves in half so the cutting loses less water.
Scrape away a 1.5 cm strip of bark on one side of the base. According to the RHS, camellia cuttings usually root better with this wound.
Dip the base into rooting hormone, following the label rate.
Bury the base 1 inch (2.5 cm) deep in a pot filled with equal parts coarse sand and potting mix, firming the medium around the stem.
Water thoroughly until the mix is evenly damp, without letting water pool.
Cover the pot with a clear plastic bag, supported by wire hoops so the plastic does not touch the leaves.
Keep the pot in bright, indirect shade, sheltered from wind and away from direct sunlight.
Place the cuttings into the potting mix within 12 hours of taking them. Until then, the RHS advises storing the stems inside a plastic bag in the shade. On very hot days, the refrigerator works well.
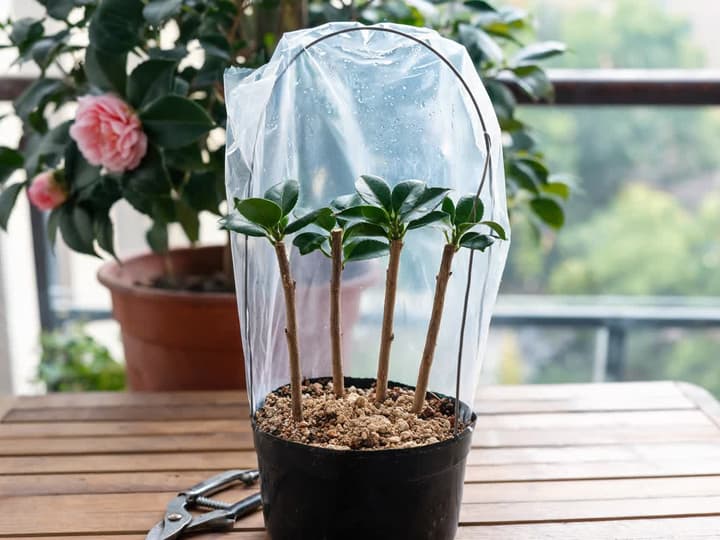
Rooting hormone for camellia cuttings
Use an IBA-based (indole-3-butyric acid) rooting hormone, sold as a powder or gel in garden centers. In a 1959 study by the Instituto Agronômico de Campinas published in the journal Bragantia, IBA ranked among the best treatments. Treated camellia cuttings developed larger roots and leafed out earlier than untreated cuttings.
Different camellia varieties respond differently to rooting hormone. A 2025 study from Mississippi State University tested four Camellia japonica cultivars with increasing concentrations of IBA: 0, 200, 400, and 600 ppm. Each cultivar showed a distinct response. The comparison benchmark was a stem base dipped for 15 seconds into a 3,000 ppm (parts per million) IBA solution.
At home, follow the label directions on the product you bought. Bond Nursery mixes its own liquid dip from powder. They use 0.5% IBA with 0.25% NAA (naphthaleneacetic acid, another rooting hormone). This is a different concentration than the university study, and none of the consulted sources directly compares the two.
Sand and soil mix for cuttings
Camellia cuttings root in a light, free-draining mix that still retains moisture. The SCCS uses equal parts coarse sand and potting soil or peat moss (dark decomposed sphagnum moss sold in bags). Bond Nursery uses milled pine bark mixed with coarse sand and perlite (lightweight white granules that loosen the soil structure). The acidity of this mix is adjusted to pH 6. The pH scale measures soil acidity: the lower the number, the more acidic the soil.
Mature camellias prefer slightly acidic soil with a pH between 5.5 and 6.5, according to NC State Extension. The rooting medium does not need to be any more acidic than that range.
Azaleas also prefer acidic soil. Our azalea propagation guide compares coconut coir with other rooting mix options.
How to keep cuttings enclosed in plastic
The plastic bag traps humid air around the leaves while the cutting lacks roots to take up water. The SCCS notes that condensation droplets on the inside of the plastic indicate everything is progressing well. If the interior dries out, mist the inner walls of the bag lightly with water and seal it back up.
Bond Nursery recommends 65 to 75 °F (18 to 24 °C) as the ideal rooting range, with the sweet spot around 70 °F (21 °C). When temperatures sit above or below 70 °F (21 °C), roots take longer to develop. During hot summer weather, move the pot to the coolest, most shaded spot in your home.
Never let the mix dry out completely, and never allow standing water to sit in the pot. Remove any dead cuttings right away so they do not rot next to the healthy ones.
When to propagate camellias in Brazil
The best time for camellia cuttings in Brazil is January through March. Sources are from the Northern Hemisphere and point to mid- to late summer. In California, that is July (SCCS); in the United Kingdom, July and August (RHS). In Brazil, summer runs from December through March, so the months are reversed.
Bond Nursery, in East Texas, finishes sticking cuttings by mid-October, the beginning of autumn there. After that, the weather slows rooting down significantly. In Brazil, that date corresponds to mid-April.
If summer has passed, there is still the hardwood cutting cited by the RHS. You make it with current-year wood that has turned woody but remains flexible, from fall to the end of winter. In Brazil, this runs from April to August. The RHS says this cutting can root in three months, and Bond Nursery sees rooting slow down after mid-April. None of the consulted sources have measured this in Brazil: the safest option is semihardwood cuttings from January to March.
The other methods have their own seasons in Brazil:
Air layering and ground layering: September to November, during spring when the plant resumes active growth (ACS and RHS).
Grafting: August and early September, in late winter (SCCS).
Seeds: March and April, when seed capsules begin cracking open (ACS).
Tea is also a camellia (Camellia sinensis), and its timing is different. A study conducted in Pariquera-Açu (SP) and published in the journal Ciência Rural in 2011 found winter to be the best time for tea cuttings. In summer, 93% of the tea cuttings died. For garden camellia, this guide follows mid to late summer, from January to March. The RHS, ACS, and SCCS focus on Camellia japonica itself. None of the consulted sources measured its timing in Brazil.
How long camellia cuttings take to root
In a commercial nursery, camellia cuttings root in 1.5 to 2 months, according to Bond Nursery. That timeframe requires automated misting systems (short bursts of water sprayed over the foliage every 8 to 10 minutes) and temperatures held near 70 °F (21 °C). At home under a plastic bag, the SCCS estimates several months up to a year, depending on variety and growing conditions.
To check whether a cutting has rooted, give it a very gentle tug. If you feel resistance, roots are already anchoring the stem into the medium, according to the SCCS. If it pulls out loose, seal the bag again and wait longer.
At Bond Nursery, cuttings are ready for potting up 6 to 8 months after sticking. At home, the timeline can stretch longer, since root formation alone takes several months to a year (SCCS). The first flower arrives 1 to 2 years after rooting.
Why camellia cuttings fail to root
It is common for camellia cuttings to fail. The Mississippi State study notes that few Camellia japonica varieties root at high percentages, and rooted cuttings still grow slowly. Bond Nursery only achieved losses below 4% by relying on automated mist benches, a specialized mix, and precise temperature control.
The primary causes identified by sources include:
Large callus at the base: some cuttings develop heavy callus tissue before producing roots. Callus is cellular tissue that forms over the cut surface, which Bond Nursery refers to as "popcorn." The nursery advises leaving the cutting undisturbed, because roots will push through after the callus forms.
Difficult cultivar: certain camellia varieties root far slower than others and can take a very long time (Bond Nursery).
Temperatures away from 70 °F (21 °C): the further temperatures stray from this mark, the slower rooting becomes.
Bone-dry or waterlogged medium: cuttings must never dry out, nor should they sit in stagnant water (Bond Nursery).
Stems that are too green: the SCCS specifies light-brown wood that is already firm.
Out of season: after mid-April, in Brazil, rooting slows down significantly.
Air layering: propagating camellias without cutting the branch
Air layering causes the branch to form roots while still attached to the camellia, inside a ball of moist moss. The ACS says it produces a good-sized plant in one year. The best time is spring, from September to November in Brazil, when the bark slips easily.
Step-by-step camellia air layering, according to the ACS and the SCCS:
Select a straight, vigorous branch and mark a spot 12 to 24 inches (30 to 60 cm) back from the tip.
Remove a complete ring of bark around the branch, making the girdle 1.5 to 2 times as wide as the branch diameter.
Scrape away the green cambium layer right beneath the bark until you reach the bare white wood.
Dust the scraped wood with rooting hormone powder.
Wrap the girdled section with a fistful of sphagnum moss that has soaked in water for 1 hour and been squeezed damp.
Wrap the moss ball tightly in clear plastic kitchen wrap and secure it above and below with ties.
Cover the plastic with aluminum foil, dull side facing outward, to stop birds from pecking at it.
Air layering done in spring usually roots between late summer and fall, from February to May in Brazil. Open the aluminum foil and check the roots through the plastic. When roots are visible in the moss, cut the branch just below the moss ball and remove the plastic.
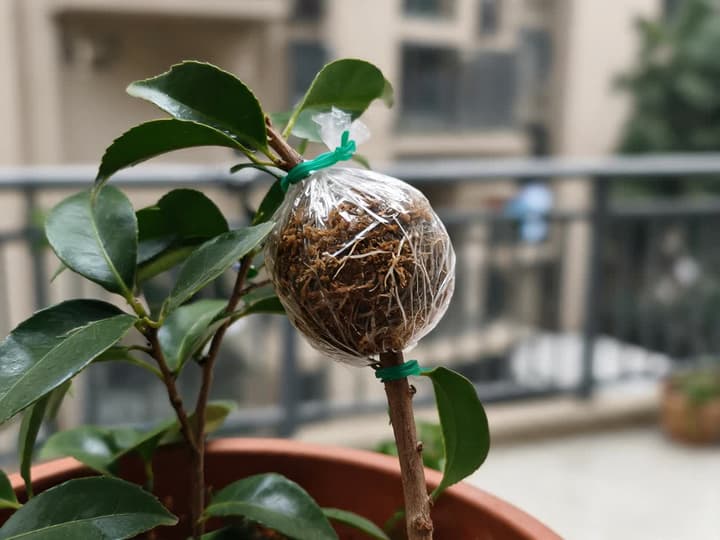
Leave the moss in place, because pulling it off can tear delicate young roots. Pot the new layer up into a container first. The SCCS uses a container around 1 gallon (roughly 4 liters) with equal parts sand and camellia-azalea potting mix. The ACS notes that air-layered plants often bloom during their very first year. Strip off excess flower buds so the young plant directs its energy toward root growth instead of flowers.
Ground layering follows the same concept, but at soil level. Bend a low-growing branch down to the earth and make a 1- to 2-inch (2.5 to 5 cm) cut on the section contacting the soil. Bury that wound in a 4- to 6-inch (10 to 15 cm) trench and pin it down with a wire loop. The RHS notes that roots should form within 12 months.
Camellia grafting: how specialty growers propagate
Grafting joins a scion cutting from the camellia you want to duplicate onto an already-rooted camellia plant (the rootstock). According to the SCCS, growers use grafting to change the flower variety on an old camellia bush. It also allows multiple varieties to grow on a single shrub. This section outlines cleft grafting, one of the grafting methods detailed by the SCCS.
Cleft grafting, described by the SCCS, is done in late winter, in August and early September in Brazil:
The rootstock can be an established older camellia or a slender potted seedling about pencil-thick. The SCCS highlights the 'Kanjiro' cultivar as an effective rootstock.
Cut off the rootstock trunk flat and split the center open vertically from top to bottom.
Take a scion from the upper canopy of the camellia you want to copy, selecting previous year's wood, and shave the base into a tapered wedge.
Insert the scion wedge into the rootstock cleft. The green cambium layer under the scion's bark must line up with the cambium layer of the rootstock: without direct contact, the graft will fail to knit.
Secure the union firmly with a rubber band and cover it with a clear glass jar or plastic container in deep shade to preserve constant humidity.
Once the scion starts pushing new leaves and the graft union calluses over, remove the protective cover gradually over a period of 1 to 2 weeks. The SCCS warns against fertilizing grafted camellias during their first year, as fertilizer salts can kill the tender union.
Growing camellias from seed: why blooms do not match
Camellias grown from seed do not come true to the parent flower. The ACS explains that camellias have undergone centuries of hybridization, and every seed contains a mixed genetic heritage. High-quality flowers rarely appear from seed. The RHS agrees: both flower color and form are unpredictable.
If you want to grow from seed regardless, follow the ACS recommendations:
Harvest the seeds when the fruit begins to split, generally in early fall (in Brazil, March and April).
Soak the seeds in water for 12 hours, or carefully nick the tough seed coat.
Sow in potting soil, peat moss, or a peat-sand mix, keeping the medium consistently damp.
When sown immediately after harvest, seeds usually germinate within 1 month. If sowing is delayed, germination may not occur until spring.
For container culture, the ACS recommends pruning the taproot after germination to encourage a denser system of fibrous feeder roots. For garden planting, leave the taproot intact: it helps the plant withstand drought and winter cold.
Nursery plants vs. home propagation
Propagating camellias at home is primarily worthwhile when you want to preserve a specific beloved flower. A rooted cutting flowers in 1 to 2 years, according to Bond Nursery. Air layering can bloom in its very first season (ACS). Seed-grown plants produce blooms whose characteristics remain a total surprise.
A purchased nursery plant comes with years of established growth and usually carries a verified cultivar name on the nursery tag. The camellia you hope to clone might lack an ID tag, or might not even be a camellia. In that case, Bloom (available for iOS) identifies plants instantly from a photo.
Care after your camellia cutting roots
Once your cutting has established a strong root system, shift it into a larger container before setting it out in the landscape. Bond Nursery uses roughly 1-gallon (4-liter) pots with their standard mix of pine bark, sand, and perlite. Keep the potted start in bright shade and keep the soil evenly moist.
Remove the plastic bag cover and harden off the young plant outdoors over 2 to 3 weeks, following the RHS method. During this transition, keep the plant outdoors during the day in a sheltered spot, bringing it back inside overnight.
Young potted camellias are more vulnerable to winter cold than ground-planted camellias because container roots lack insulating soil mass. In frost-prone areas, protect the pot through its first winter, as outlined in our guide on winter camellia care.
Frequently asked questions
Can you root camellia cuttings in water?
None of the consulted sources tested or recommended rooting camellia cuttings in plain water. The RHS, ACS, and SCCS root camellias in sand mixed with potting substrate or pine bark. The safest approach, and the only method supported by testing, is a pot with sand and soil enclosed inside a plastic bag.
Can I plant a camellia cutting straight into garden soil?
You can, but it takes much longer, and none of our sources measured success rates for camellia cuttings stuck directly into open garden beds. The RHS notes that hardy shrubs can root directly into outdoor soil inside an unheated cold frame with a glass lid. In that setup, cuttings may not finish forming complete root systems until the following late spring. Inside an enclosed pot, you can regulate humidity and check on your cuttings every day.
Which camellia branches should you cut for propagation?
Take a stem tip from the current season's growth that has turned light brown and firm at the base. It should measure 3 to 4 inches (7 to 10 cm) long and carry 2 or 3 healthy leaves. Avoid soft, all-green tips as well as branches showing leaf spots or pests: the RHS stresses selecting healthy parent material free of insects and disease.
Do camellia cuttings need rooting hormone to root?
It helps substantially. In the 1959 study from the Instituto Agronômico de Campinas, IBA-treated camellia cuttings developed significantly larger root systems than untreated controls. None of the consulted sources recorded rooting percentages for camellias stuck completely without hormone. Apply IBA powder or gel at the label-directed rate and make a 1.5 cm scrape wound at the stem base.
Where to begin
If the mother plant is staying with you, start an air layer in September and take backup cuttings in January, going by the months in Brazil. If the plant will be removed in a few weeks, take cuttings from several branches today and enclose them all. Either way, expect months of waiting and a few lost cuttings.
Sources
Royal Horticultural Society: Camellia growing guide, Semi-ripe cuttings, and Layering. Accessed on October 15, 2026.
American Camellia Society: Rooting camellias (Bond Nursery Corp.), Air layering, and Propagation by seed. Accessed on October 15, 2026.
Southern California Camellia Society: Camellia propagation. Accessed on October 15, 2026.
NC State Extension: Camellia japonica. Accessed October 15, 2026.
Souza, H. M.; Inforzato, R. Rooting of Camellia japonica L. var. alba plena cuttings using plant hormones. Bragantia, v. 18, 1959 (Instituto Agronômico de Campinas).
Marlow, T. R.; Harkess, R. L. Using cutting immersion to apply rooting hormone for propagation of Camellia japonica. Mississippi State University, 2025.
Lima, J. D.; Lima, A. P. S.; Bolfarini, A. C. B.; Silva, S. H. M.-G. Rooting of Camellia sinensis L. cuttings depending on branch collection season, genotypes, and indolebutyric acid. Ciência Rural, v. 41, n. 2, p. 230-235, 2011.
Related articles
How to Care for Hibiscus: Sun, Watering, Fertilizer, and Pruning for Flowers
How to care for hibiscus: 6 hours of direct sun, evenly moist soil without waterlogging, half-strength fertilizer in spring and summer, and pruning in early spring. Find out why the flower lasts one day and why buds drop before opening.
Do Ferns Like Sun or Shade? It Depends on the Type
Ferns prefer bright shade: plenty of light, but no direct sun on their fronds. Tuberous sword fern is the exception that handles sun. Here is the ideal light for each type, where to place pots, and how fronds show too much or too little light.
African Violet Yellow Leaves: Causes and What to Do
Yellow leaves on an African violet usually stem from overwatering, and the first place to check is the center of the plant. Losing one lower leaf at a time is normal. Identify whether age, watering, cold water, sunlight, cold drafts, or fertilizer is the culprit based on the yellowing pattern, and see what to do today.