How to Propagate Croton: Cuttings, Water, or Air Layering
A croton stem cutting roots in about 4 weeks in warm conditions. Here is the step-by-step guide, what changes in water, air layering for thick branches, and how to handle the sap.
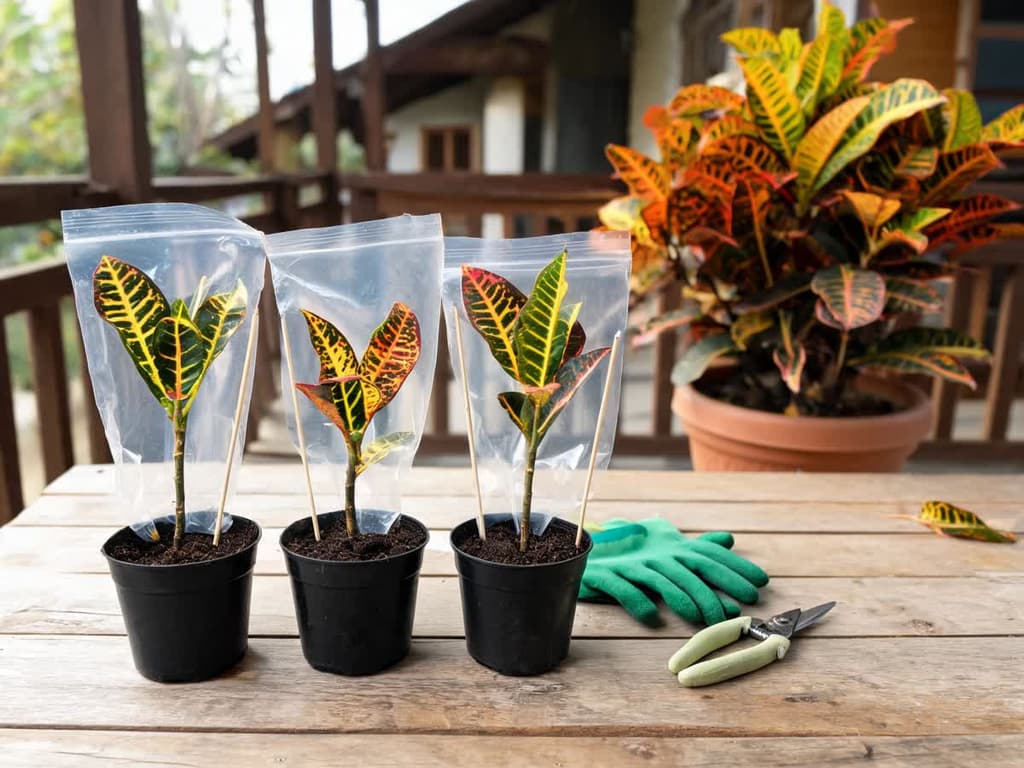
To propagate a croton, snip a 3- to 6-inch stem tip with 3 to 5 leaves. This trimmed piece is your cutting. Bury the base in a moist rooting medium, which is a lightweight mix that encourages root growth. With the medium kept between 70 and 80 °F (21 to 27 °C), roots appear in about 4 weeks, according to the University of Florida. For thick stems or tall, leggy plants, air layering is the way to go while the branch is still attached.
The croton in pots and gardens in Brazil is Codiaeum variegatum, a colorful shrub in the spurge family. It does not belong to the botanical genus Croton, which includes other plants sharing the same common name, such as the Amazonian dragon's blood. This guide applies only to the colorful croton.
Quick summary:
Stem tip cutting: 3 to 6 inches, 3 to 5 leaves, moist medium kept at 70 to 80 °F (21 to 27 °C); roots form in about 4 weeks.
Cuttings also root in water; pot them into soil once the roots reach 1 inch.
A single leaf can grow roots in water, but it will never produce a new plant.
Wear gloves: the sap oozing from cuts irritates the skin and stains clothes.
Croton propagation methods that actually work
Three methods work for crotons: stem tip cuttings in potting mix, rooting cuttings in water, and air layering. University extension offices recommend stem tip cuttings as the standard method and air layering for thicker stems.
Method | When to use it | Time to rooting |
|---|---|---|
Stem tip cutting in mix | Healthy branch, or even an accidentally snapped stem | About 4 weeks with mix kept at 70 to 80 °F / 21 to 27 °C (University of Florida) |
Rooting in water | If you want to watch the roots grow in a glass | No scientific studies have timed this for crotons |
Air layering | Thick stems or leggy plants that lost their bottom leaves | From 1 month to 1 year, depending on the season (University of Florida) |
Single leaf | Does not propagate crotons | Roots will form, but no new shoot will develop (University of Florida) |
Crotons only produce new plants from a stem cutting with a node, the point on the stem where the leaf emerges. Wax plants also root from the node, and wax plant cuttings come from the same type of cut. In contrast, peace lilies lack stems that can root, and they propagate only by clump division, as shown in the guide on peace lily propagation.
Croton sap safety: put on gloves before you cut
Cutting a croton releases a sap that irritates the skin. The North Carolina State University Extension notes that contact between the sap and skin or mucous membranes causes itching and swelling. The same source warns that the sap stains fabric permanently.
Wear gloves and old clothes when cutting, and avoid touching your eyes. When you are done, wash your hands thoroughly with soap and water. On the cutting, wipe any sap running from the cut with a damp paper towel before planting.
Croton is also toxic to dogs and cats. The Pet Poison Helpline is an American animal poison control service. According to the helpline, eating the plant causes mouth and stomach irritation, along with drooling, vomiting, or diarrhea. Keep cut branches and leaves away from pets.
Step-by-step guide to croton stem cuttings in potting mix
A stem tip cutting is simply the top few inches of a leafy branch that develops its own root system. If a branch accidentally snaps off, you can use it too: just trim the tip following these same steps.
Where to cut without harming the parent plant
Cut just below a node, because roots grow from the buried node. Iowa State University explains that most plants sprout just below the cut and produce multiple new branches. Because of this, taking a tip cutting makes the mother plant bushier rather than weaker.
Water the parent plant the day before. The stem cutting will be fully hydrated and handle the rootless days much better.
Using clean pruning shears, snip a 3- to 6-inch stem tip with 3 to 5 leaves, cutting just below a node.
Strip off the lower leaves to clear 1 or 2 nodes for planting.
Cut any remaining large leaves in half. Crotons are among the foliage plants that lose the most water through their leaves, and the cutting has no roots yet to replace it.
Wipe away any sap from the cut base with a damp paper towel.
If you have rooting hormone, apply a pinch to the cut. The hormone is a powder with auxin, the substance the plant uses to form roots.
Insert the base into a small pot filled with moist rooting mix, making sure at least one node is buried and no foliage touches the soil.
Tent a clear plastic bag over the pot, leaving it unsealed and propped up with sticks so it does not touch the leaves.
Set the pot in a warm spot that receives 4 to 6 hours of bright, indirect light each day, away from harsh direct sun.
Keep the substrate moist without waterlogging it. With the plastic bag over it, the substrate takes days to dry, and daily watering is not necessary.
Rooting hormone is optional. The home guide from the University of Florida includes this step, while the croton production guide from the same university does not mention it. Iowa State University warns that too much hormone can delay rooting.
You do not need to let the cut end dry before planting. Iowa State University advises planting the cutting as soon as possible, because it loses water without roots to take it back up. None of the consulted extensions recommend this step for crotons.
Which rooting mix to use for croton cuttings
Two Brazilian studies measured the medium on crotons directly. In 1994, Tillmann and colleagues compared 7 substrates in a mist chamber, which wets the leaves with a fine mist. Medium vermiculite performed best, while soil and sand performed worst. Vermiculite is a lightweight, expanded mineral sold in garden centers.
In 2001, a master's thesis from UNESP Ilha Solteira mixed soil with agricultural residues, using 2 parts soil to 1 part residue. With sugarcane bagasse, 82% of the 15-cm cuttings rooted. With carbonized rice hulls, 75% rooted. In its production guide, the University of Florida recommends equal parts perlite and peat moss. Perlite is a lightweight, white granule of expanded rock, and peat moss is decomposed organic matter that holds water.
At home, use straight vermiculite or equal parts perlite and peat moss. If you have carbonized rice hulls, mix 1 part of them with 2 parts soil, as in the UNESP study. Avoid pure garden soil and pure sand.
Rooting croton in water vs. soil
A croton stem roots in water, but those roots struggle during the move to soil. Iowa State University explains that roots formed in water are thicker and not adapted to potting mix. After planting, the cutting can wilt, lose leaves, or dry out at the tips.
No studies have measured how many croton cuttings take root in water. In soil, Brazilian studies measured up to 82% rooting. Because of this, soil is the safer path, and a glass is for those who want to watch roots grow.
To root in water, keep the bottom node submerged and the leaves out of the water. Change the water 1 to 2 times a week, without letting the level drop to the point where the roots are exposed to the air. Move the cutting to soil when the root reaches 1 inch (2.5 cm), as Iowa State University advises.
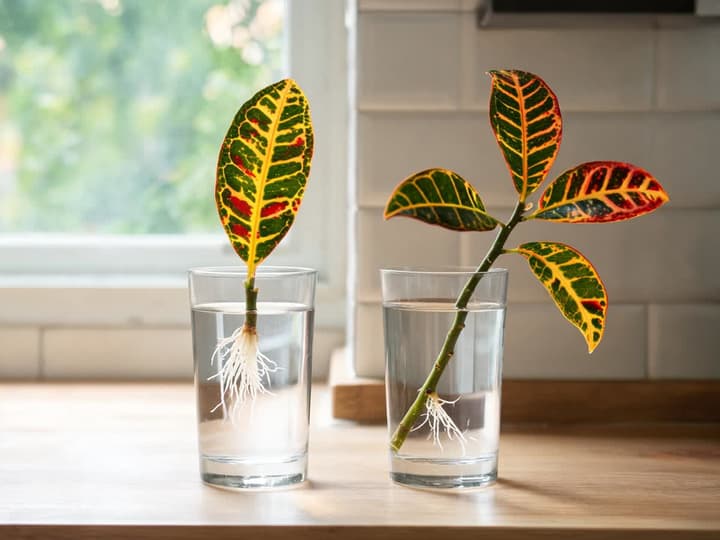
A croton leaf alone in water grows roots and still does not become a plant. The University of Florida croton production guide notes that the leaf roots at the base of the petiole and produces no new plant. It can look pretty in the glass for months without ever sprouting. In peperomia, by contrast, a buried leaf forms a new plant.
Air layering: best for thick branches and leggy plants
Air layering means getting roots to grow on a branch while it remains attached to the plant. The mother plant keeps nourishing the branch, and you only make the cut once roots have already formed. The University of Illinois Extension cites crotons among the plants where this method works well. The reason is the large leaves, which lose water too quickly in a detached cutting.
Air layering is ideal for thick branches and older, leggy crotons that have dropped their lower foliage. The upper portion becomes a well-rooted specimen, and the mother plant pushes new side shoots right below the cut.
Pick a section of stem 12 to 15 inches below the tip. Remove leaves roughly 3 to 4 inches above and below that spot.
Wearing gloves, use a clean knife to make two parallel circular cuts around the branch, about 1 inch apart. Peel off the ring of bark between the cuts.
Scrape the exposed wood to remove the cambium, the thin, slippery layer right beneath the bark. If the cambium remains, the wound closes with new bark instead of roots.
Wrap the wound in a handful of damp, well-squeezed sphagnum moss. Sphagnum is a dried moss sold at garden centers.
Cover the moss tightly with clear plastic wrap, securing it at the top and bottom with ties or tape. Add an outer layer of aluminum foil to shield the roots from overheating in direct sun.
Check the moss every week. If it looks pale and feels dry, untie the top wrap and add a little water.
Once healthy roots are clearly visible through the plastic, cut the branch right below the moss ball and pot it up.
The girdling cut follows Iowa State University, which places croton in the group of woody-stemmed plants. Illinois Extension describes another cut, an angled incision up to one-third into the branch, propped open with a toothpick. Iowa State University reserves that cut for fibrous-stemmed plants, like dracaena. We follow this source because it is the only one that specifies which cut to use on croton.
The University of Florida gives 1 month to 1 year until rooting, depending on the plant and the season. For the croton group, the Illinois Extension mentions 3 to 4 months. The same Florida publication states that hormone is not necessary for most air layers.
When to propagate croton
The ideal window for propagating crotons is whenever the rooting medium stays between 70 and 80 °F (21 to 27 °C). In that warmth, the University of Florida notes that roots develop in about 4 weeks. If the soil temperature drops below 70 °F (21 °C), rooting takes several weeks longer.
In the Northern Hemisphere, the easiest time is late spring and summer, from May to August, when the house is warmer. Outside those months, a heat mat under the pot keeps the substrate warm. Iowa State University recommends 24 to 27 °C for the substrate.
Has it rooted? What to look for in the first weeks
In warm potting mix, root growth takes around 4 weeks. To check, give the stem a very gentle upward tug: if you feel firm resistance, roots are anchoring into the mix. Fresh leaf growth emerging from the tip is another clear sign the cutting took.
New foliage usually opens bright green at first, even if the mother plant displays vivid yellow and red. The University of Florida points out that croton leaves start out green and develop their intense coloration over time when exposed to proper light. A green cutting has not lost its variegation.
Limp or wilted leaves in the first few days indicate that the cutting is losing moisture faster than it can absorb it. Check that the plastic tent is properly positioned and that the mix is consistently damp. A soft, blackened stem base indicates rot caused by oversaturated soil.
Leaf spots, pests, and yellowing foliage stem from different issues than simple stem rot. Our plant problem guide walks through how to identify those issues by leaf symptoms.
Moving your cutting to a permanent pot or garden bed
Move your young croton into its permanent pot or outdoor bed once it shows established roots and active new leaf growth. The University of Florida relies on these two checkpoints as the green light for repotting.
While your cutting rooted under bright, indirect light, mature crotons demand higher light levels. The North Carolina Extension suggests full sun to partial shade, noting that vibrant leaf color depends on bright exposure. Introduce the young plant to direct sun gradually, adding an hour of exposure each week.
If the cutting loses its bottom leaves after transplanting, check the light. North Carolina Extension notes that crotons drop their lower leaves in too much shade. Bloom, a plant app for iPhone, sets up a watering schedule for the new cutting and sends reminders on watering days.
In outdoor beds or hedges, space plants 2 to 3 feet apart, following University of Florida landscaping recommendations. In the ground, temperatures below 50 °F (10 °C) cause severe cold damage. For potted plants, the North Carolina Extension advises moving containers indoors once ambient temperatures near 50 °F (10 °C).
Frequently asked questions
How do you propagate croton in water?
Cut a 3- to 6-inch stem tip and remove the bottom leaves. Keep the lower node submerged in a cup of water. Change the water 1 to 2 times a week. Move the cutting to soil once the roots reach 1 inch, because water roots struggle during the transition.
Can you propagate a croton from a single leaf?
No. A single croton leaf can root at the base of its stalk in water, but it lacks the stem tissue needed to generate new shoots, according to the University of Florida. It can sit green in a cup for months without ever turning into a plant. Cuttings must include a stem segment with at least one node.
Can you grow crotons from seeds?
University extension resources do not recommend starting crotons from seed at home. Standard propagation relies entirely on stem cuttings and air layering. Plants grown from vegetative cuttings remain clones of the parent plant, keeping identical leaf coloration once the foliage matures.
Do 'Brasileirinho' and 'Petra' crotons propagate the same way?
Yes. 'Brasileirinho' and 'Petra' are colorful-leaf croton varieties, and the sources teach the same stem tip cutting method for all varieties. The University of Florida cites 'Petra' among the cultivated varieties. Indoors, it recommends varieties like 'Petra', which keep their color with less light.
Getting started
Find a branch with healthy new growth, put on protective gloves, and snip a 3- to 6-inch section right below a node. Place the cutting into moist vermiculite, cover it loosely with a plastic bag, and keep it warm for about 4 weeks.
Bloom is an iPhone (iOS) app that identifies your plants from a quick photo and builds an accurate watering schedule for them.
Sources
Stamps, R. H. and Osborne, L. S. Croton Production and Use (ENH878). University of Florida IFAS Extension, EDIS, 2003.
University of Florida IFAS Extension, Gardening Solutions: Crotons. Accessed September 18, 2026.
Park Brown, S. Plant Propagation Techniques for the Florida Gardener (CIR579). University of Florida IFAS Extension, EDIS. Accessed September 18, 2026.
Iowa State University Extension and Outreach, Yard and Garden: How to Propagate Houseplants by Stem Tip Cuttings and How to Propagate by Air Layering and Simple Layering. Accessed September 18, 2026.
University of Illinois Extension: Air Layering. Accessed September 18, 2026.
NC State Extension Gardener Plant Toolbox: Codiaeum variegatum. Accessed September 18, 2026.
Pet Poison Helpline: Croton. Accessed September 18, 2026.
Tillmann, M. A. A., Cavariani, C., Piana, Z. and Minami, K. Comparison among different substrates on the rooting of croton cuttings (Codiaeum variegatum L.). Scientia Agricola, v. 51, n. 1, p. 17–20, 1994.
Souza, C. S. S. Physical and chemical characterization of different substrates: influence on the production of croton and acalypha cuttings. Master's thesis, UNESP, Ilha Solteira, 2001.
Related articles
How to Care for a Maidenhair Fern: Light, Water, and Revival Tips
Learn how to care for a maidenhair fern indoors: bright indirect light, consistently moist soil, high humidity, and how to revive it if it dries out completely.
How to Propagate Spider Plants: Root the Pup Before Cutting
The safest spider plant cutting comes from a pup still attached to the mother plant: rest the plantlet on soil in a small pot, wait for roots to establish, and only then cut the stolon. Learn when the pup is ready, whether rooting in water is worth it, how to divide the clump, and why plants fail to produce babies.
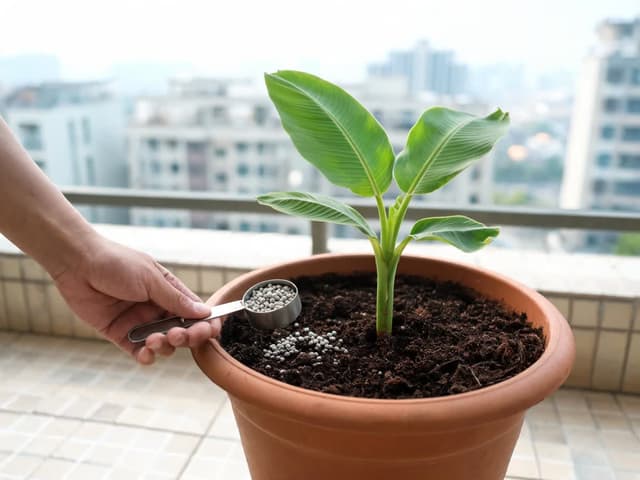
Banana plant fertilizer: fertilizing potted and backyard plants
Banana plant fertilizer needs more potassium than nitrogen, in a 3-1-6 ratio. For a potted plant on a balcony, use the label dose in spring and summer. In the backyard, fertilize every 2 months, adjusting the amount by mat age. Learn the formula, timing in Brazil, and signs of deficiency or excess.