Rubber Plant Potting Soil: The Mix, the Pot, and When to Repot
The best soil for a rubber plant drains quickly and has enough weight to keep a tall plant from tipping over: equal parts potting mix, pine bark, and coarse sand. Find out the right pot, what to buy, and when to repot.
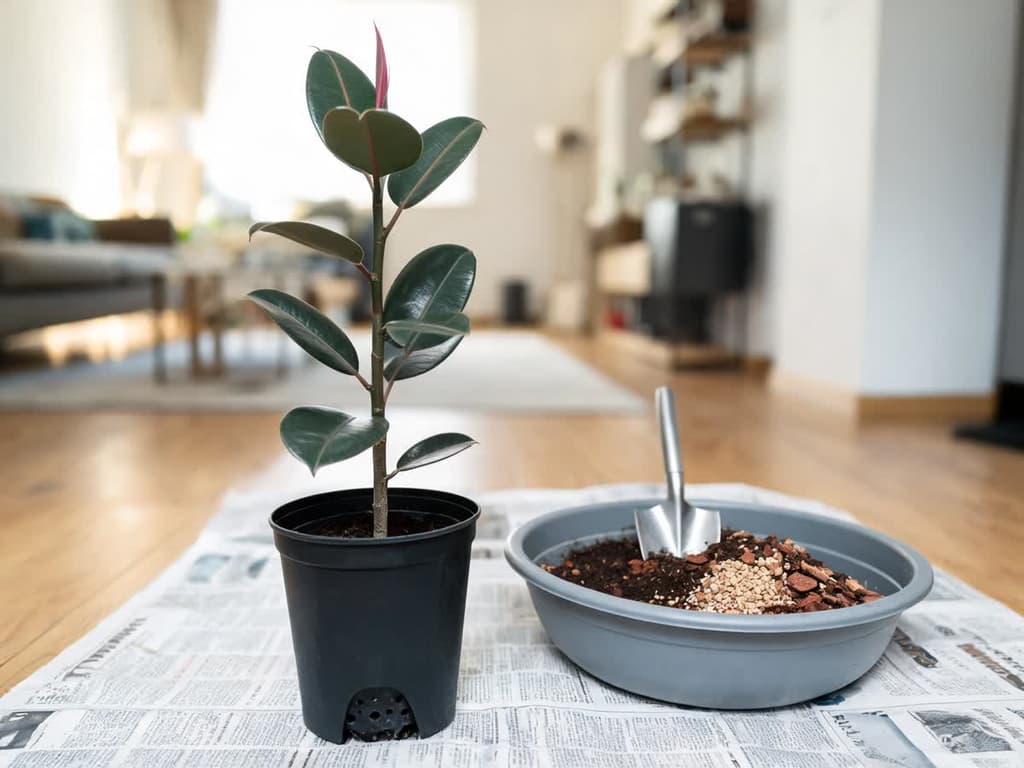
The best rubber plant potting soil is a mix that lets water drain through the container hole and has enough weight to hold up a tall plant. A recipe from Clemson, the extension service of a US university, solves both problems. Adapted for Brazil, it uses equal parts potting mix, pine bark, and coarse sand. The pot needs a drainage hole and should be only 1 to 2 inches wider than the current one.
Potting soil is the container growing medium: the mix that anchors the roots and holds moisture, sold ready in bags or blended at home. This guide covers the container rubber plant (Ficus elastica), the plant with thick, glossy leaves. The Pará rubber tree from the Amazon, which produces natural rubber, is an entirely different tree.
Quick summary:
Recipe: 1 part potting mix, 1 part fine pine bark, and 1 part washed coarse sand. A rubber plant under 3 feet tall can use perlite (lightweight white volcanic rock granules) instead of sand.
Rubber plants tolerate a heavier mix than monsteras. The RHS recommends a loam-based potting soil with fine bark.
Use a pot with a drainage hole, 1 to 2 inches wider than the current one. Adding stones to the bottom does not replace a drainage hole.
Repot with fresh mix every 2 to 3 years in spring (September to November in Brazil). In the other years, replace only the top inch.
Soil that stays waterlogged days after watering, accompanied by leaf drop, means you need to check the roots today.
What is the best soil for a rubber plant?
The best rubber plant potting soil is a firm mix that drains quickly and does not break down into fine dust over the years. A rubber plant lives for many years in the same pot and grows tall, with large leaves at the top. For that reason, the mix needs three qualities: let water pass through freely, retain some moisture, and add weight to the container.
Technical sources agree on the essentials and differ on the details. The Royal Horticultural Society (RHS), the British horticultural society, directs using a soil-based potting mix with fine bark for container ficus. North Carolina State University Extension (NC State Extension) also mentions soil in the potting mix composition. Clemson Cooperative Extension calls for a well-draining houseplant mix.
Rubber plants tolerate many soil types. The University of Florida (UF/IFAS) notes that, in the ground, it grows in almost any well-drained soil, from clay to sand, acidic or alkaline. In a pot, water drains worse than in the ground, and standing water is the real risk to the roots.
Rubber plants are not related to monsteras or pothos, which are tree-climbing epiphytes that need a very airy mix packed with large bark chunks. A rubber plant handles a denser blend, and a tall specimen needs that extra weight to prevent tipping over.
Rubber plant potting soil recipe
The Clemson recipe for foliage plants uses 1 part peat moss, 1 part pine bark, and 1 part coarse sand. In Brazil, pure peat moss is hard to find. The adaptation below uses bagged potting mix in its place, because it already contains peat moss or coco coir as a base.
Ingredient | Plant over 3 feet tall | Plant under 3 feet tall | What it does |
|---|---|---|---|
Bagged potting mix, garden-soil free | 1 part | 1 part | Holds moisture and nutrients between waterings |
Fine pine bark, composted (already partially decomposed) | 1 part | 1 part | Creates pore space and resists rapid breakdown |
Washed coarse sand | 1 part | None | Adds weight to the pot and creates pore space |
Perlite | None | 1 part | Creates pore space without adding weight |
Clemson publishes both versions, one with sand and one with perlite. The 3-foot height threshold is specific to this guide: no scientific source specifies the exact height where adding sand becomes necessary. Measure parts using the same container, such as a bucket or an empty plastic tub. Mix all components dry in a basin, then add water until the blend feels damp to the touch without dripping.
Coarse sand is the difference in this recipe. In ficus nurseries, container trees get 10% to 20% coarse sand in the potting mix, according to UF/IFAS. Sand prevents them from tipping over in the wind. Clemson's recipe uses more: 1 part in 3. The UF/IFAS publication on homemade recipes explains why. Sand weighs more than the other ingredients and is intended for top-heavy plants.
Use washed coarse builder's sand. The same UF/IFAS publication advises against fine sand, which packs down and compacts the mix. No source has measured an exclusive custom proportion just for rubber plants: this recipe is Clemson's recommendation for foliage plants in general.
The fiddle-leaf fig, in the same genus as the rubber plant, uses the perlite version and only replaces half of that perlite with sand. For a rubber plant over 3 feet tall, sand makes up the entire third part: indoors, it can reach 10 feet tall, according to NC State.
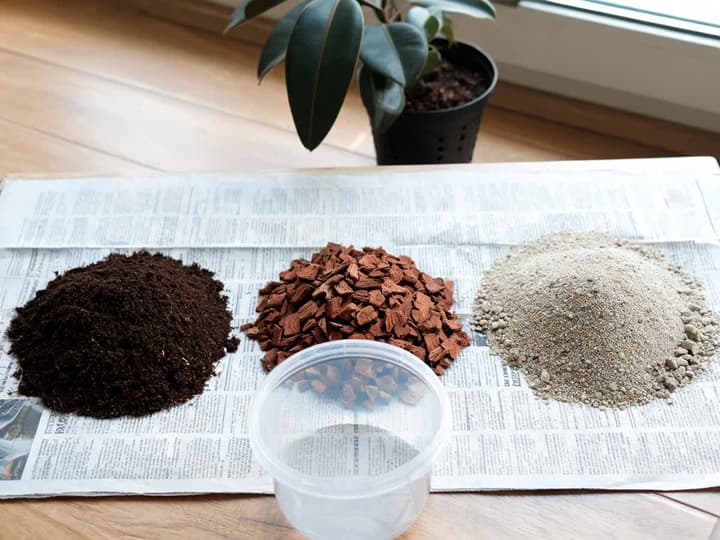
Topsoil, enriched garden soil, or indoor potting mix?
For a rubber plant, buy indoor potting mix. Topsoil and enriched garden soil are typically outdoor dirt mixed with organic matter, sold in bulk or bags. Read the ingredient list: if the first ingredient listed is soil or topsoil, it acts like dense garden dirt inside a container.
Do not use garden soil in the pot. Clemson says that garden soil contains too many bacteria for containers and would need to be sterilized in the oven before use. Penn State Extension warns that it can introduce pests and diseases to houseplants.
Potting mix is a ready-to-use, lighter blend formulated specifically for containers. On the bag, look at the ingredients: pine bark, coconut coir, or peat moss as the primary base are good signs. Avoid bags that list "soil" or "topsoil" as the main ingredient.
Plain potting mix works fine on its own if the pot has drainage holes, the rubber plant is small, and you only water once the top 2 inches dry out. The recipe with added bark and sand performs much better for tall plants or for growers who water frequently.
Peat moss, coconut coir, and pine bark: what to buy in Brazil
Peat moss (decomposed bog moss) is the base of European and American potting soils. In Brazil, coconut coir is the most common, made up of dust and fibers from ground coconut husks. Purdue University lists coconut coir as an alternative to peat moss.
Coconut coir in Brazil comes mainly from green coconuts. Researchers from Embrapa Hortaliças described green coconut husk fiber as an agricultural substrate in 2002. The same article cites pine bark among the substrates already used in the country.
Foreign recipe ingredient | What to buy in Brazil | Caution |
|---|---|---|
Peat moss | Potting soil or coconut coir | Clemson advises rinsing coconut coir before use because it can carry residual salts |
Pine bark | Fine, composted pine bark | Choose fine bark broken down into small pieces |
Coarse sand | Washed coarse builder's sand | Never use fine sand |
Perlite | Perlite or small expanded clay pebbles | Expanded clay pebbles weigh more than perlite |
Pine bark offers a major benefit for plants that stay in the same container for years. According to Purdue, pine bark potting mixes shrink less than peat mixes when supporting long-lived foliage plants.
Pot selection for a rubber plant: drainage holes and modest sizing
The pot for a rubber plant needs a hole in the bottom. Without a hole, irrigation water pools below the roots, and Clemson links root rot to potting mix that does not drain quickly.
When repotting, choose a container that is 1 to 2 inches (2.5 to 5 cm) larger in diameter than the current one. This is the recommendation from Clemson for repotting indoor plants. The NC State extension in Wayne County calls for a maximum increase of 2 inches (5 cm).
An oversized container harms a rubber plant. Excess potting mix that the roots cannot reach stays soggy for extended periods, which is where fungal root rot begins.
Cachepots (decorative outer pots without drainage holes) should only be used as outer sleeves. Take the plastic nursery pot out of the cachepot to water the plant, and return it only once all excess water stops dripping. Standing water inside a cachepot keeps the base of the soil soaked for days, as detailed in our guide on how to water a rubber plant.
Adding a layer of rocks or clay pebbles at the bottom: is it necessary?
It is unnecessary, and adding stones does not replace a drainage hole. Four out of six German care guides on rubber plant potting soils advise putting gravel or expanded clay pebbles at the bottom. Horticultural authorities disagree with that advice.
Extension specialist Linda Chalker-Scott, from Washington State University (WSU), wrote that the drainage layer only hinders the movement of water. Water does not move down from fine potting mix into coarse gravel until the soil above is completely saturated. Clemson and NC State say the same.
A 2025 study published in the journal PLOS ONE measured the effect of the layer in various substrates. In soilless substrate, almost every layer reduced the water retained in the pot. In soil-based substrate, the type the RHS recommends for the rubber plant, most layers changed nothing. The test was conducted with the pot soaked and draining, with no plant growing in it.
This guide recommends skipping the drainage layer. WSU shows that it hinders drainage, and the 2025 study, the most recent direct measurement, found no positive effect in loam-based soil. In both situations, the drainage layer merely steals space where roots could grow. Ensure your pot has drainage holes, elevate the container on pot feet or a saucer you regularly empty, and use the mix containing coarse sand.
Rubber plants in expanded clay pebbles or Seramis: does it work?
No source in this guide tested the rubber plant in hydroculture, so the safest option is to keep the plant in potting soil. In hydroculture, the root sits in expanded clay pebbles and receives water with fertilizer from a reservoir. Seramis, a German brand, is a porous clay granule for soilless cultivation.
In Brazil, the similar and easy-to-find material is expanded clay, the brown ceramic pebbles sold in garden centers.
A study by the International Society for Horticultural Science (ISHS) tested expanded clay in hydroculture with other foliage plants: dumb cane, dracaena, and syngonium. Growth was equal to or better than in organic substrate with the same fertilizer solution. The rubber plant was not in the test.
A plant that already lives in potting mix has roots adapted to soil. None of the referenced sources explain how to transition a mature rubber plant from soil to clay pebbles. The safest strategy is to keep the plant in a potting mix and use expanded clay pebbles merely as an ingredient in place of perlite.
When to repot a rubber plant and change its soil
Repot your rubber plant and change its potting mix every 2 to 3 years, as indicated by the RHS profile. The best time is spring, when the plant resumes growth: from September to November in Brazil.
Certain warning signs indicate the plant needs repotting ahead of schedule. Penn State and Clemson highlight the following:
roots growing out through the bottom drainage holes;
roots circling tightly around the root ball, with almost no visible soil left in the lower third of the pot;
potting mix that dries out unusually fast, even during cool weather;
a plant that wilts immediately after being watered.
Four out of six German care guides mention repotting young plants every 2 years and mature specimens every 4 to 5 years. None cite a scientific source. This guide adheres to the RHS timeframe of every 2 to 3 years, along with root-bound signs to decide whether to repot sooner.
If your rubber plant has grown too large to lift from its container, scrape away the top 1 inch of soil every year and replace it with fresh potting mix, as advised by the RHS.
Soil that stays wet and dropping leaves: is the mix to blame?
Sometimes it is, but examine the pot before replacing the soil. Potting soil that remains soggy for days after watering usually stems from one of four causes:
A pot without drainage holes, or holes clogged by root growth. Tip the pot and inspect the underside.
Standing water inside the saucer or cachepot. Empty the drip tray or outer pot 15 minutes after every watering.
A pot that is too large for the root system. Excess potting mix that roots cannot reach stays waterlogged.
Old, compacted potting mix. Over time, potting soil decomposes, shrinks, and loses its internal air pockets. Purdue notes that peat moss shrinks and compacts more than pine bark over time.
The first three issues can be fixed without changing the potting soil. The fourth problem requires a fresh mix, carried out in spring if the plant is stable, or right away if the roots feel mushy.
In the meantime, water only when the top 2 inches of soil feel dry to the touch, following our guide on how to water a rubber plant. Yellowing lower leaves that drop while the soil stays wet are the classic hallmark of overwatering. Review other root-related causes of rubber plant leaf drop.
White surface mold and musty odors in the soil
White mold on the soil surface rarely harms the plant. According to an expert at Ask Extension, a service of US university extensions, the mold is usually a saprophytic fungus. It does not attack the plant. It appears when the potting mix stays too wet.
Scrape away the top 1 inch of soil containing the white crust and top dress with fresh potting mix. Afterward, allow the top 2 inches to dry thoroughly before watering again. The same extension answer notes that white crust can also be mineral salt buildup from fertilizer or hard tap water, which calls for the identical fix: scrape off and replenish.
A foul, rotting smell indicates a different issue. Potting soil that smells sour and stays waterlogged may harbor rotting roots, where scraping off the surface is not enough. Unpot the plant and inspect the root system, following the emergency repotting steps below.
Inherited an unlabeled plant? The Bloom app (available for iOS) identifies species from a single photo. With a verified plant name, you can make sure your specimen is indeed a rubber plant before investing in potting supplies.
How to repot a rubber plant: step-by-step instructions
Wear protective gardening gloves: the milky white latex sap that leaks from damaged roots or broken stems can cause skin irritation. Line your floor with old newspapers.
Water the rubber plant 1 day prior to repotting so the root ball slides out intact.
Blend your potting mix and moisten it until it feels damp to the touch.
Gently lay the pot on its side and pull the plant out by the base of its main stem. If the root ball sticks, run a dull knife around the inside rim of the pot.
Loosen roots that are circling tightly around the bottom of the root ball. NC State advises untangling and trimming circling root ends, otherwise they will fail to grow outward properly.
Add your prepared mix to the bottom of the new pot until the top surface of the root ball rests 1 inch below the container rim.
Center the plant, fill in the perimeter gaps with fresh mix, and gently press down with your fingers without packing it tightly.
Water thoroughly until water drains out of the drainage hole, then empty the collection saucer.
Return the repotted rubber plant to its normal location. Wait to water again until the top 2 inches of the potting mix have dried out completely.
Emergency repotting: waterlogged soil and sudden leaf loss
If the soil has stayed soaking wet for days despite withholding water and the plant drops multiple leaves at once, change the soil immediately. Waiting until spring only applies to healthy, stable plants.
Remove the plant from the pot and inspect the roots. The University of Maryland describes rotted roots as brown or black, soft, with the outer root layer sloughing off to the touch. Healthy roots are firm and light-colored.
Prune away all soft, decayed roots using clean pruning shears and wash away old, clinging soil. Repot into fresh, barely damp mix. Select a pot with drainage holes that is the same size as or smaller than the old one, since the root system is now reduced. Do not water again until the top 2 inches of soil dry out.
If the lower base of the stem is also soft and dark, the root system may be beyond saving. Take a healthy stem cutting from the top growth and propagate it, as described in our rubber plant care guide.
Frequently asked questions
Do I need to adjust the pH of rubber plant potting soil?
No. The RHS profile notes that rubber plants grow well in acidic, neutral, or alkaline substrates. UF/IFAS confirms that they tolerate both acidic and alkaline soils. Adding agricultural lime is typically only required in mixes built from pure sphagnum peat moss, which is naturally very acidic according to UF/IFAS. Standard commercial indoor potting mixes do not consist of pure raw peat.
Can I grow a rubber plant purely in coconut coir?
It is not ideal. Clemson uses coconut coir instead of peat moss in a mix, and instructs washing it before use because of salt. UF/IFAS notes that it requires fertilizer with more nitrogen. In the recipe in this guide, the base is potting mix, which already contains coconut coir or peat moss, blended with pine bark and coarse sand.
Can I use outdoor garden dirt in my rubber plant container?
No. Clemson and Penn State strongly discourage using garden soil in indoor containers. It compacts easily, drains poorly, and carries weed seeds, pests, and soil-borne diseases. Clemson only permits garden soil if it has been heat-sterilized in an oven and amended with bark, peat, perlite, or sand. That requires far more effort than buying a quality indoor potting mix.
Action checklist for today
Lift your container to check for clear drainage holes and make sure no water is pooling inside the decorative cachepot.
Stick your finger 2 inches into the potting mix. If it has stayed saturated for days and leaves are falling, inspect the drainage holes and cachepot. If neither explains the issue, unpot the plant to check the roots today.
White mold on top: scrape away the top 1 inch of soil and top dress with fresh potting mix.
Pick up indoor potting mix, fine composted pine bark, and washed coarse sand for your spring repotting.
Repot into a container that is 1 to 2 inches (2.5 to 5 cm) wider in the spring, between September and November in Brazil.
Sources
Royal Horticultural Society (RHS), Ornamental figs: growing guide: soil-based potting mix with fine bark; scrape off and replace the top inch (2.5 cm) in years without repotting.
RHS, Ficus elastica: acidic, alkaline, or neutral pH; replace the top layer every year and repot every 2 to 3 years.
NC State Extension, Ficus elastica: soil-based potting mix.
Clemson Cooperative Extension, Rubber Plant: well-draining potting mix, pot with a hole, root rot from poorly draining potting mix.
Clemson Cooperative Extension, Indoor Plants: Soil Mixes (HGIC 1456, Shaughnessy, revised in 2024): foliage plant recipes; washing coco coir; garden soil.
Clemson Cooperative Extension, Indoor Plants: Transplanting & Repotting: pot 1 to 2 inches larger; signs it is time to repot.
UF/IFAS, Ficus elastica: Rubber Tree: tolerates well-drained acidic and alkaline soil.
UF/IFAS, Henley, Chase, and Osborne, Ficus Production Guide (research note RH-91-16, archived copy): 10% to 20% coarse sand for potted trees.
UF/IFAS, Homemade Potting Mix: coarse sand for top-heavy plants; fine sand makes the mix dense.
Purdue Extension, Evaluating Container Substrates and Their Components (HO-255-W): coconut coir as an alternative to peat; pine bark shrinks less.
Penn State Extension, Repotting Houseplants: signs it's time to repot; garden soil in the container.
NC State Extension, Wayne County, How to Repot a Houseplant: container at most 5 cm larger; circling roots.
Linda Chalker-Scott, WSU, The Myth of Drainage Material in Container Plantings.
Rowe (2025), PLOS ONE 20(2): e0318716: effect of the drainage layer by substrate type.
Carrijo, Liz, and Makishima (2002), Green coconut shell fiber as an agricultural substrate, Horticultura Brasileira.
ISHS, Effect of different substrates on growth of ornamentals in hydroculture (Acta Horticulturae 361).
Seramis, product page: porous clay granules for soilless cultivation.
University of Maryland Extension, Root Rots of Indoor Plants.
Ask Extension, Christmas cactus has mold (2014): white mold on the surface and salt crust.
Related articles
How to Care for Hibiscus: Sun, Watering, Fertilizer, and Pruning for Flowers
How to care for hibiscus: 6 hours of direct sun, evenly moist soil without waterlogging, half-strength fertilizer in spring and summer, and pruning in early spring. Find out why the flower lasts one day and why buds drop before opening.
Do Ferns Like Sun or Shade? It Depends on the Type
Ferns prefer bright shade: plenty of light, but no direct sun on their fronds. Tuberous sword fern is the exception that handles sun. Here is the ideal light for each type, where to place pots, and how fronds show too much or too little light.
African Violet Yellow Leaves: Causes and What to Do
Yellow leaves on an African violet usually stem from overwatering, and the first place to check is the center of the plant. Losing one lower leaf at a time is normal. Identify whether age, watering, cold water, sunlight, cold drafts, or fertilizer is the culprit based on the yellowing pattern, and see what to do today.