Camellia Losing Leaves: Causes and How to Save the Plant
A camellia losing leaves is not always dying. See if it is normal shedding of old leaves, do the scratch test to check if it is alive, and save the plant based on the cause.
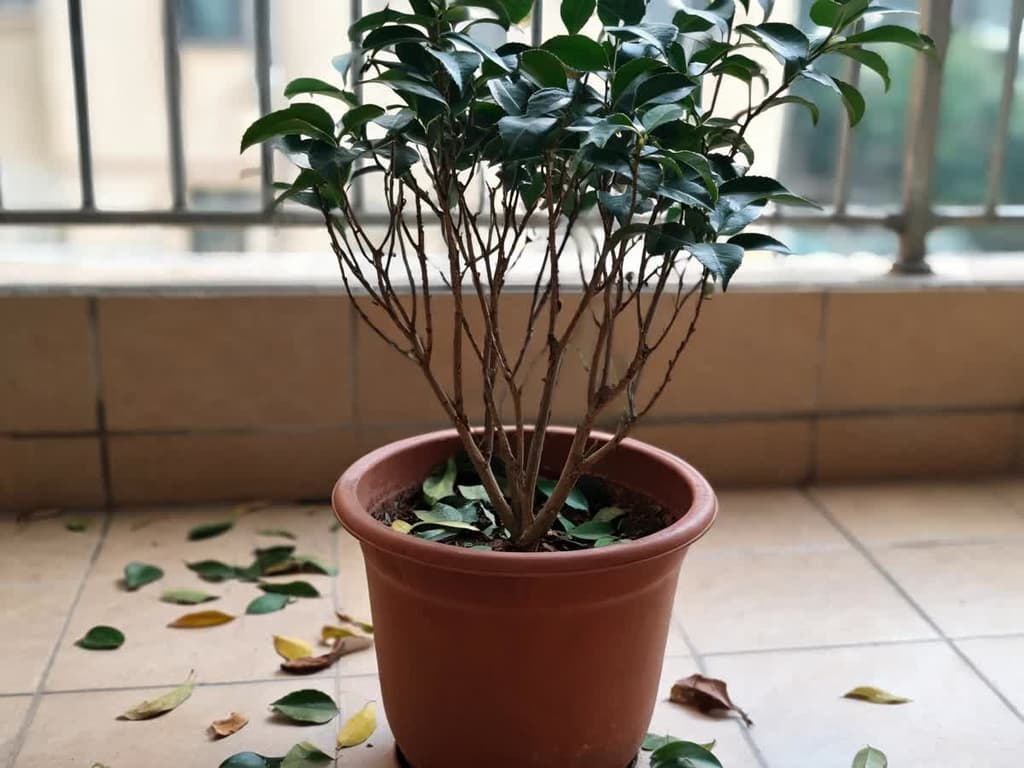
A camellia losing leaves is not always dying. A few old leaves falling from the interior of the plant in spring or summer are normal leaf shedding. Mass leaf drop, bare branches, or an entire branch wilting indicate a problem. The cause may be in the roots, the plant's location, cold weather, or a pest. As long as the stem is green under the bark, the camellia is alive and can potentially be saved.
This guide covers the common camellia (Camellia japonica), the one in the camellia care sheet, in pots or in the garden. First find out if the plant is alive, then what changed before the leaf drop, and only then fix the cause.
Quick summary:
Old leaves yellowing and dropping near the base and in the interior of the plant, with new shoots emerging, are normal shedding. In Brazil, it runs from September to March.
To find out if the camellia is alive, do the scratch test: scratch the bark of a branch with your fingernail. Green underneath is alive; brown and dry is dead.
Waterlogged soil with brown, mushy roots is root rot, one of the most serious camellia diseases.
Leaves dropping after purchase, a change in location, or a frost indicate shock (stress from a sudden change in environment). If the stem is green, the plant can resprout.
A single branch drying out, with a gray patch on the bark, is canker (a fungal disease that sinks the bark and dries out the branch): cut below the diseased part.
Do not fertilize a camellia that is losing leaves.
Is the camellia dying or just shedding leaves?
The camellia is an evergreen plant, but it sheds its old leaves gradually. The Royal Horticultural Society (RHS) is the United Kingdom's horticultural society. It says not to worry about yellow leaves that fall in spring or summer. This applies only to old leaves, near the base and in the interior of the plant. In Brazil, spring and summer run from September to March.
Clemson University, in the United States, places this shedding in late spring, when new leaves are emerging. The sign that it is normal shedding is this combination: a few old leaves dropping, the outside of the plant remaining green, and new shoots at the branch tips.
Outside of this pattern, leaf drop is a sign of trouble. New leaves falling, whole branches becoming bare (including lower ones), many leaves dropping at once, or an entire branch wilting call for a diagnosis. Yellow leaves still attached to the plant have causes that differ by the leaf's age and its underside. The guide to camellia with yellow leaves shows these differences.
How to tell if the camellia is still alive
Scratch the bark of a thin branch with a fingernail or a pocket knife. This is the branch test, which the RHS calls the scratch test in its guide on why trees and shrubs die. Green tissue under the bark indicates a live branch. Brown tissue indicates a dead branch.
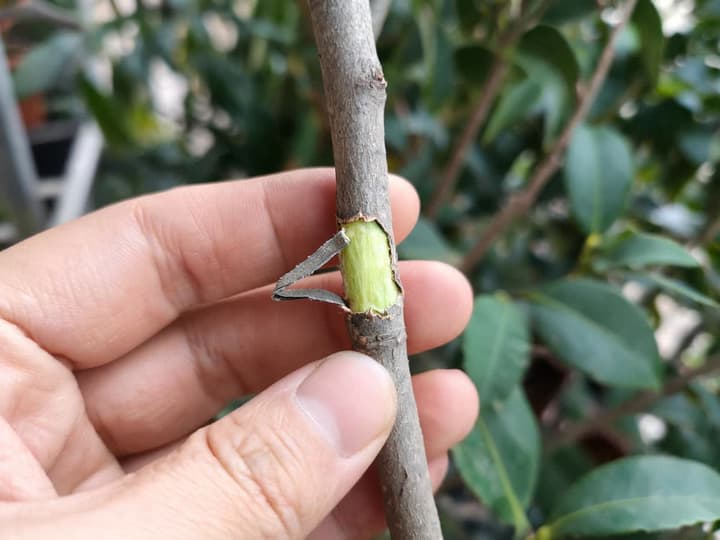
Perform the test in this order, as the RHS describes:
Scratch a thin stem near the tip. The bark of a living stem is usually smooth and firm; that of a dead stem peels away or is shriveled.
If the tip is brown inside, scratch a thicker branch closer to the trunk. The plant may have only lost its tips.
If almost the entire upper part is brown under the bark, scratch the trunk just below the soil line. A trunk that is dark inside, accompanied by mushy, rotten roots, indicates a dead plant.
With any sign of life (green under the bark or firm roots), the RHS recommends waiting before making a decision. The wait is a few months, or until the next growing season (when the camellia puts out new growth). If the plant keeps deteriorating or does not sprout during that season, consider it dead.
The roots also reveal whether the camellia is alive. Clemson describes healthy camellia roots as white. Roots attacked by rot turn reddish-brown to dark brown.
Why camellias drop leaves: what changed before the leaf drop
Many causes of leaf drop leave clues in what happened during the preceding weeks. Before handling the plant, answer these questions: is the soil waterlogged or dry? Was the plant recently purchased, moved, or caught in frost? Is the leaf drop occurring across the whole plant or on just one branch?
What you see | What happened before | Likely cause |
|---|---|---|
Yellow, limp leaves, soil constantly wet | Frequent watering, pot without drainage holes, or a full saucer | Root rot |
Wilted plant and dry soil in the center of the root ball (the block of soil and roots) | Top watering that runs down the edges of the pot | Dry root ball inside the pot |
Leaves dropping during the first weeks at home | The camellia recently came from a nursery or store | Environmental shock |
Leaves and buds dropping indoors | The pot was moved from a porch into a heated room | Heat and low light |
Brown or scorched leaves dropping | Frosty night, cold wind, or harsh sun following cold weather | Cold damage |
Only one branch has wilted, yellow leaves | Gray patch on the bark of that branch | Canker |
Leaves with yellow spots on top and scales on the underside | No change in watering, location, or weather | Scale insects |
Scorched leaf margins and heavy leaf drop | Recent fertilizing or fertilizer applied above label rates | Fertilizer burn |
Waterlogged roots: root rot in camellias
Root rot is one of the most serious diseases of camellias, according to Clemson. It is caused by Phytophthora cinnamomi, a fungus-like soil organism. The American Camellia Society (ACS), the camellia society of the United States, states that potted camellias are very susceptible. The disease is much more severe in poorly drained soil.
The ACS lists early signs: yellow, smaller, or limp leaves, dieback of branch tips, and flower buds that open slowly or drop. Later, the plant wilts, branches die back, and the entire camellia can die. Sometimes an apparently healthy plant wilts and dies in a matter of days during a hot, dry period. The plant dies rapidly because the roots had already been rotting during cool, wet weeks.
To confirm, pull the camellia out of its pot and examine the fine feeder roots along the edge of the root ball. White roots are healthy. Roots that are reddish-brown or dark brown are diseased, according to Clemson. Clemson also notes that root rot is difficult to control once infection begins.
If the roots are diseased, take these steps:
Stop watering, empty the saucer, and check that the pot's drainage holes are not blocked.
Do not reuse the soil or the pot from a diseased plant, as the ACS recommends. Use fresh soil and a different pot.
Repot into a pot of the same size, never into a significantly larger pot. The ACS explains that soil without roots in an oversized pot stays wet for prolonged periods and promotes rot.
After repotting, water only when the surface soil begins to dry out, as the RHS recommends for container plants.
Do not apply fertilizer until the plant produces new growth.
The ACS mentions soil drench products that protect roots against Phytophthora. They control the organism while they are being applied, but do not eradicate it: once applications stop, the disease can return. Clemson notes that all sasanqua camellia (Camellia sasanqua) varieties are resistant to root rot, whereas all japonica varieties are susceptible.
Dry root ball inside the pot
Dry soil also causes leaves to drop, even when you water frequently. The RHS explains that potting mix and root-ball soil can repel water instead of absorbing it. In that case, water runs down the sides while the core of the root ball stays dry.
To moisten the entire root ball, the RHS recommends adding a few drops of dish soap to the watering can. The soap helps the water penetrate the soil. Water until the moisture reaches throughout the entire root ball. Lift the pot before and after: thoroughly soaked, it feels significantly heavier. The RHS advises checking pot weight, because a light pot signals dry soil inside.
A newly planted camellia in the garden can also dry out for another reason. The RHS explains that roots planted pot-bound in the root ball, without anyone loosening them by hand, do not grow into the surrounding soil. During the first year, check the plant once a week. The RHS camellia growing guide instructs checking the soil at a depth of about 4 inches (10 cm). If it is dry there, water thoroughly.
Newly purchased camellia losing leaves
Camellias dropping leaves within their first few weeks at home may be suffering from environmental shock. The RHS describes plants moved straight from a nursery greenhouse into the garden. Their foliage can easily get scorched by wind, sun, or cold.
The RHS recommends hardening off the new plant gradually, over 2 to 3 weeks. Leave the camellia outdoors in a sheltered spot during the day. At night, bring it indoors or cover it. The warmer the place it came from, the more time it needs to adjust.
The first two years after planting carry the greatest risk, according to the RHS. During this phase the root system is still establishing, and waterlogging or drought kills the plant more easily. If the soil is neither waterlogged nor dry and the plant keeps losing leaves, unpot it and inspect the root system. Watering more or less cannot fix rotten roots.
Camellias indoors: heat, low light, and moving the pot
Indoors, the camellia suffers from warm nights and dry air. The International Camellia Society (ICS) is the international camellia society. It says that the warm, dry air of a heated home often causes leaves to drop. Over time, it can kill the plant.
The University of Connecticut (UConn) Extension quotes a camellia grower on wintering indoors. He recommends nights of at most 15 °C, preferably between −1 °C and 4 °C, in an unheated room. With warm nights, the buds drop. This range applies to a camellia kept indoors; a potted camellia exposed to frost outside is a different case. For light, UConn points to an east- or west-facing window.
No university has measured how much air humidity a camellia needs indoors. Two German-language gardening websites, Hortica (Germany) and Schweizer Garten (Switzerland), mention around 60% in winter, without citing a study. The safest option is to take care of heat and light, which have sources: move the pot to the coolest and brightest room in the house, away from heaters, fireplaces, and air vents.
No university has measured the effect of moving the pot on camellia leaves. The RHS describes a similar effect on plants leaving a nursery greenhouse: sudden changes in sun, wind, or cold scorch the leaves. Choose a permanent spot for the camellia before the buds appear and leave the pot there.
If the soil is moist, do not add more water simply because leaves are dropping. Adding water to a plant dormant from cold or shock only accelerates root rot. The guide on how to care for camellias covers light, acidic soil, and watering for potted and garden camellias. If flower buds are also falling, the guide on how to make camellias bloom breaks down the causes of bud drop.
Cold, frost, and wind causing leaf drop
Severe cold and wind scorch leaves, and the camellia drops the damaged foliage. The RHS lists root troubles, drought, frost, and harsh winds among the causes of browning, shedding leaves. The ICS notes that japonica tolerates extreme cold, especially if shielded from wind and already hardened off.
The greatest damage comes from a sudden drop below freezing. The ACS describes leaves that freeze and dry out in the morning sun right after frost. The plant may lose some or all of its leaves. The solution the ACS provides is to shade the camellia during the cold months.
The ICS points out two camellia vulnerabilities in cold weather. New autumn growth caused by late fertilization freezes, drops its leaves, and dies. The roots of a potted camellia are more exposed to the cold than those of a camellia planted in the ground, especially in waterlogged soil.
Leaves discolored by the cold usually recover in spring, according to the ICS. In contrast, brown branch tips and branches do not recover, according to Penn State Extension. Perform the scratch test, wait for new growth, and cut only what remains brown on the inside. The guide on winter camellia care shows how to protect potted and garden plants before the next frost.
Heat scorches too. The RHS notes that after a heatwave, camellia leaves can develop large brown patches that look scorched. Severely damaged leaves can be removed, but usually no action is needed.
An entire branch dying back: camellia canker
When only one branch loses its leaves, suspect canker, a fungal disease that causes the bark to sink and dries out the branch. Clemson ranks canker among the three most serious camellia diseases in South Carolina. The other two are root rot and flower blight. Canker is caused by the fungus Glomerella cingulata.
The symptoms, according to Clemson, are these:
The leaves on a branch suddenly turn yellow and wilt.
The branch tip dries out.
Grayish lesions appear on the bark.
A sunken canker develops on the bark, which can girdle the entire branch and kill everything above it.
Symptoms worsen during hot, dry weather.
To treat it, Clemson advises pruning diseased branches several inches (8 cm or more) below the affected area. Disinfect pruners between cuts with 1 part bleach to 9 parts water. Clemson also notes copper-based fungicide during wet spells and leaf-drop periods. The fungicide shields the leaf scars left behind when foliage falls.
Pests that cause leaf drop: scale and spider mites
Scale insects feed on camellia sap and, in heavy infestations, trigger leaf drop. Clemson lists yellow spots on upper leaf surfaces, foliage loss, branch dieback, and eventual plant death. Tea scale (Fiorinia theae) is the most serious on camellias: it anchors to the leaf underside in elongated scales roughly 1 mm long.
With light infestations, Clemson recommends scraping scale off by hand and removing severely infested leaves. The RHS cites another common camellia scale that coats leaves black with a fungus called sooty mold. Spider mites are the other pest: tiny creatures living on leaf undersides that cause bronzed, rust-colored speckling on top. According to the University of Florida, two-spotted spider mite damage typically surges in hot, dry weather. The guide to camellia with yellow leaves explains how to identify both pests from leaf undersides and how to manage them.
Bloom (available for iOS) matches a photo of a spotted leaf against pest and disease symptoms. Photo diagnosis is included in the Premium plan.
Excess fertilizer and fertilizer as emergency aid
Over-fertilizing also causes leaf drop. The Clemson camellia factsheet states that scorched leaf margins and heavy leaf drop often indicate excess fertilizer. If the soil is not waterlogged, the ICS recommends watering thoroughly to flush out excess fertilizer. If the plant loses all its leaves, do not throw it away: the ICS says it can produce new growth once the soil normalizes.
Do not fertilize a camellia that is dropping leaves. The ICS compares this to serving a three-course meal to someone who is critically ill. First identify and resolve the issue, and withhold fertilizer until the plant produces new growth.
How to save the camellia step by step
Perform the scratch test on a thin branch and, if it shows brown, test a thicker branch. Green beneath the bark means the camellia is alive.
Check the soil. In containers, feel the surface soil and lift the pot to gauge its weight. In the garden, dig 10 cm (4 in) deep with a hand trowel. Waterlogged: follow the root rot instructions. Dry: soak the entire root ball.
If the soil was waterlogged or the leaf drop lacks an obvious trigger, slide the plant from its container and inspect the root system. White roots are healthy; brown, mushy roots are rotted.
Consider what changed over recent weeks: new purchase, relocation, frost, or fertilizer. Address that trigger first.
Turn several leaves over and check their undersides. Attached crusts or scales point to scale insects.
Do not fertilize and do not upsize the pot while the plant is shedding leaves.
Prune away only branches that test brown during the scratch test. Cut back below the dead tissue to where scratched bark reveals green.
Wait for new growth. If the plant keeps declining or fails to bud out in the next growing season, the RHS suggests considering it lost.
Frequently asked questions
What should I do when camellia leaves turn brown?
First determine the underlying cause. The RHS includes root troubles, drought, frost, and harsh winds among causes of brown leaves, and damaged foliage can fall. Broad brown patches appearing after heatwaves are heat scorch. Brown margins following feeding indicate overfertilization, according to the ICS and Clemson.
Should I cut off bare camellia branches?
Only if they are dead. Scratch the bark: wood that shows green underneath is alive and can leaf out again, so leave it on the plant. Stems that are brown inside will not recover, according to Penn State. Prune dead branches back below the brown tissue to where scratched bark reveals green, then wait for new growth.
Can a completely defoliated camellia still sprout?
Yes, provided the stems remain green under the bark. The ICS notes that a camellia defoliated by excess fertilizer can put out new foliage once the soil balances out. The RHS recommends waiting a few months, or until the next growing season, before discarding a plant that retains signs of life.
Can I fertilize a camellia that is losing leaves?
No. The ICS compares fertilizing an ailing camellia to serving a heavy three-course dinner to a critically sick patient. When roots are rotted or dehydrated, the plant cannot absorb nutrients, and excess fertilizer burns leaf edges. Pinpoint the root issue, resolve it, and wait to fertilize until active growth resumes.
What to do today for a camellia losing leaves
Scratch a branch. If it is green under the bark, the camellia is alive. Then check the soil and the weight of the pot, and if the leaf drop is unexplained, inspect the roots. A few old leaves from the interior falling between September and March in Brazil, along with new shoots, are normal shedding. In that case, there is nothing to fix.
If the soil is soggy, address the root system before attempting anything else. If the camellia was moved, recently bought, or hit by frost, place it in a cool, bright, sheltered spot and withhold fertilizer. If only one branch is withering, prune back below the affected tissue.
Related articles
How to Care for Hibiscus: Sun, Watering, Fertilizer, and Pruning for Flowers
How to care for hibiscus: 6 hours of direct sun, evenly moist soil without waterlogging, half-strength fertilizer in spring and summer, and pruning in early spring. Find out why the flower lasts one day and why buds drop before opening.
Do Ferns Like Sun or Shade? It Depends on the Type
Ferns prefer bright shade: plenty of light, but no direct sun on their fronds. Tuberous sword fern is the exception that handles sun. Here is the ideal light for each type, where to place pots, and how fronds show too much or too little light.
African Violet Yellow Leaves: Causes and What to Do
Yellow leaves on an African violet usually stem from overwatering, and the first place to check is the center of the plant. Losing one lower leaf at a time is normal. Identify whether age, watering, cold water, sunlight, cold drafts, or fertilizer is the culprit based on the yellowing pattern, and see what to do today.