Camellia Leaves Turning Yellow: Causes and What to Do
Yellow camellia leaves in spring, only on older inner leaves, are part of normal leaf drop. Otherwise, leaf age, the undersides, the soil, and sun exposure help pinpoint pH, roots, scale, and sunburn.
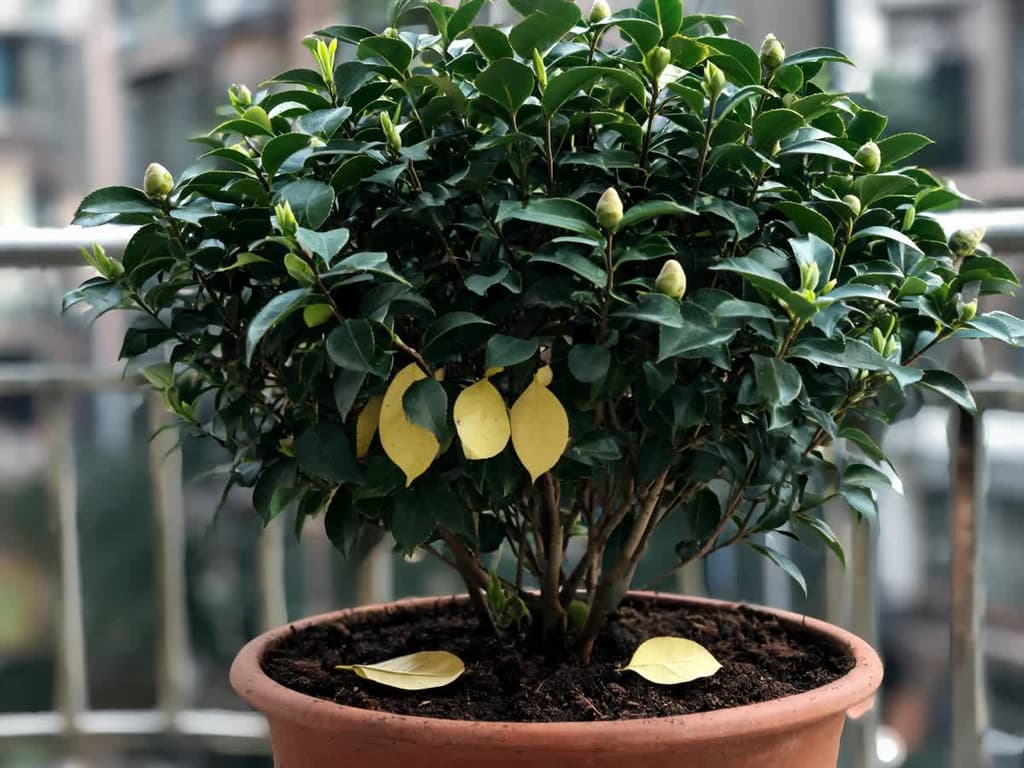
Camellia leaves turning yellow in spring is usually normal leaf shed. The yellowing affects only a few older leaves inside the plant, close to the trunk. The plant stays green on the outside and keeps putting out fresh growth. Outside this pattern, yellowing comes from a nutrient deficiency, low-acid soil, waterlogged roots, scale, or overly harsh sun.
This guide covers the common camellia (Camellia japonica), the one from the camellia care guide, grown in the garden or in a large container. To pinpoint the cause, check four things in this order: the age of the yellow leaf, its underside, the soil, and the side of the plant where the yellow appears.
If you inherited the shrub with your home and aren't sure whether it's a camellia, Bloom (available for iOS) identifies plants from a photo. On the Premium plan, the app also compares leaf photos with symptoms of pests and diseases.
Quick summary:
A few older inner leaves turning yellow evenly between September and March (spring and summer in Brazil), with green new growth, is normal leaf shed. Do not fertilize and do not cut branches.
Older leaves turning yellow between the veins (the raised lines on the leaf) or along the margins indicate magnesium deficiency. Confirm with a soil test (sending soil to a lab) before applying Epsom salt (magnesium sulfate).
New leaves turning yellow with green veins indicate chlorosis (yellowing caused by nutrient deficiency) triggered by soil that is not acidic enough. Measure the pH, which indicates soil acidity: camellias need between 5.5 and 6.5.
An entire plant yellowing and wilting while the soil is wet points to root rot. Fix the drainage before applying any fertilizer.
Yellow spots on the upper leaf surface paired with brown scales or a white cottony mass underneath indicate scale insects. Apply oil to the undersides of the leaves 2 to 3 times, spaced 7 to 10 days apart.
Camellia with yellow leaves: what each pattern indicates
What you see | Where to check | Likely cause | First step |
|---|---|---|---|
Few older inner leaves evenly yellow, from September to March (in Brazil) | Green new growth | Normal leaf drop | None. Let the leaves fall. |
Older leaves yellowing between veins or along the margins | New leaves green | Magnesium deficiency | Soil test before applying Epsom salt. |
Entire plant turning pale, older leaves more yellow, stalled growth | Soil and roots healthy | Nitrogen deficiency | Acid-loving plant fertilizer, at the label rate. |
New leaves yellow with green veins | Soil pH above 6.5 | Chlorosis from soil that isn't acidic enough | Correct pH; in containers, fresh potting mix for acid-loving plants. |
Yellow spots on the upper leaf surface | Scales or white cottony mass on the underside | Scale insects | Horticultural oil on leaf undersides, 2 to 3 applications. |
Light stippling and bronzed leaves | Tiny moving specks on white paper | Spider mites | Insecticidal soap or plant-safe oil on leaf undersides. |
Entire plant yellowing and wilting | Waterlogged soil, reddish-brown roots | Root rot | Stop watering and fix drainage. |
Yellowing and bronzing on one side only | Side facing afternoon sun | Sunburn | Partial shade; scorched leaves will not recover. |
Irregular yellow mottling on a few branches | Plant blooming normally | Virus | Do not take cuttings from affected branches. |
The camellia yellow leaves causes page includes photos and treatment steps for the pests and diseases on this list.
The age of the yellow leaf: old, new, or the whole plant
A first look separates old leaves from new ones. Older leaves sit in the interior and along the lower parts of the branches. New leaves sit at the branch tips and appear lighter and glossier.
Older inner leaves yellowing in spring: normal leaf drop
The camellia keeps leaves year-round, but each leaf has a limited lifespan. The Royal Horticultural Society (RHS), the UK horticultural society, notes that camellias shed old leaves periodically. The RHS advises not to worry if the yellowing stays on old leaves at the base and interior, in spring or summer.
The Clemson University Home & Garden Information Center, in the United States, places this drop in late spring, as new foliage emerges. In Brazil, late spring falls in November and December. Since the RHS also includes summer, normal leaf drop can occur from September to March, peaking in November and December.
Three signs confirm normal leaf drop. The yellowing is uniform, without spots. The yellow leaves sit in the interior of the plant. The branch tips display green new shoots or leaves. In this case, do not fertilize, and do not prune. The yellow leaf drops on its own: leave it on the branch.
Older leaf yellow between the veins or along the edge: magnesium deficiency
Magnesium deficiency also starts on older leaves, which is why people confuse it with normal leaf drop. The difference lies in the yellowing pattern. With magnesium deficiency, older leaves yellow between the veins or along the margins while the veins stay green, according to Clemson. In severe cases, leaves drop prematurely.
Clemson warns not to confuse this drop with normal late-spring leaf shed. UF/IFAS, the University of Florida extension, states that magnesium deficiency is the most common nutrient deficiency in camellias in that state. According to Clemson, the cause is usually too much calcium or potassium in the soil.
Clemson recommends fertilizing based on a soil test. Once magnesium deficiency is confirmed, use 1 tablespoon of Epsom salt (magnesium sulfate) per 1 gallon (3.8 liters) of water. Without a soil test, Epsom salt might not solve anything, because the yellowing could stem from another cause. The consulted sources do not specify how often to repeat this. To be safe, drench the soil around the trunk with the mixture once and wait for new growth before applying it again.
The whole plant turning pale and growing slowly: nitrogen deficiency
When the entire camellia turns pale green and the older leaves become yellower than the new ones, suspect nitrogen deficiency. UF/IFAS describes this pattern: uniform yellowing across the entire leaf, most pronounced on older leaves. As the deficiency worsens, the whole plant turns pale green or yellow and growth slows dramatically.
Yellowing from nitrogen deficiency is uniform, without any vein pattern. The difference from normal leaf drop is the scope. Normal drop affects just a few interior leaves, whereas nitrogen deficiency impacts the entire plant. Fertilize only after confirming the soil is not waterlogged. Use a fertilizer formulated for acid-loving plants (the same kind used for azaleas), following the package rate.
New leaf yellow with green veins: chlorosis from low-acid soil
Chlorosis is the yellowing of foliage caused by a nutrient deficiency. In camellias, chlorosis from soil that is not acidic enough shows up as yellowing between the veins, which remain green. To tell it apart from magnesium deficiency, look at leaf age. Magnesium affects older leaves (Clemson). Iron deficiency typically appears on new leaves at branch tips. The RHS explains that camellias are acid-loving plants. In alkaline soil (the opposite of acidic), they suffer from iron and manganese deficiencies.
pH measures soil acidity on a scale where 7 is neutral. Below 7 the soil is acidic, and above 7 it is alkaline. The NC State Extension camellia profile indicates slightly acidic soil, with a pH between 5.5 and 6.5. A simple pH test kit, sold at garden centers, shows whether the soil in your container or garden bed is between 5.5 and 6.5.
In containers, pH rises over time when tap water is hard (rich in lime). The RHS recommends avoiding prolonged watering with tap water in hard-water areas. One sign of hard water is the white limescale crust it leaves on faucets and showerheads. If your water is like this, water your potted camellia with rainwater.
Treatment depends on where the plant is growing:
In containers: replace the potting mix with an ericaceous mix formulated for acid-loving plants, the same mix used for azaleas. The RHS recommends containers with this soil for gardeners with alkaline garden soil.
In the garden: apply an acid-loving plant fertilizer according to the label directions. Chelated iron (iron in a form roots can absorb even in less acidic soil) helps correct chlorosis. The RHS cautions that it is expensive and requires yearly reapplication.
To lower garden bed pH: sulfur powder lowers pH gradually because soil bacteria convert it to acid. The Clemson University Extension states that this can take several months and that the application rate comes from a soil test.
Azaleas are acid-loving plants just like camellias and show the exact same yellowing between green veins. The guide to yellow leaves on azaleas covers how to lower container soil pH in detail.
The underside of the leaf: scale and mites
The second step is checking under the foliage. Turn over 5 or 6 yellow leaves from different branches and inspect their undersides under good lighting. Pests that suck camellia sap live underneath and create yellow patches on the upper surface.
Yellow spots on top and white fuzz underneath: scale insects
Tea scale (Fiorinia theae) is the most serious scale insect affecting camellias, according to Clemson. It lives attached to the leaf underside, protected under a waxy armor coating or scale. The female measures just over 1 mm, has an elongated shape, and is dark brown, gray, or nearly black. The male is white.
The sign on the upper leaf surface is yellow blotching. On the underside, the scales form a white, cottony covering during heavy infestations. UF/IFAS notes that severely infested plants grow poorly, drop leaves, and suffer branch dieback. This scale rarely disappears on its own.
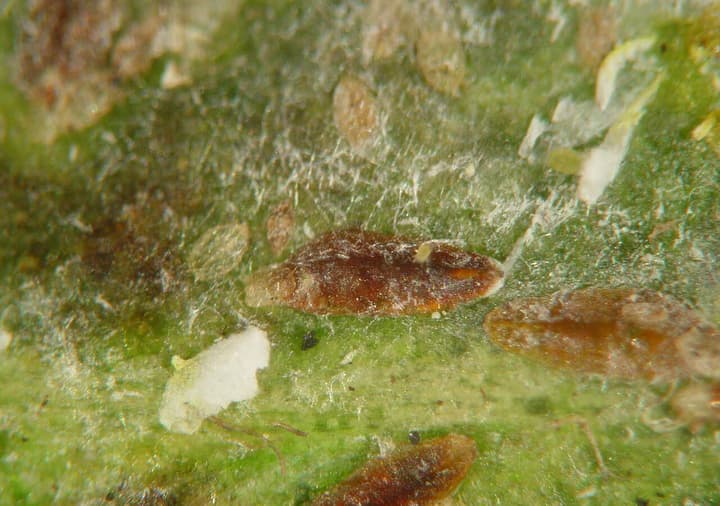
Control involves four steps, according to UF/IFAS and Clemson:
Scrape off scales by hand during light infestations and prune off heavily infested leaves. Dispose of them in the trash, well away from the plant.
After blooming finishes, prune out thin, non-flowering shoots from the center of the plant. Opening up the shrub helps the oil spray reach leaf undersides.
Apply horticultural oil according to label rates, coating the undersides of the leaves thoroughly. Apply only when temperatures are between 45 and 85 °F (7 and 29 °C). Water the plant beforehand if the soil is dry.
Repeat the oil spray 2 to 3 times, spacing applications 7 to 10 days apart.
The oil can also burn the foliage. The University of Maryland Extension states that the risk of damage is high above 85 °F (29 °C). Damage also occurs during cloudy, rainy, or very humid weather, because the oil dries more slowly. The same extension warns not to apply it to a drought-stressed plant: water beforehand and wait for the plant to recover.
A black coating on leaves that wipes away with a damp cloth is sooty mold. Sooty mold is a fungus that grows on the sugary honeydew secreted by certain sap-sucking insects. The RHS notes that it does not directly attack plant tissue, but it blocks sunlight from reaching the leaf. Control the scale insects and clean the leaves with a damp cloth.
The guide to scale insects on plants covers other scale species that attack indoor and garden plants.
Pale stippling and bronzed foliage: spider mites
Mites cause the upper surface of the leaf to develop pale stippling or a bronze cast, according to UF/IFAS. A mite is an eight-legged spider relative, nearly invisible to the naked eye, that lives on leaf undersides. To confirm, tap a branch over a sheet of white paper: mites drop down and appear as moving specks.
UF/IFAS states that red mites favor cool, humid conditions, while two-spotted spider mites prefer hot, dry weather. UF/IFAS suggests starting with strong blasts of water from a garden hose several times. If that fails, apply insecticidal soap or horticultural oil to the undersides of the leaves following the label rates. The same temperature threshold for treating scale applies: 45 to 85 °F (7 to 29 °C). The guide to spider mites details how to repeat treatments until the pest is gone.
Soil and roots: waterlogging and root rot
The third check is beneath the soil. Stick your finger 2 inches (5 cm) deep into the soil near the trunk. Wet soil at that depth days after the last watering, alongside a yellowing, wilting plant, points to a root problem.
Uniformly yellow leaves with waterlogged soil: root rot
Camellia root rot is caused by Phytophthora cinnamomi, a soil-borne fungus-like organism. According to Clemson, symptoms include uniform yellowing across leaves, weak growth, and entire-plant wilting. Diseased roots turn reddish-brown or dark brown, whereas healthy roots remain white.
UF/IFAS notes that older leaves turn yellow first. Foliage becomes pale green, resembling nutrient deficiency, before yellowing, wilting, and dropping. The disease develops in soggy soil, on plants set too deep, and under poor drainage. Symptoms often surface only when hot weather arrives and the plant requires more root support.
Fertilizer will not fix this yellowing because damaged roots cannot take up nutrients. To check, lift the plant from its container or gently dig down to the feeder roots near the base. White, firm roots are healthy. Roots that are brown, mushy, and slip their outer sheaths when pulled are rotted.
The two extensions disagree on fungicides. Clemson says fungicides only prevent infection and will not cure an already infected plant. UF/IFAS says a registered fungicide helps if you catch the problem early and correct drainage. Both agree that drainage comes first. To be safe, treat fungicide as a supplement at the label rate, not a cure. Start with drainage:
In containers: stop watering until the top 2 inches (5 cm) of potting mix dry out. Remove standing water from saucers and ensure the drainage hole flows freely.
In the garden: Clemson recommends raised planting beds (soil mounded above grade) in ground that holds excess water. When planting or transplanting, set the top of the root ball level with the surrounding ground without burying the trunk.
Clemson notes that all Camellia japonica cultivars are susceptible, whereas all Camellia sasanqua varieties are resistant. Where root rot has killed a camellia, Clemson advises planting sasanqua or a grafted japonica whose rootstock is sasanqua.
Dry, crumbling soil at a 2-inch (5 cm) depth paired with wilted leaves points to the opposite problem: underwatering. Clemson notes that watering is the single most critical factor for camellias in their first months after planting. UF/IFAS recommends regular irrigation throughout the first year. For container plants, water until it runs out the bottom and recheck the soil in 2 days. In the garden, soak the base around the trunk slowly and check soil moisture at 2 inches (5 cm) after 2 days.
A newly purchased potted camellia that starts yellowing within weeks calls for both checks: the soil at 2 inches (5 cm) and the root system. UF/IFAS recommends inspecting roots before purchase, and Clemson recommends buying only plants free of yellow or wilting leaves. The camellia care sheet classifies the species as an outdoor, partial-shade plant, not recommended for growing indoors.
A plant that has dropped nearly all its foliage and has brittle, dead branches may be dying. Before attempting to save it, check whether the roots still retain any white, viable tissue.
Branch patterns and plant orientation: harsh sun and viruses
The fourth check looks at the entire shrub from a distance. Notice whether yellowing is widespread or clustered on one side or along specific branches.
Yellowing and bronzing limited to the sunny side: sunburn
Sunburn occurs when camellias receive excessive direct sun, particularly afternoon sun, according to Clemson. Leaves develop scorched or bronzed patches, concentrated exclusively on the sun-exposed side of the plant. Secondary leaf-spotting fungi can invade sun-damaged foliage later on.
Clemson points out three risk factors: full sun, plants placed against a wall, and moving directly from shade into sun. In Brazil, the highest-risk wall faces north or west. NC State recommends shade or partial shade for camellias.
Clemson states that leaves that have turned brown will not recover. Provide partial shade: relocate the container to an area with dappled light or, in the garden, shield the exposed side with shade cloth. Wait for fresh growth. UF/IFAS mentions that some sasanqua varieties tolerate more sun provided they receive adequate irrigation.
Irregular yellow blotches on scattered branches: virus
Camellia yellow mottle virus creates irregular yellow patterns or variegation on the foliage, according to Clemson. In some cases, whole leaves turn yellow. The RHS notes that infected plants usually continue growing and flowering normally.
The virus spreads between plants through grafting and cuttings taken from infected stock. Clemson notes there is no chemical control. Do not propagate from mottled branches, and prune out those stems only if the yellowing bothers you visually.
Frequently asked questions
Will fertilizer fix a camellia with yellow leaves?
Only when the underlying issue is a nutrient deficiency and the root system is healthy. UF/IFAS notes that root rot turns foliage pale green, mimicking nutrient deficiencies. Diseased roots cannot absorb nutrients. Check the soil moisture and roots before applying fertilizer, and use a formula for acid-loving plants at the label rate.
Does Epsom salt fix yellow leaves on camellias?
Only if the cause is magnesium deficiency, where older leaves show yellowing between the veins or around the edges. Clemson recommends confirming the deficiency with a soil test first, then applying 1 tablespoon of Epsom salt dissolved in 1 gallon (3.8 liters) of water. For new-leaf chlorosis or root rot, Epsom salt will not help.
Should I pull off yellow camellia leaves?
During normal leaf drop, leave them alone: older leaves fall on their own. For scale infestations, Clemson recommends pruning and discarding heavily infested leaves. For sunburn or virus infections, yellow foliage can stay on the bush, as removing it does not change the underlying cause.
Can neem oil make a camellia turn more yellow?
Yes, if applied during hot weather or to a drought-stressed plant. Neem is one of the plant-derived oils listed by the University of Maryland Extension. With these oils, the risk of foliage burn is high above 85 °F (29 °C). The extension advises spot-testing a small area and watching it for 1 to 2 days before spraying the whole plant.
Will yellow camellia leaves turn green again?
Sunburned leaves that have turned brown will not recover, according to Clemson. For other issues, the sign that treatment worked is fresh, healthy green leaves emerging at branch tips. Older leaves that have already yellowed usually drop.
What to do today for your yellowing camellia
Check four things in this order: leaf age, the underside, the soil at 2 inches (5 cm), and which side is yellow. If it is only a few older leaves inside the plant, between September and March in Brazil, with green new shoots, it is normal shed and there is nothing to fix.
If new growth is yellow with green veins, test the soil pH before applying fertilizer. If leaf undersides show scale armor or white masses, begin horticultural oil treatments. If the soil is waterlogged, fix drainage before attempting anything else. The guide to yellow leaves on potted plants covers general causes across other indoor and patio plants.
Related articles
How to Care for Hibiscus: Sun, Watering, Fertilizer, and Pruning for Flowers
How to care for hibiscus: 6 hours of direct sun, evenly moist soil without waterlogging, half-strength fertilizer in spring and summer, and pruning in early spring. Find out why the flower lasts one day and why buds drop before opening.
Do Ferns Like Sun or Shade? It Depends on the Type
Ferns prefer bright shade: plenty of light, but no direct sun on their fronds. Tuberous sword fern is the exception that handles sun. Here is the ideal light for each type, where to place pots, and how fronds show too much or too little light.
African Violet Yellow Leaves: Causes and What to Do
Yellow leaves on an African violet usually stem from overwatering, and the first place to check is the center of the plant. Losing one lower leaf at a time is normal. Identify whether age, watering, cold water, sunlight, cold drafts, or fertilizer is the culprit based on the yellowing pattern, and see what to do today.