How to Prune a Snake Plant: Which Leaves to Cut, Where, and How Much
To prune a snake plant, cut the entire leaf flush with the soil using a clean knife, removing at most 1/4 of the leaves at once. See what to do with soft, bent, dry-tipped, or overgrown leaves.
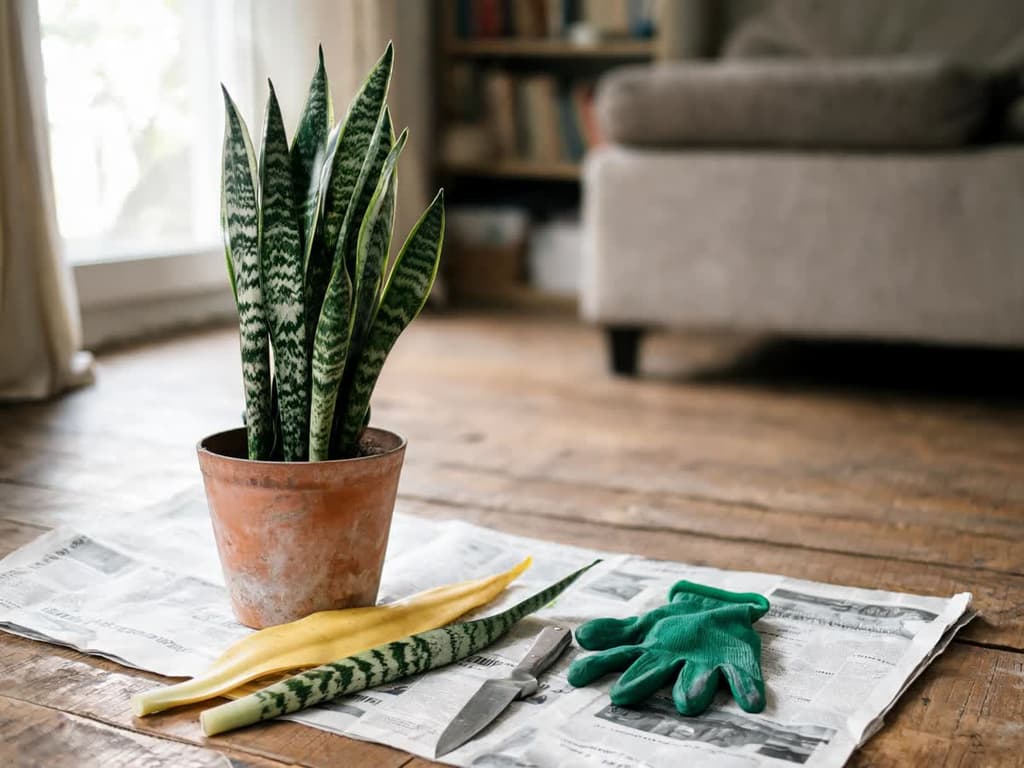
To prune a snake plant, cut the entire leaf flush with the soil using a clean knife or pruning shears. You do not prune a snake plant like a shrub: it has no branches, and each leaf emerges straight from the base. Because of that, pruning means removing the leaves one by one. Cutting off a single leaf does not harm the rest of the plant.
The snake plant (Dracaena trifasciata, formerly called Sansevieria trifasciata) does not need routine pruning, according to the Royal Horticultural Society (RHS). Pruning serves to remove damaged, soft, bent, or overly tall leaves. New leaves emerge from the rhizome, the thick stem that runs horizontally underground.
Quick summary:
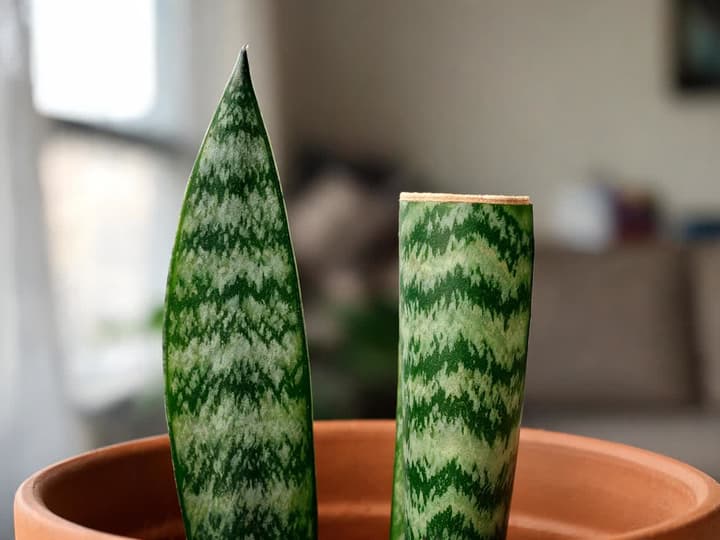
To remove a leaf, cut the entire leaf flush with the soil. A leaf cut in the middle will never form a tip again.
Remove no more than 1/4 of the plant's total leaf area at one time, as advised by the New York Botanical Garden (NYBG).
A leaf with a soft, dark base indicates rot: cut it today and check the roots on the very same day.
A dry tip on an otherwise firm leaf can stay. The leaf continues to feed the plant.
To shorten a snake plant that is too tall, cut the tallest leaves at the base or, in spring, repot only the fresh center into a smaller pot.
The best time in Brazil is from September to November. Cut soft leaves in any month.
Which snake plant leaves to cut and which to leave
Cut any leaf that is soft, broken, bent, or too tall for its space. Keep firm, green leaves, even if they have a dry tip or a brown edge. Before cutting, squeeze the base of the leaf between your fingers: a soft base signals rot, while a firm base shows the leaf is not rotting.
What you see on the leaf | What it is | What to do |
|---|---|---|
Soft, dark, or black base, sometimes with a foul odor | Rot | Cut the entire leaf today flush with the soil, and inspect the roots |
Yellow, soft leaf | Excess water, the most common cause | Cut flush with the soil and let the soil dry out before watering again |
An old leaf on the outside of the plant slowly turning yellow, with a firm base | An old leaf reaching the end of its life | Cut flush with the soil once it dries out |
Leaf bent or broken in the middle | Leaf damaged by an impact, weight, or bending | Cut flush with the soil whenever you no longer want to see the crease |
Flopped leaf, without a crease | Low light or an overly tall, heavy leaf | Cut flush with the soil and move the plant to brighter light; staking is the other option |
Dry tip or brown margin, firm leaf | Old damage that will not heal | You can leave it; trimming the tip is optional |
Leaf too tall for its location | Normal growth | Cut the tallest leaves flush with the soil |
Yellow leaves have multiple causes beyond watering, and each one calls for a different response. The guide on yellow leaves on snake plants covers cold temperatures, harsh direct sun, fungi, and the natural yellow margins of specific varieties.
The adult snake plant care profile, covering watering, light, and temperature:
Why a snake plant leaf cut in the middle does not grow back
A snake plant leaf cut in the middle will never grow a new tip. The New York Botanical Garden explains that when the tip breaks, the leaf may stop growing altogether. In practice, the cut top remains blunt and flat for as long as the leaf lives.
The new leaf emerges from the rhizome, underground, not from the cut leaf. A production guide from the University of Florida (UF/IFAS) records this regrowth in commercial plantings. In Florida commercial beds, cold or hail sometimes damages the leaves. In that case, growers cut everything down to 5 cm (2 inches) above the ground to renew the bed.
Those Florida fields are open-air commercial operations, not a living room pot. Cutting all the leaves down to the ground is not recommended for houseplants. At home, the limit of 1/4 of the foliage at one time remains in effect.
Each snake plant leaf typically lasts for many years without drying out or turning brown, according to the RHS. A leaf cut in half will spend all those years with a severed top. For that reason, growers who do not want to see that flat edge cut the entire leaf flush with the soil.
How to prune a snake plant, step by step
Gather a smooth-edged knife or pruning shears, rubbing alcohol, gloves, and newspaper to protect the floor. The RHS recommends gloves because snake plant sap can irritate the skin.
Clean the blade. The NYBG advises using sterile tools. Wipe the blade with rubbing alcohol before you begin, and wipe it again between plants.
Part the neighboring leaves to reach the base of the leaf you are removing, right where it meets the soil.
Cut the leaf flush with the soil, right above the surface, in a single cut. The extension service (public outreach) at Penn State University advises cutting the damaged leaf at the soil level.
Let the cut dry. The NYBG recommends keeping the cut dry while it forms a protective seal, or callus. The NYBG does not specify how many days callusing takes: until your next regular watering, avoid splashing water onto the cut or into the center of the plant.
Clean up all trimmings immediately, keeping them away from dogs and cats: the plant is toxic to pets.
The short stub left behind dries out and stays on the plant, notes the NYBG. That stub will not grow anymore and can simply remain where it is.
When to water a snake plant after pruning
Water only when the soil dries out, exactly as you would without pruning. None of the consulted sources prescribe a specific waiting period after cutting. The NYBG simply asks that you keep the cut dry while it heals over. Watering the soil directly, away from the center of the rosette (the cluster of leaves emerging from a single point), helps keep the wound dry. The complete routine is detailed in the guide on how to water a snake plant.
How much of a snake plant you can cut at once
Remove at most 1/4 of the plant's leaf area at a time, as directed by the New York Botanical Garden. On a snake plant with 12 similar-sized leaves, that means up to 3 leaves at a time. If you want to remove more, wait for new leaves to grow and remove the old ones gradually, over the seasons.
This rule applies to pruning for aesthetics and size control. Soft leaves are a different case: remove them entirely the very day you spot them, even if you exceed the 1/4 limit, because rot will spread through the leaf and can reach the rhizome.
Soft, black base on a snake plant: remove the entire leaf today
A leaf with a soft, dark, or blackened base cannot simply be trimmed back: remove the entire leaf flush with the soil that very day. Soft tissue never recovers, and cutting off just the top leaves the rot right at the base next to the rhizome. After making the cut, examine the root system.
The University of Florida guide describes bacterial soft rot caused by Erwinia on leaf cuttings: the lower section turns mushy, sometimes giving off a foul, fishy odor. The same guide links this rot to water sitting on the foliage and excessively wet potting mix.
None of the consulted sources details a step-by-step rescue process. The steps below are the safest option for the plant:
Cut the soft leaf flush with the soil. If the stub left in the pot is still mushy, gently excavate around it and slice back until you reach firm, pale tissue.
Take the plant out of its pot and inspect the roots and rhizome. Healthy roots are firm and pale; rotted roots are soft, dark, and fall apart easily.
Prune away any rotted roots and mushy sections of rhizome. Sanitize the blade with rubbing alcohol after each cut into decayed tissue.
Repot whatever firm sections remain into dry soil and wait for the soil to dry before the first watering.
If the entire rhizome has turned to mush, salvage any leaves that are still firm. You can propagate each one as a cutting.
Two separate issues produce the same soft base: bacterial soft rot and root rot from overwatering. Photo diagnosis in Bloom (available for iOS) pinpoints which one you are dealing with on the Premium plan. The summary below outlines how to manage bacterial soft rot in snake plants:
Snake plant leaves bent, broken, or flopping over
A leaf creased in half will never stand upright again: the bend remains permanent. If the bent leaf stays green and firm, you can leave it alone until you no longer want to look at the crease. When that time comes, cut the entire leaf off flush with the soil.
A leaf that has merely flopped over without creasing has two solutions according to the sources:
Stake it. The RHS suggests using a wire ring or bamboo stakes tied with twine to prop up drooping foliage.
Prune it. The NYBG states that an excessively long leaf that cannot support itself can be cut off flush with the soil, up to 1/4 of the plant's leaf area at a time.
Both sources carry equal weight. This guide follows the NYBG approach of pruning, because staking only props the leaf up while the lack of light persists. The RHS recommends staking for those who prefer to keep the leaf intact.
According to the NYBG, leaves flop over because of insufficient light or overwatering, while the RHS highlights low light. The NYBG explains that snake plants grow weak and leggy in dim locations, as well as when watered and fertilized through the winter. In a brighter spot, new leaves emerge sturdy and upright. The guide on light requirements for snake plants details how far from a window the plant needs to be to grow firm foliage.
If the entire plant is leaning rather than just a single leaf, the RHS advises checking the roots. A whole plant tilting over can indicate root rot.
Dry tips on snake plants: trim or leave alone
The dry tip can stay on the leaf. The University of Maryland Extension, in a response to a reader, explains that the brown edge does not heal. The same response states that a leaf with a brown edge still feeds the plant. Because of that, there is no rush: cut the entire leaf only when it is dried out or excessively brown.
Trimming just the tip is purely an aesthetic choice. If the brown tip bothers you, trim it with clean shears following the natural contour of the leaf, cutting in a V-shape so the leaf retains a pointed look. Leave a sliver of 1 to 2 mm of dry tissue along the cut line to avoid opening a fresh wound in the green flesh. This practice comes from commercial nursery routines: none of the consulted institutional sources have measured whether that dry margin prevents the tip from browning again.
After being trimmed, the leaf may stop growing taller. The NYBG notes this behavior for broken tips, though no research has measured it on trimmed tips. The rest of the leaf remains firm and green.
A dry tip has an underlying cause, and scissors do not fix that cause. The guide on dry tips on snake plants lists cold temperatures, intense sun, overfertilization, and spider mites. If brown margins show up only on the oldest, outermost leaves, Maryland Extension considers it normal aging.
Overgrown snake plants: how to reduce their size
There are two ways to downsize a snake plant that has grown too tall: cut out the tallest leaves or repot just the new center rosette. Snake plants can reach up to 1.2 m (4 feet) in height, according to Penn State. Pruned leaves are not quickly replaced because snake plants grow slowly.
Cut the tallest leaves. Cut any leaves that exceed your desired height flush with the soil, up to 1/4 of the plant's total leaf area at a time. If more than 1/4 of the foliage is too tall, repot just the younger center. Do not cut leaves in half to lower their height: they will stay flat-topped and never regenerate a pointed tip.
Repot just the new center. The NYBG outlines this method for plants that already boast a vigorous young rosette in the middle. During spring repotting, divide away the older sections of the plant along with their roots. Pot only the fresh center, with its own roots, into a smaller container with drainage holes. A smaller pot keeps the plant root-bound, which snake plants prefer.
During that same spring repotting, the RHS also details dividing the clump (the group of rosettes sharing the pot). Unpot the plant and pull or cut the clump into sections, each containing foliage and healthy roots. Discard damaged or dead portions. Move each division into its own pot filled with fast-draining potting mix, as described in the guide on the best soil mix for snake plants.
A tall, floppy snake plant that falls over usually developed that way from low light or too much water. Cutting the leaves solves its height today. New leaves will only grow shorter and sturdier if you relocate the plant to a brighter spot.
When to prune a snake plant in Brazil
The best time to prune a snake plant in Brazil is spring, from September to November. The NYBG explains that, in spring, the plant is actively growing, seals cuts, and produces new leaves faster. The RHS calls this phase the return to growth after winter dormancy, from March to May in the Northern Hemisphere.
The NYBG places the snake plant's winter dormancy between late October and February in the Northern Hemisphere. In Brazil, this dormancy falls from late April to August. Pruning during these months works, but the response is slow: the NYBG asks for patience and for the plant to rest through the entire winter.
Soft leaves suffering from rot are the exception to every calendar. Remove them the day you find them, regardless of the month.
Cut snake plant leaves can be propagated
The healthy leaf you cut can become a new plant. Cut the leaf into pieces 5 to 10 cm long: the RHS uses 5 cm (2 inches), and Iowa State University uses 7.5 to 10 cm. No one has measured which size roots better. Keep each piece facing the direction it grew: the base of each piece is the side that was closer to the soil.
The RHS lets the sections sit in a dry spot for 1 to 2 days before planting so the cuts can callus. Then, insert the lower half of each piece, bottom-side down, into slightly damp, well-draining soil mix. The University of Florida warns that soggy soil rots leaf cuttings, so never leave the mix waterlogged.
Two conditions determine whether leaf propagation is worthwhile:
Only firm tissue will root. When dealing with a leaf that rotted at its base, only the firm section well above the mush is usable. None of the consulted sources have formally tested propagating from that salvaged section.
Variegated leaves revert to plain green. Iowa State points out that leaf-section cuttings from most variegated snake plants produce offspring without the mother plant's yellow stripes or patterns. For 'Laurentii', which features yellow borders, the University of Florida advises dividing the clump, which preserves the variegation.
Frequently asked questions
Can I put cinnamon on a snake plant pruning cut?
None of the consulted institutional sources recommend cinnamon for snake plants, nor have they tested its effect on leaf wounds. The New York Botanical Garden simply directs growers to use clean tools and keep the wound dry until a callus forms. With a sanitized blade and dry conditions, cinnamon serves no proven purpose.
Do snake plants wilt after pruning?
No institutional source has measured wilting following pruning, and two commercial nurseries contradict each other on the subject. The safest strategy is to remove only a few leaves at a time, staying within the 1/4 limit. If an entire plant wilts or droops over, the problem almost certainly lies in the roots, and the RHS advises checking for root rot.
How often should you prune a snake plant?
There is no fixed schedule. The RHS states that the snake plant does not need pruning. Cut when a leaf is soft, broken, dry, or too tall, up to 1/4 of the leaf area at a time. To remove more leaves, wait for new ones to grow, preferably in spring, which runs from September to November in Brazil.
Are snake plants harmful to dogs and cats?
The snake plant is toxic to dogs and cats, according to the ASPCA, the animal poison control center in the United States. Ingestion causes nausea, vomiting, and diarrhea due to the plant's saponins. Collect the trimmed leaves on the same day, before your pet chews on them.
Where to start today
Squeeze the base of each leaf of your snake plant. A leaf with a soft base comes off today, flush with the soil, and the root deserves a check on the same day. Firm leaves with damage, a bend, or a dry tip can wait. The best time to prune is spring, which runs from September to November in Brazil. During this period, cut up to 1/4 of the leaf area and use the healthy leaves as cuttings.
Sources
Royal Horticultural Society: How to grow sansevierias (pruning, sap that irritates the skin, leaves that live for many years, flopping leaves, division, leaf cuttings, spring from March to May). Accessed on October 14, 2026.
New York Botanical Garden, LuEsther T. Mertz Library: Snake Plant (Dracaena) and the Plant Information Service answers Can I prune the floppy leaves of my snake plant? and What can I do to keep my snake plant leaves from flopping over?. Accessed October 14, 2026.
Penn State Extension: Snake Plant: A Forgiving, Low-maintenance Houseplant. Accessed October 14, 2026.
University of Maryland Extension, Home and Garden Information Center, on Ask Extension: My snake plant is not looking well, June 4, 2026. Accessed on October 14, 2026.
University of Florida, IFAS, Mid-Florida Research and Education Center: Sansevieria Production Guide (RH-91-30). Accessed on October 14, 2026.
Iowa State University Extension and Outreach: How to Propagate Houseplants by Leaf Section Cuttings. Accessed on October 14, 2026.
ASPCA Animal Poison Control: Snake Plant. Accessed October 14, 2026.
Related articles
How to Care for Hibiscus: Sun, Watering, Fertilizer, and Pruning for Flowers
How to care for hibiscus: 6 hours of direct sun, evenly moist soil without waterlogging, half-strength fertilizer in spring and summer, and pruning in early spring. Find out why the flower lasts one day and why buds drop before opening.
Do Ferns Like Sun or Shade? It Depends on the Type
Ferns prefer bright shade: plenty of light, but no direct sun on their fronds. Tuberous sword fern is the exception that handles sun. Here is the ideal light for each type, where to place pots, and how fronds show too much or too little light.
African Violet Yellow Leaves: Causes and What to Do
Yellow leaves on an African violet usually stem from overwatering, and the first place to check is the center of the plant. Losing one lower leaf at a time is normal. Identify whether age, watering, cold water, sunlight, cold drafts, or fertilizer is the culprit based on the yellowing pattern, and see what to do today.