Ponytail Palm Soil: Fast-Draining Mix, Pot Size, and When to Repot
Ponytail palm soil is a cactus mix: 3 parts coarse sand or grit to 1 part potting soil, in a pot with drainage holes only 1 to 2 inches wider than the current one. See what to buy, when to repot, and how to handle mold.
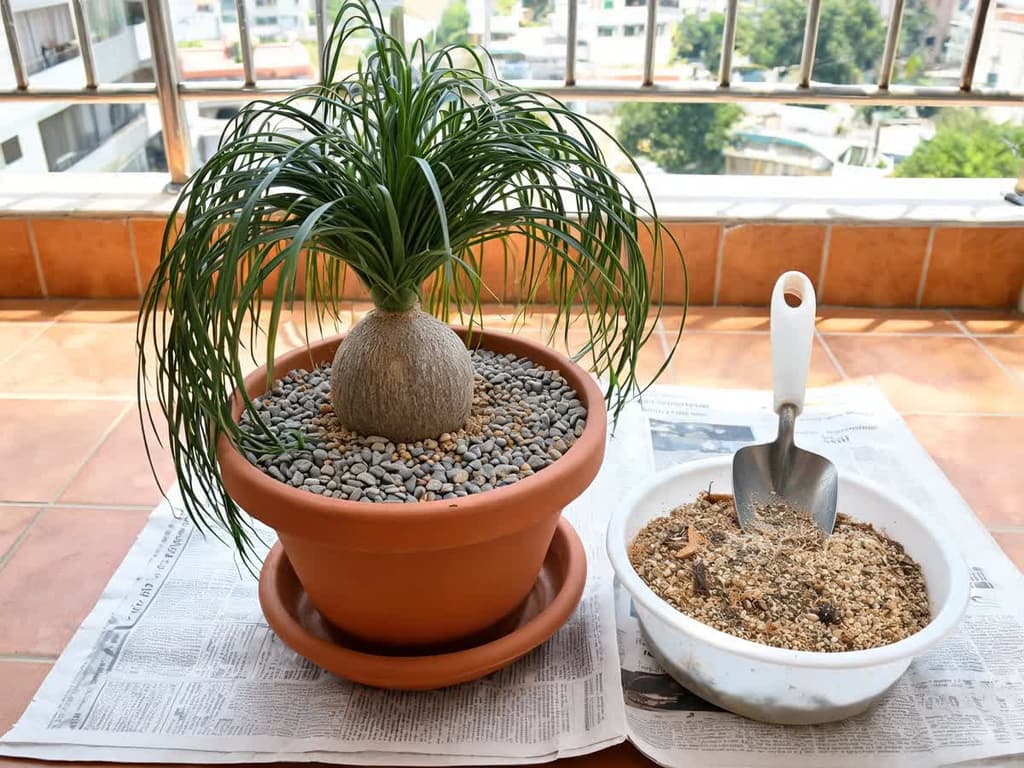
Ponytail palm soil is a very fast-draining potting mix, just like cactus soil. Use a commercial cactus and succulent mix or mix 3 parts coarse sand or grit (small gravel sold at building supply stores) to 1 part general potting soil. This is the New York Botanical Garden (NYBG) recipe. The pot needs drainage holes at the bottom and should be only 1 to 2 inches (2.5 to 5 cm) wider than the current container.
Potting soil or substrate is the potting medium: the mixture that holds the roots and retains water between waterings. The ponytail palm (Beaucarnea recurvata) stores water in the swollen base of its trunk. Because of this, it tolerates dry soil for weeks and rots in soil that stays wet.
Quick summary:
What | How to do it | Source |
|---|---|---|
Mix | 3 parts coarse sand or grit, 1 part potting soil, and a handful of coco coir or shredded bark | NYBG |
Commercial mix | Cactus and succulent mix, unfertilized | NYBG, NC State |
Pot | With drainage holes, 1 to 2 inches (2.5 to 5 cm) wider than the current one | NYBG, Clemson |
Pot bottom | No layer of stones | Clemson, WSU |
Top of the soil | Thin layer of grit | NYBG |
Repotting | When the base touches the rim, in spring (September to November in Brazil) | NYBG |
What is the best soil for a ponytail palm
The best potting mix for a ponytail palm contains far more coarse sand or grit than potting soil. The NYBG provides two options: unfertilized commercial cactus soil, or 3 parts coarse sand or grit to 1 part general potting mix. In the homemade recipe, the NYBG adds a little coco coir or shredded bark for texture.
NC State is the North Carolina State University extension, the university service that guides the public on cultivation. It recommends well-draining soil, like cactus and succulent mix. The University of Wisconsin directs mixing coarse sand and grit into regular potting soil so water drains faster.
Potting mix mistakes take time to show up. The NYBG warns that a plant in the wrong mix does well at first and can develop root rot later. The cause is soil that holds too much water. Because of this, a plant that has "always done well" in nursery soil can still be in the wrong soil.
In Brazil, "pata-de-elefante" is also a common name for the spineless yucca (Yucca elephantipes), which has a straight trunk and wide leaves. The yucca accepts a different mix, described in the yucca soil guide. If the plant came without a label, the Bloom app (available for iOS) identifies the species from a photo before you buy the soil.
Does standard bagged potting soil work for a ponytail palm?
Standard bagged potting soil does not work on its own for a ponytail palm: it holds water for too long. It works as 1 part of the mix, combined with 3 parts coarse sand or grit, which is the NYBG recipe.
Garden soil does not work either. Clemson, the Clemson University Extension, advises against using garden soil in pots because of the bacteria it carries. In a study specifically on ponytail palms, garden soil resulted in the worst growth among 8 mixes (Raza and colleagues, 2024).
If the plant came from the nursery in dark, fluffy potting soil, the medium contains high organic matter and dries out slowly. Leave the plant in it until repotting season, and water only when the soil dries completely to the bottom. If the base softens before then, unpot the plant the same day. The guide on how to water a ponytail palm shows how to check the bottom of the pot with a wooden skewer.
Kakteenerde, Bims, and Lava: what to buy in Brazil
German ponytail palm guides use names like Kakteenerde (cactus soil) and Bims (pumice). The table shows the equivalent found in garden centers and building supply stores in Brazil, with the same type of material and the same grain size.
German name | What it is | In Brazil | Caution |
|---|---|---|---|
Kakteenerde | commercial cactus mix | cactus and succulent mix | Check that it drains quickly and, if not, mix in more coarse sand |
Quarzsand, grober Sand | coarse sand | washed coarse sand | Never use fine sand, which compacts the mix (UF/IFAS) |
Bims | pumice | pumice, at succulent and bonsai shops | It is lightweight: the pot tips over more easily |
Lava, Lavagranulat | crushed volcanic rock | rarely sold: use pea gravel or size 0 crushed stone (the smallest grade of crushed stone) | Use small grit, not large crushed stone |
Blähton, Tongranulat | expanded clay | expanded clay | Never as a drainage layer at the bottom; no consulted source recommends this mixture, so choose coarse sand or grit instead |
Perlite | perlite | perlite | It is lightweight: choose coarse sand for tall plants |
Coconut coir, bark | coconut coir, bark | coconut coir, fine pine bark | Just a handful in the mix |
The weight of the mix matters for this plant. The ponytail palm becomes top-heavy over the years. UF/IFAS, the University of Florida extension, recommends sand for plants that tend to tip over. The same source calls perlite a lightweight substitute for sand. Because of this, use coarse sand or grit instead of perlite in tall ponytail palms.
Commercial cactus mix varies widely by brand. Water the pot: if water does not run out of the drainage hole immediately, mix extra coarse sand into the bagged soil. The guide on cactus soil provides a test to check the drainage of the bag you bought.
Rich soil or soil with plenty of sand for ponytail palms: where the sources disagree
Not all sources call for soil with little compost. The RHS, the Royal Horticultural Society of the United Kingdom, recommends loam-based, peat-free compost. A nursery study in Pakistan compared 8 mixes (Raza and colleagues, 2024). The plant grew the most in 50% coco coir and 50% leaf compost.
The RHS and the nursery study address different questions. The study grew the plants in a shaded greenhouse in 9-inch (23 cm) pots. It measured height, foliage, and photosynthesis, without measuring rot. Indoors, watering fluctuates from week to week, and soil that retains moisture kills ponytail palms.
This guide follows NYBG, NC State, and Wisconsin, which write for indoor home growers. Growing slowly does not harm a ponytail palm, whereas base rot can kill it. None of the consulted sources measured rot between the two soil types, so this guide recommends the safer choice for the plant: the mix with 3 parts coarse sand.
Ponytail Palm Pot: Size, Drainage Holes, and Shape
A ponytail palm pot should be only slightly larger than the current one. The NYBG recommends a relatively small pot and stepping up to the next size when repotting. Clemson provides the specific measurement: 1 to 2 inches (2.5 to 5 cm) larger in diameter. A pot that is too large leaves too much wet soil around too few roots, which NYBG links to root and trunk rot.
A drainage hole at the bottom is mandatory. Use an unattached saucer and empty it after watering, because the NYBG states that an attached saucer traps water. A cachepot (decorative outer pot without holes) serves only as an outer cover for the grow pot, provided you dump the standing water at the bottom after watering.
Shallow, wide pots are recommended by several German guides, which claim that ponytail palm roots are shallow. No consulted botanical garden or university extension confirms shallow root systems. No consulted source condemns shallow pots: the sourced requirements are simply drainage holes and a diameter only 1 to 2 inches wider than the current pot. A clay pot weighs more than plastic and better supports a tall plant, as noted in the ponytail palm care guide.
A small pot also controls plant size. Wisconsin explains that a ponytail palm stays small in a small pot and increases in height and width when moved to a larger container. Large, mature plants become difficult to move due to their weight.
Grit on Top of the Soil, Not at the Bottom of the Pot
Stones belong on top. The NYBG recommends a thin layer of grit or gravel over the soil surface. This grit layer keeps the base of the trunk and lower foliage away from damp potting mix.
Do not use a drainage layer of stones, broken pottery, or expanded clay at the bottom of the pot. Clemson says this layer makes water move through the pot more slowly. Extension specialist Linda Chalker-Scott from Washington State University (WSU) wrote that it disrupts drainage.
A 2025 experiment measured the opposite: the layer reduced the water retained in the pot (Rowe, PLOS ONE). The author tested unplanted pots, only soaking and draining them. This guide follows Clemson and WSU, because Rowe's experiment did not include plants and the mix with 3 parts coarse sand already drains quickly without any layer. Every centimeter of rock at the bottom is one centimeter less soil for the roots.
When to Repot a Ponytail Palm
Change the soil and the pot when the swollen base touches the rim of the pot. This is the sign the NYBG uses. Roots coming out of the drainage hole and a white crust on the soil surface are also signs that it is time to repot. These two signs come from the guide by Pflanzen-Kölle, a German plant shop.
The repotting interval varies across sources. The NYBG mentions about 2 years. Wisconsin states that the plant can go many years without repotting. Rely on the base touching the pot edge rather than the calendar.
The best time is spring, which runs from September to November in Brazil (NYBG, RHS). Clemson also accepts repotting houseplants in summer (December to February in Brazil), while the plant is actively growing. Avoid winter, from June to August in Brazil: with the cold, the fresh soil takes longer to dry.
In years without a full repot, replace just the top layer of soil, an option mentioned by the RHS. Scrape away the old surface soil until you see the top roots, then top it off with fresh potting mix and grit.
How to Repot a Ponytail Palm, Step by Step
Prepare the fresh mix and a pot with drainage holes, 1 to 2 inches (2.5 to 5 cm) wider than the current one.
Repot when the soil is dry all the way to the bottom: a wooden skewer inserted to the bottom of the pot must come out clean. Dry soil releases from roots more easily.
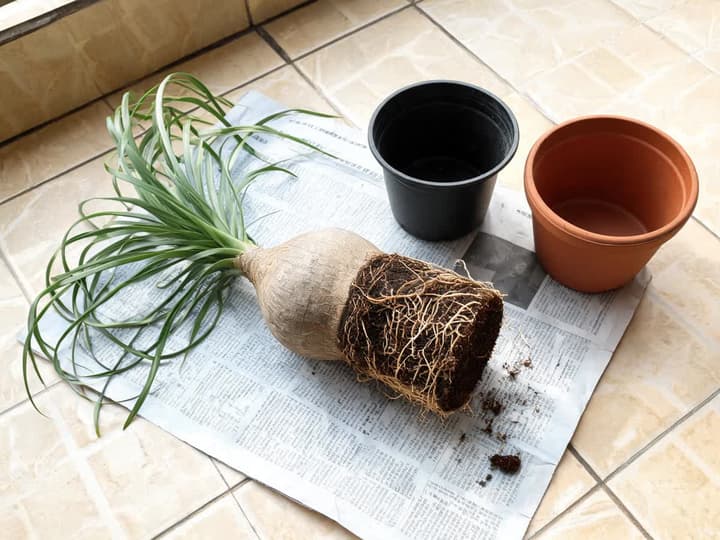
Lay the pot on its side and pull the plant out by the base, never by the foliage. Cut away stubborn plastic pots with scissors.
Remove old soil that falls away freely. Do not force the root ball (the mass of soil and roots) if it feels solid.
If roots encircle the root ball, make shallow vertical slices with a clean knife to loosen them, as directed by Clemson. Slicing frees root tips without breaking up the root ball.
Add potting mix to the bottom of the new pot until the base sits at the exact depth it grew before.
Fill in around the sides with potting mix without burying the trunk. The NYBG warns that buried trunk tissue rots.
Cover the soil surface with a thin layer of grit.
If the roots were firm, even with the shallow cuts from step 5, water until liquid drains from the bottom hole, as Clemson recommends. If you pruned soft, rotting roots, wait until the soil dries out before your first watering.
A rock-hard root ball is common for a plant kept in the same pot for years, and you do not need to tear it apart. Pot the root ball whole and simply refresh the loose soil around it. If water channels down the sides without penetrating the root ball after repotting, bottom water: submerge the pot in a basin of water until the soil is moist throughout. The guide on how to water a ponytail palm covers this step by step.
Base offshoots removed during repotting can become new plants. Offshoots require a different potting medium; see the guide on how to propagate ponytail palms for details.
White Mold on Ponytail Palm Soil
White mold on the soil surface, paired with a firm trunk base, does not require immediate repotting. Ask Extension is the question-and-answer service of the university extensions in the United States. According to it, this mold is usually a fungus that feeds on dead organic matter and does not attack the plant. It appears when the soil stays wet for too long.
Scrape off the moldy top layer and topdress with grit. Then space out waterings until the soil dries completely to the bottom between applications. If mold returns despite reduced watering, the soil mix likely retains too much water: repot into the 3-part coarse sand mix the following spring.
Before assuming it is harmless mold, squeeze the base. Mold alongside a firm base points to overwatering: stretch the interval between waterings. Mold paired with a soft base indicates rot, and the plant must come out of the pot the same day.
Soft Trunk Base and Musty Odor: Can Repotting Save a Ponytail Palm?
Repotting saves a ponytail palm only if the softened area is small. The NYBG states that once soft, shriveled tissue spreads beyond a small spot, the plant rarely recovers. A base that yields under your thumb while the soil is moist signals rot.
Unpot the plant today and squeeze the entire base, including the section that was buried underground. If the soft spot is small and has not reached the roots, the ponytail palm care guide shows how to carve out rotting tissue and repot. Pot into fresh, dry soil in a clean pot with drainage holes, and wait for the soil to dry out before watering. If the soft section is extensive, take firm basal offshoots to root as cuttings.
Fix the underlying cause along with replacing the medium. If daily watering caused the rot, even brand-new soil will rot the plant: water only after the potting mix dries all the way to the bottom. In ponytail palms, rot originates in waterlogged roots and travels up into the swollen trunk base (NYBG):
Desert roses also store moisture in an enlarged trunk and encounter the identical issue. The guide on how to repot a desert rose demonstrates what to do when a soft caudex appears mid-repot.
Frequently Asked Questions
What pot size does a ponytail palm need?
The pot should be 1 to 2 inches (2.5 to 5 cm) wider in diameter than the current one, as Clemson recommends. The NYBG advises a relatively compact pot, stepping up only one container size when repotting. A much larger pot leaves too much wet soil around the root system. Drainage holes are mandatory.
Are coffee grounds good for ponytail palms?
None of the consulted sources recommend coffee grounds for ponytail palms. A University of Melbourne study incorporated spent coffee grounds into the soil of 5 vegetable and garden species, finding that plant growth dropped drastically (Hardgrove and Livesley, 2016). Coffee grounds also increased water retention in the soil, which is the opposite of what a ponytail palm needs.
Can you use commercial cactus mix alone for ponytail palms?
Yes, provided it drains quickly. The NYBG and NC State recommend cactus and succulent mix. Formulas vary by manufacturer, so water the pot and verify that water drains freely out the bottom immediately. If the bottom of the pot stays damp while the top dries out, blend additional coarse sand into the commercial soil.
Do ponytail palms need acidic soil or garden lime?
No. UF/IFAS classifies the ponytail palm as tolerant of both acidic and alkaline soils, as well as clay, sand, and loam (a blend of sand, clay, and organic matter). A German brand of ponytail palm soil includes lime in its ingredients, but drainage remains the determining factor. Do not add lime or fertilizer to the mix.
What to Do Today
Press your ponytail palm's swollen base with your finger and inspect the container rim. Soft base: unpot the plant today. Firm base with space from the rim: leave the plant in place, scraping off only surface mold if present. Firm base pressing against the pot rim: purchase coarse sand, grit, and a drainage-holed pot one size up, then repot in spring.
Sources
NYBG, New York Botanical Garden, Ponytail Palm.
NC State Extension, Beaucarnea recurvata.
University of Wisconsin–Madison Extension, Ponytail palm, Beaucarnea recurvata.
RHS, Beaucarnea recurvata.
Clemson Cooperative Extension, Indoor Plants: Soil Mixes and Indoor Plants: Transplanting & Repotting.
UF/IFAS, Homemade Potting Mix and Beaucarnea recurvata: Ponytail Palm.
Linda Chalker-Scott, WSU, The Myth of Drainage Material in Container Plantings.
Rowe (2025), PLOS ONE 20(2): e0318716.
Raza and colleagues (2024), Effect of Various Growing Substrates on Growth and Development of Ponytail Palm, Sarhad Journal of Agriculture 40(4): 1206–1214.
Hardgrove and Livesley (2016), Applying spent coffee grounds directly to urban agriculture soils greatly reduces plant growth, Urban Forestry & Urban Greening 18: 1–8.
Ask Extension, Christmas cactus has mold.
Related articles
Do Ferns Like Sun or Shade? It Depends on the Type
Ferns prefer bright shade: plenty of light, but no direct sun on their fronds. Tuberous sword fern is the exception that handles sun. Here is the ideal light for each type, where to place pots, and how fronds show too much or too little light.
African Violet Yellow Leaves: Causes and What to Do
Yellow leaves on an African violet usually stem from overwatering, and the first place to check is the center of the plant. Losing one lower leaf at a time is normal. Identify whether age, watering, cold water, sunlight, cold drafts, or fertilizer is the culprit based on the yellowing pattern, and see what to do today.
How to Repot Lucky Bamboo in Water and Soil
How to repot lucky bamboo: in water, clean pot and pebbles plus rainwater or distilled water; in soil, a pot 2 inches wider, with drainage. See when to repot, how to handle roots and braided stalks, and how to tell normal stress from rot.