Supermarket Basil Dying: Why It Happens and How to Save It
That supermarket basil pot packs dozens of thin seedlings into a tiny root ball, wilting days after you buy it. Here is how to divide the root ball, acclimate it to light, and read every symptom.
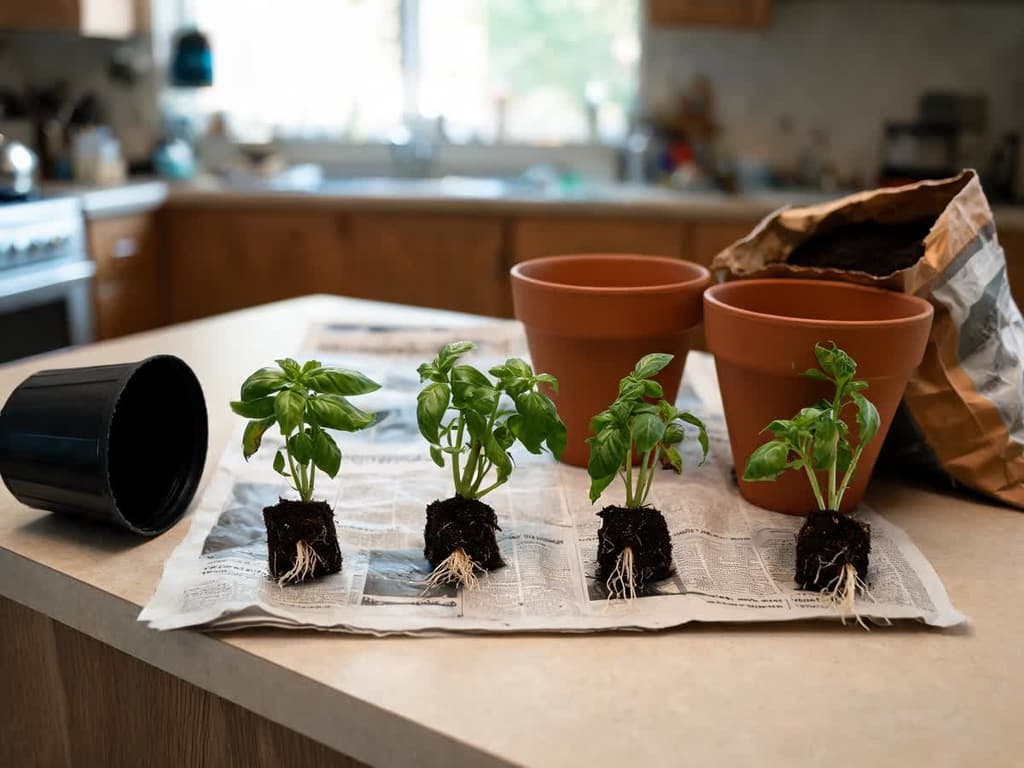
Supermarket basil dies because the pot packs dozens of thin seedlings crowded together in a tiny root ball (the mass of soil and roots). Growers raise them in greenhouses for short-term harvest, and the stems fight for the exact same water and light. To save the pot, divide the root ball into smaller clumps (clusters of seedlings with roots and soil) within the first few days and repot each clump into a larger container. Keep the plants out of direct sun for 1 day, then move them gradually to your brightest window.
If you see supermarket basil dying days after purchase, the cause is the pot itself. The RHS, the Royal Horticultural Society of the United Kingdom, describes this pot as made for a short harvest. According to the RHS, the crowded seedlings "tend to succumb to fungal disease or bolt". Bolting early is bad because flowering affects leaf flavor, according to the same RHS. The same page says they can survive if they are divided and repotted quickly.
Quick summary:
A supermarket basil (Ocimum basilicum) pot contains a dozen or more seedlings in a pot built to support only one plant, according to the University of New Hampshire.
The fix is dividing the root ball into clumps and repotting them into containers at least 20 cm (8 inches) wide, the minimum size recommended by the RHS.
Temperatures below 12 °C (54 °F) cause potted basil to wilt and develop dark spots, according to a 2023 study conducted with a UK commercial grower.
Why supermarket basil dies within days
The supermarket pot has too many seedlings for the soil it holds. The University of New Hampshire Extension notes that a pot large enough for one healthy plant can come with "a dozen or more." English horticulturist Mark Ridsdill Smith, from the blog Vertical Veg, counted around 50 seedlings in an 8 cm diameter pot.
A 2023 study published in Frontiers in Plant Science details how a commercial UK grower produces these pots. Researchers from Royal Holloway, University of London, recorded 30 seeds per 0.4-liter pot. In the greenhouse, the pot reaches market readiness in 32 days during summer and up to 52 days in winter. While this reflects a single producer's protocol, it highlights the product's purpose: rapid growth for immediate retail sale.
Once brought home, this overcrowded root ball fails in two opposite ways:
It dries out fast. Too many roots and too little soil cannot retain moisture. The University of Delaware explains that root-bound plants (roots tightly coiled around each other) dry out faster and struggle to produce new feeder roots.
It becomes waterlogged. The University of New Hampshire points to overwatering as the number one reason potted culinary herbs fail. Many supermarket pots sit inside a plastic sleeve (the plastic wrapping around the pot), and this wrap along with saucers traps standing water around the roots.
These two dynamics are not contradictory: the very same pot can swing from bone-dry to waterlogged within a single week. Because of this, insert your finger into the soil down to the first knuckle (about 2.5 cm or 1 inch) before watering to check whether it feels dry or moist.
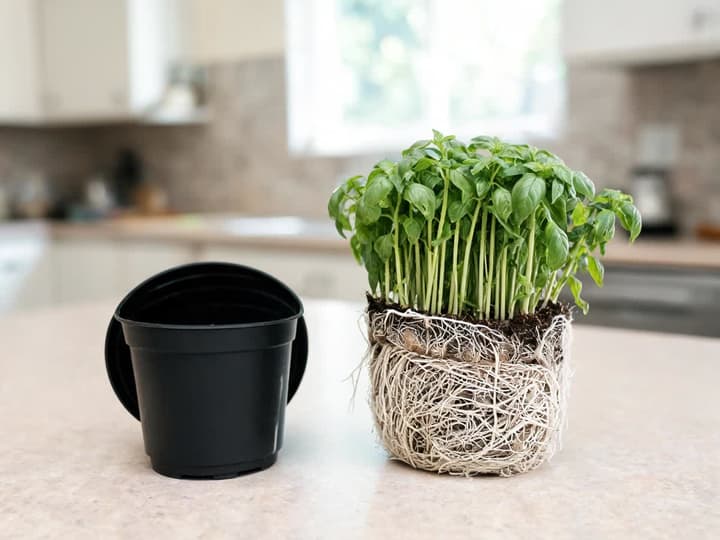
The RHS has a third explanation on its page about herbs in containers. Supermarket herbs grow in greenhouses and arrive "too soft and stressed" (full of soft leaves, but fragile) to adapt to outdoor life. Indoors, the shift is also substantial: the plant leaves a greenhouse with strong, controlled light and enters a kitchen with less light.
How to save supermarket basil: divide the root ball
To save grocery store basil, divide the root ball within the first few days after purchase. The RHS provides instructions on dividing potted herbs, featuring basil as a prime example. The process involves two steps: first splitting the root ball in half, and then splitting each half again if possible. Following both steps yields 4 distinct clumps.
Remove the plastic sleeve, then slide the entire plant out of its pot. Hold the root ball firmly by the base of the stems.
Using your hands, tease the root ball apart down the middle. Pull gently to untangle the roots gradually.
If the two halves separate without tearing too many roots, split each half once more. Each clump should keep whatever stems remain clustered together, along with the soil clinging to their roots.
Plant each clump into a pot with drainage holes at the bottom, using quality potting soil. The new pot must be at least 20 cm (8 inches) wide and deep, according to the RHS.
Set the clump at the exact same depth it sat in its original container, taking care not to bury the stem bases.
Water thoroughly until liquid drains freely from the bottom holes.
The University of Georgia recommends keeping as much original soil around the root zone as possible during transplanting. The soil protects the delicate root hairs responsible for absorbing water, helping the plant recover quickly from transplanting.
Specific measurements vary across sources. Mark Ridsdill Smith plants clumps of 2 to 3 seedlings together in a 2- to 5-liter pot. The RHS recommends spacing individual plants 10 cm (4 inches) apart when sharing a larger container. No university research has quantified the ideal stem count per clump. Follow the RHS for container dimensions and spacing, as guidance from a major horticultural society carries more authority than gardening blogs. For seedling count per pot, favor larger clumps: Iowa State notes that with houseplants, larger divisions recover more reliably.
The University of New Hampshire offers two practical paths: dividing the root ball or thinning out the stems (clipping away crowded seedlings). We highlight dividing first because it preserves all your plants. To thin instead, snip the weakest seedlings at soil level using clean scissors until only one or two vigorous stems remain. Cutting at the soil line leaves the remaining root systems completely undisturbed.
After dividing: shade for 1 day, then gradual light
After repotting, leave the pots in bright shade for 24 hours, out of strong sun. No university has measured this timeframe for potted herbs: the number comes from horticulturist Mark Ridsdill Smith, and shade is the safest option for the newly repotted plant. Next, move the pots to the brightest window in the house. In Brazil, the window that receives the most sun faces north.
The University of New Hampshire states that most culinary herbs require at least 6 hours of direct sunlight each day. If moving the plants outdoors to full sun on a patio or porch, introduce bright light gradually.
Indoor plants moved directly into full sun can burn, bleach, and drop leaves. The warning comes from Iowa State University Extension, which recommends increasing light levels over 10 to 14 days. For an indoor windowsill, Iowa State does not give a timeframe. In that case, follow Mark Ridsdill Smith: he moves pots to a bright sill right after 24 hours of shade.
Insufficient light also triggers leaf drop. The University of Maryland explains that when plants transition from commercial greenhouses to indoor settings, light levels drop significantly, and existing leaves cannot adapt. The plant frequently sheds older foliage and replaces it with acclimated leaves. If older leaves drop without brown spots while fresh growth emerges at the stem tips, your plant is simply adjusting to your home's light levels.
If your windowsill receives fewer than 6 hours of direct sun per day, find a brighter spot: check our guide on how much light basil needs daily.
What each symptom in wilting basil means
The table below breaks down five common warning signs seen in supermarket basil during the first few weeks. Pervasive yellowing across the entire plant has its own dedicated section. To tell symptoms apart, always inspect the soil surface and the stem bases before adding water:
What you see | Soil condition | Probable cause | What to do |
|---|---|---|---|
Wilting in the days following division, but new growth stays green | Moist, not waterlogged | Transplant shock | Keep soil evenly moist, shield from harsh sun, and wait about 1 week |
Wilting, crispy leaves, and brittle, dried-out stems | Dry | Underwatering | Set the pot in a water bath for 15 to 30 minutes |
Persistent wilting that continues even after watering | Waterlogged | Root rot | Unpot the plant and inspect root health |
Seedlings collapsed at the base, with thin, dark, pinched stems right at the soil line | Waterlogged | Damping-off (fungal disease killing young seedlings) | Snip and discard collapsed seedlings; divide remaining upright stems |
Blackened leaves or brown patches between the leaf veins | Any condition | Cold injury | Move above 12 °C (54 °F); prune away dead foliage |
Wilting after repotting
Wilting in the first few days after division is transplant shock, the stress of changing root balls and soil. Steve Reiners, from Cornell University, explains that a plant raised in a protected environment struggles to take up water under new conditions. Because of this, it "may wilt a bit." His report focuses on tomatoes and peppers, which resumed growing about 1 week later.
The University of Georgia advises keeping newly transplanted seedlings consistently watered over their first 3 to 4 days until they establish. That guideline applies to in-ground garden beds. In pots, add water only when the top layer feels dry down to your first knuckle. Hold off on fertilizing during this initial stage: Iowa State recommends waiting several weeks before applying fertilizer to divided plants so their roots can mend. When fresh leaves emerge and deepen in color, the plant is recovering successfully, as documented by Cornell.
Wilting with dry soil and brittle stems
Dry soil, limp leaves, and dry, brittle stems indicate a lack of water. The root-bound supermarket root ball dries out so fast that irrigation water rolls right down the edges without wetting the center. To rehydrate it, Virginia Tech recommends placing the pot in a basin with 5 to 7.5 cm (2 to 3 inches) of water.
Let the pot soak for 15 to 30 minutes until moisture reaches the top surface of the soil. Never leave it submerged longer than 60 minutes, or you risk suffocating roots and triggering rot. If the stems and foliage perk up, water has reached the vascular system. According to NC State Extension, plants that wilt repeatedly and recover immediately after watering are root-bound and drying out too fast. An undersized pot is almost always the culprit. When that happens, divide the root ball.
Basil also wilts under midday heat even when the potting mix is moist. Our guide on how often to water basil explains how to distinguish heat-induced limpness from true drought stress.
Wilting that persists after watering, with soggy soil
If leaves stay wilted after watering, the most likely cause is root rot, according to NC State Extension. Waterlogged soil deprives roots of oxygen, causing them to die and stop transporting water to the leaves. That is why the plant wilts even with soaked soil. Iowa State warns that root rot is often confused with underwatering, so check the roots before watering again.
Slide the plant out of the container and examine the root system. Healthy roots are firm and creamy white, branching into abundant fine hairs. Rotted roots turn mushy, dark brown, or reddish, according to Iowa State.
If healthy white root tissue remains, trim away the brown, rotting sections with clean, sterilized shears. Repot the healthy portion into fresh, clean potting mix in a container with drainage holes. If only a small root mass survives, NC State suggests downsizing to a smaller pot matching the remaining root volume, noting that severely damaged plants cannot always be saved. After every watering, empty excess drainage from the saucer, as advised by the University of New Hampshire, and discard the tight plastic grower sleeve.
Collapsed seedlings with blackened stems
Seedlings that suddenly topple over, showing dark, water-soaked, shriveled stems right at the soil line, have fallen victim to damping-off. Damping-off is a fatal disease caused by soil-borne fungal pathogens attacking young seedlings. The University of Connecticut notes that crowded seedlings trap stagnant humidity around their stems and encourage fungal growth, especially when soil stays wet for prolonged periods.
The Connecticut Agricultural Experiment Station describes the symptoms of damping-off on basil: fungal pathogens attack the basal stem, leaving the tissue shriveled, dark, and desiccated at the soil line. The Station recommends pulling and discarding affected plants immediately. In a dense supermarket root ball, pulling infected stems tears neighboring root systems. Instead, cut collapsed seedlings flat at soil level, mirroring the thinning method outlined by the University of New Hampshire, and discard them. Immediately divide remaining upright stems to increase airflow and drop surrounding humidity.
Blackened leaves following cold exposure
Leaves that darken or develop brown spots between the veins after a cold night indicate chilling damage. The study in Frontiers in Plant Science shows that below 12 °C (54 °F), potted basil wilts severely, loses color, and loses aroma. For this reason, the pot travels from the greenhouse to the market in a heated truck.
Cold injury often surfaces several days after returning the plant to warmer temperatures. Roberto Lopez, a horticulture researcher at Iowa State University, observes that older leaves begin dropping a few days after re-entering warm conditions. His findings were republished by industry portal HortiDaily. No controlled research has quantified the specific damage from frosty windowpanes, chilly car trunks, or direct air conditioner drafts blowing over the foliage. To stay safe, keep your plant away from cold window glass and chilling drafts at night. The University of Illinois points out that even harvested basil leaves turn black when stored inside a standard refrigerator.
Prune away blackened foliage, retaining any stem tips that stay green and firm. At night, keep the plant in an area that stays reliably between 13 and 16 °C (55 to 60 °F) or warmer, the baseline range recommended by the University of New Hampshire for supermarket potted herbs. That threshold rests safely above the 12 °C chill-damage zone. During cold weather, keep pots in a consistently warm space overnight: check our full guide on winter basil care.
Yellowing leaves across the whole pot
Widespread yellow foliage across the container points to multiple potential culprits. The University of New Hampshire links yellowing lower leaves that shed prematurely to overwatering. Downy mildew, a destructive fungal disease affecting basil, starts as chlorotic yellow patches between leaf veins paired with purplish-gray sporulation on the undersides. Find full diagnostic breakdowns in our guide to basil with yellow leaves.
To diagnose disease symptoms accurately from your photos, Bloom (available for iOS) provides automated leaf analysis on its Premium plan.
How to revive a wilting basil plant
To bring wilting basil back, determine whether the soil is dry or wet before taking action. Press your finger 2.5 cm (1 inch) into the potting mix down to the first knuckle. Follow these prioritized rescue steps depending on your findings:
Dry soil: set the container in a shallow water bath for 15 to 30 minutes, then let all excess drain freely.
Moist or soggy soil: withhold water completely. Remove decorative plastic sleeves, dump standing water from saucers, and inspect the roots for rot.
Sun-wilted plants: move the pot into bright, indirect shade until leaves regain their turgor.
Root-bound containers: divide the crowded root ball as soon as the foliage perks back up and the potting mix is no longer saturated.
Skip fertilizer: avoid applying plant food for several weeks post-division. The University of Delaware notes that excess fertilizer salts are a leading cause of seedling death after transplanting.
Dehydrated plants typically recover their posture shortly after water reaches the root system. None of our consulted university sources provide a definitive recovery timeline in hours or days. If stems stay limp following a thorough bottom-watering soak, unpot the plant to inspect root integrity. The University of Maryland explains that temporary, short-lived wilting does not cause lasting harm to overall plant health.
Once your plant stabilizes and shows active growth, pinch stem tips back right above a set of true leaves. Trimming top growth prompts basil to branch out bushy side shoots, as detailed in our guide on how to prune basil.
When a basil plant cannot be saved
Basil cannot be revived once its entire root system has turned brown, soft, and decayed. The same holds true if stem bases on every seedling have blackened and collapsed from rot. Iowa State describes root rot advancing upward from the bottom leaves until the entire vascular structure fails. The University of Maryland advises discarding irreparably damaged specimens.
Fusarium wilt, a disease caused by a fungus in the genus Fusarium, is another hopeless case. NC State describes brown streaks on the stem, the stem tip curving like a hook, and sudden leaf drop. No product is registered to control this disease, according to NC State. Discard the plant and its soil, and do not use that soil for another basil plant.
Before throwing the pot away, look for firm, green shoot tips without flowers. Each tip can become a new plant in water: this is a cutting, a severed piece of shoot that grows roots. The RHS instructs you to cut the tip just below a leaf, remove the lower leaves, and pinch out the growing tip with your fingers. According to the RHS, the cutting "roots quickly." Montana State University Extension provides the details:
Select a healthy stem section featuring 3 to 5 nodes (the joints along the stem where leaves emerge).
Make a clean cut directly below the lowest node, submerging at least 1 node underwater.
Refresh the water weekly without fertilizer, ensuring the water level never drops low enough to expose newly developing roots. Iowa State approves changing the water 1 to 2 times per week.
Transplant into potting soil once roots measure 2.5 to 5 cm (1 to 2 inches) long.
Iowa State notes that water-grown roots are thicker and more brittle, meaning newly potted cuttings may wilt slightly over their first few days in soil. Keep the mix evenly moist during this adjustment window. Never take cuttings from Fusarium-infected plants.
Frequently asked questions about dying supermarket basil
How long does a supermarket basil plant last?
No scientific studies measure how many days an undivided grocery store basil pot survives on its own. The RHS simply clarifies that these pots are grown for immediate, short-term harvest. Once divided and repotted into proper containers, horticulturist Mark Ridsdill Smith harvests productive growth for 6 to 12 weeks, sometimes longer. Longevity depends on container size, soil quality, lighting, and seedling health at the time of purchase.
Can wilted basil bounce back?
Basil wilted from dry soil bounces back reliably once the root ball absorbs adequate moisture, though sources give no fixed timeline. Snip away brittle, dead leaves and allow healthy growth points to produce fresh foliage. Basil wilting from root rot only recovers if enough firm, white roots remain intact to support repotting.
Why is my basil stem turning black at the bottom?
A blackened, mushy stem at the soil line signals fungal rot: either damping-off in tender young seedlings or root rot fueled by waterlogged potting soil. Dark brown vertical striping accompanied by sudden wilting indicates Fusarium wilt. Cold temperatures below 12 °C (54 °F) also cause stem blackening alongside brown necrotic patches between leaf veins.
Can you plant supermarket basil outdoors in the garden?
The RHS recommends growing supermarket basil in pots indoors. According to the RHS, commercial greenhouse herbs arrive lush yet overly stressed, making them ill-suited for the harsh swings of outdoor garden beds. Follow RHS advice here, as it addresses supermarket pot culture specifically. If you choose to move it outside, acclimate the plant to full sun gradually over 10 to 14 days, following Iowa State's houseplant hardening guidelines.
Your immediate first step with supermarket basil
Divide your supermarket basil pot within the first few days after bringing it home, while seedlings remain upright and firm. If stems have already wilted, diagnose the underlying cause using our symptom table and divide once foliage recovers. Check soil moisture with your finger before every watering session. To keep your herbs thriving once established, read our complete guide on how to care for basil. Supermarket rosemary also arrives crowded in small pots where soil dries out fast; if your rosemary is dying, explore other causes, such as leaf burn from dish soap sprays applied to the foliage.
Related articles
How to Care for Hibiscus: Sun, Watering, Fertilizer, and Pruning for Flowers
How to care for hibiscus: 6 hours of direct sun, evenly moist soil without waterlogging, half-strength fertilizer in spring and summer, and pruning in early spring. Find out why the flower lasts one day and why buds drop before opening.
Do Ferns Like Sun or Shade? It Depends on the Type
Ferns prefer bright shade: plenty of light, but no direct sun on their fronds. Tuberous sword fern is the exception that handles sun. Here is the ideal light for each type, where to place pots, and how fronds show too much or too little light.
African Violet Yellow Leaves: Causes and What to Do
Yellow leaves on an African violet usually stem from overwatering, and the first place to check is the center of the plant. Losing one lower leaf at a time is normal. Identify whether age, watering, cold water, sunlight, cold drafts, or fertilizer is the culprit based on the yellowing pattern, and see what to do today.